Spark和SparkSQL

Spark是MapReduce的下一代的分布式计算框架。相比更早期的MapReduce的Job和Task的两层,Spark更为灵活,其执行粒度分为Application、Job、Stage和Task四个层次。本文写作基于Spark 2.4.4版本的源码。

【TLDR】本来写文章确实是简练清楚为最佳,不过我发现Spark架构实在是很庞大,其中涉及到的一些架构知识我觉得都很有启发意义,因此这篇文章就被我写得很长。为了简化论述,我将部分细节放到了源码中作为注释,因此正文中是主要内容。

【注】本篇文章经授权已被腾讯技术工程知乎号和微信收录。

Spark Core

RDD

RDD(Resilient Distributed Dataset),即弹性数据集是Spark中的基础结构。RDD是distributive的、immutable的,可以存在在内存中,也可以被缓存。
对RDD具有转换操作和行动操作两种截然不同的操作。转换(Transform)操作从一个RDD生成另一个RDD,但行动(Action)操作会去掉RDD的壳。例如take是行动操作,返回的是一个数组而不是RDD了,在Scala中可以看到。

1
2
3
4
5
6
7
8
scala> var rdd1 = sc.makeRDD(Seq(10, 4, 2, 12, 3))
rdd1: org.apache.spark.rdd.RDD[Int] = ParallelCollectionRDD[40] at makeRDD at :21

scala> rdd1.take(1)
res0: Array[Int] = Array(10)

scala> rdd1.take(2)
res1: Array[Int] = Array(10, 4)

转换操作是Lazy的,直到遇到一个Action操作,Spark才会生成关于整条链的执行计划并执行。这些Action操作将一个Spark Application分为了多个Job。
常见的Action操作包括:reducecollectcounttake(n)firsttakeSample(withReplacement, num, [seed])takeOrdered(n, [ordering])saveAsTextFile(path)saveAsSequenceFile(path)saveAsObjectFile(path)countByKey()foreach(func)
我们需要注意的是,有一些Transform操作也会得到一个Job,例如sortBy这是因为这个Job是用来初始化RangePartitioner,然后Sample输入RDD的partition边界的,和sortBy的业务无关,在实践中所占用的时间也是远小于实际占用的时间的。

RDD的常见成员

  1. def getPartitions: Array[Partition]:获得这个RDD的所有分区,由Partition的子类来描述
  2. def compute(partition: Partition, context: TaskContext): Iterator[T]
  3. def getDependencies: Seq[Dependency[_]]:用来获取依赖关系
    包含ShuffleDependency、OneToOneDependency、RangeDependency等。
  4. part: Partitioner
    Partitioner是一个abstract class,具有numPartitions: IntgetPartition(key: Any): Int两个方法。通过继承Partitioner可以自定义分区的实现方式,目前官方提供的有RangePartitionerHashPartitioner等。
    HashPartitioner是默认分区器,对key的hashCode取模,得到其对应的RDD分区的值。注意这里的hashCode可能还是个坑,例如Java里面数组的hashCode并不蕴含数组内容的信息,所以可能相同的数组被分到不同的分区。如果我们有这样的需求,就需要自定义分区器。
    RangePartitioner会从整个RDD中Sample出一些Key。Sample的Key的数量是基于生成的子RDD的partition数量来计算的,默认是每个partition取20个,再乘以分区数,最懂不超过1e6个。得到总共要sample多少个之后,我们要乘以3,再平摊到父RDD上。乘以三的意思是便于判断Data skew,如果父RDD的某个partition的数量大于了乘以3之后平摊的值,就可以认为这个partition偏斜了,需要丢这些partition进行重新抽样。
  5. def getPreferredLocations(partition: Partition): Seq[String]

常见RDD

RDD是一个抽象类abstract class RDD[T] extends Serializable with Logging,在Spark中有诸如ShuffledRDD、HadoopRDD等实现。每个RDD都有对应的compute方法,用来描述这个RDD的计算方法。需要注意的是,这些RDD可能被作为某些RDD计算的中间结果,例如CoGroupedRDD,对应的,例如MapPartitionsRDD也可能是经过多个RDD变换得到的,其决定权在于所使用的算子。
我们来具体查看一些RDD。

  1. ParallelCollectionRDD
    这个RDD由parallelize得到

    1
    2
    scala> val arr = sc.parallelize(0 to 1000)
    arr: org.apache.spark.rdd.RDD[Int] = ParallelCollectionRDD[0] at parallelize at <console>:24
  2. HadoopRDD

    1
    class HadoopRDD[K, V] extends RDD[(K, V)] with Logging
  3. FileScanRDD
    这个RDD一般从spark.read.text(...)语句中产生,所以实现在sql模块中

    1
    2
    3
    4
    5
    class FileScanRDD(
    @transient private val sparkSession: SparkSession,
    readFunction: (PartitionedFile) => Iterator[InternalRow],
    @transient val filePartitions: Seq[FilePartition])
    extends RDD[InternalRow](sparkSession.sparkContext, Nil) {
  4. MapPartitionsRDD

    1
    class MapPartitionsRDD[U, T] extends RDD[U]

    这个RDD是mapmapPartitionsmapPartitionsWithIndex操作的结果。
    注意,在较早期的版本中,map会得到一个MappedRDDfilter会得到一个FilteredRDDflatMap会得到一个FlatMappedRDD,不过目前已经找不到了,统一变成MapPartitionsRDD

    1
    2
    3
    4
    5
    6
    scala> val a3 = arr.map(i => (i+1, i))
    a3: org.apache.spark.rdd.RDD[(Int, Int)] = MapPartitionsRDD[2] at map at <console>:25
    scala> val a3 = arr.filter(i => i > 3)
    a3: org.apache.spark.rdd.RDD[Int] = MapPartitionsRDD[4] at filter at <console>:25
    scala> val a3 = arr.flatMap(i => Array(i))
    a3: org.apache.spark.rdd.RDD[Int] = MapPartitionsRDD[5] at flatMap at <console>:25

    join操作的结果也是MapPartitionsRDD,这是因为其执行过程的最后一步flatMapValues会创建一个MapPartitionsRDD

    1
    2
    3
    4
    5
    6
    7
    8
    scala> val rdd1 = sc.parallelize(Array((1,1),(1,2),(1,3),(2,1),(2,2),(2,3)))
    rdd1: org.apache.spark.rdd.RDD[(Int, Int)] = ParallelCollectionRDD[8] at parallelize at <console>:24

    scala> val rdd2 = sc.parallelize(Array((1,1),(1,2),(1,3),(2,1),(2,2),(2,3)))
    rdd2: org.apache.spark.rdd.RDD[(Int, Int)] = ParallelCollectionRDD[9] at parallelize at <console>:24

    scala> val rddj = rdd1.join(rdd2)
    rddj: org.apache.spark.rdd.RDD[(Int, (Int, Int))] = MapPartitionsRDD[12] at join at <console>:27
  5. ShuffledRDD
    ShuffledRDD用来存储所有Shuffle操作的结果,其中KV很好理解,C是Combiner Class。

    1
    class ShuffledRDD[K, V, C] extends RDD[(K, C)]

    groupByKey为例

    1
    2
    3
    4
    5
    scala> val a2 = arr.map(i => (i+1, i))
    a2: org.apache.spark.rdd.RDD[(Int, Int)] = MapPartitionsRDD[2] at map at <console>:25

    scala> a2.groupByKey
    res1: org.apache.spark.rdd.RDD[(Int, Iterable[Int])] = ShuffledRDD[3] at groupByKey at <console>:26

    注意,groupByKey需要K是Hashable的,否则会报错。

    1
    2
    3
    4
    5
    6
    7
    scala> val a2 = arr.map(i => (Array.fill(10)(i), i))
    a2: org.apache.spark.rdd.RDD[(Array[Int], Int)] = MapPartitionsRDD[2] at map at <console>:25

    scala> a2.groupByKey
    org.apache.spark.SparkException: HashPartitioner cannot partition array keys.
    at org.apache.spark.rdd.PairRDDFunctions$$anonfun$combineByKeyWithClassTag$1.apply(PairRDDFunctions.scala:84)
    at org.apache.spark.rdd.PairRDDFunctions$$anonfun$combineByKeyWithClassTag$1.apply(PairRDDFunctions.scala:77)
  6. CoGroupedRDD

    1
    class CoGroupedRDD[K] extends RDD[(K, Array[Iterable[_]])]

    首先,我们需要了解一下什么是cogroup操作,这个方法有多个重载版本。如下所示的版本,对thisother1other2的所有的key,生成一个RDD[(K, (Iterable[V], Iterable[W1], Iterable[W2])),表示对于这个key,这三个RDD中所有值的集合。容易看到,这个算子能够被用来实现Join和Union(不过后者有点大材小用了)

    1
    2
    def cogroup[W1, W2](other1: RDD[(K, W1)], other2: RDD[(K, W2)], partitioner: Partitioner)
    : RDD[(K, (Iterable[V], Iterable[W1], Iterable[W2]))]
  7. UnionRDD

    1
    class UnionRDD[T] extends RDD[T]

    UnionRDD一般通过union算子得到

    1
    2
    scala> val a5 = arr.union(arr2)
    a5: org.apache.spark.rdd.RDD[Int] = UnionRDD[7] at union at <console>:27
  8. CoalescedRDD

常见RDD外部函数

Spark在RDD之外提供了一些外部函数,它们可以通过隐式转换的方式变成RDD。

  1. PairRDDFunctions
    这个RDD被用来处理KV对,相比RDD,它提供了groupByKeyjoin等方法。以combineByKey为例,他有三个模板参数,从RDD过来的KV以及自己的C。相比reduce和fold系列的(V, V) => V,这多出来的C使combineByKey更灵活,通过combineByKey能够将V变换为C。需要注意的是,这三个函数将来在ExternalSorter里面还将会被看到。

    1
    2
    3
    4
    5
    6
    7
    8
    9
    def combineByKey[C](
    createCombiner: V => C,
    mergeValue: (C, V) => C,
    mergeCombiners: (C, C) => C,
    partitioner: Partitioner,
    mapSideCombine: Boolean = true,
    serializer: Serializer = null): RDD[(K, C)] = {
    //实现略
    }
  2. OrderedRDDFunctions
    这个用来提供sortByKeyfilterByRange等方法。

Spark的架构概览

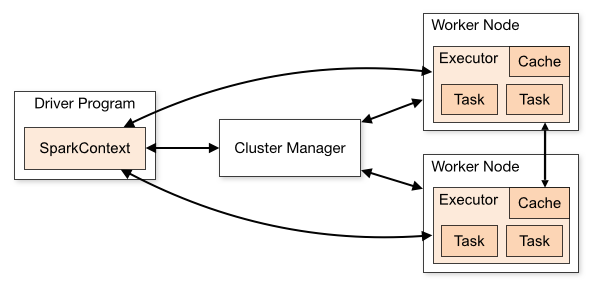
Spark在设计上的一个特点是它和下层的集群管理是分开的,一个Spark Application可以看做是由集群上的若干进程组成的。因此需要区分Spark中的概念和下层集群中的概念,例如常见的Master和Worker是集群中的概念,表示节点;而Driver和Executor是Spark中的概念,表示进程。根据爆栈网,Driver可能位于某个Worker节点中,或者位于Master节点上,这取决于部署的方式

官网上给了这样一幅图,详细阐明了Spark集群下的基础架构。SparkContext是整个Application的管理核心,由Driver来负责管理。SparkContext负责管理所有的Executor,并且和下层的集群管理进行交互,以请求资源。

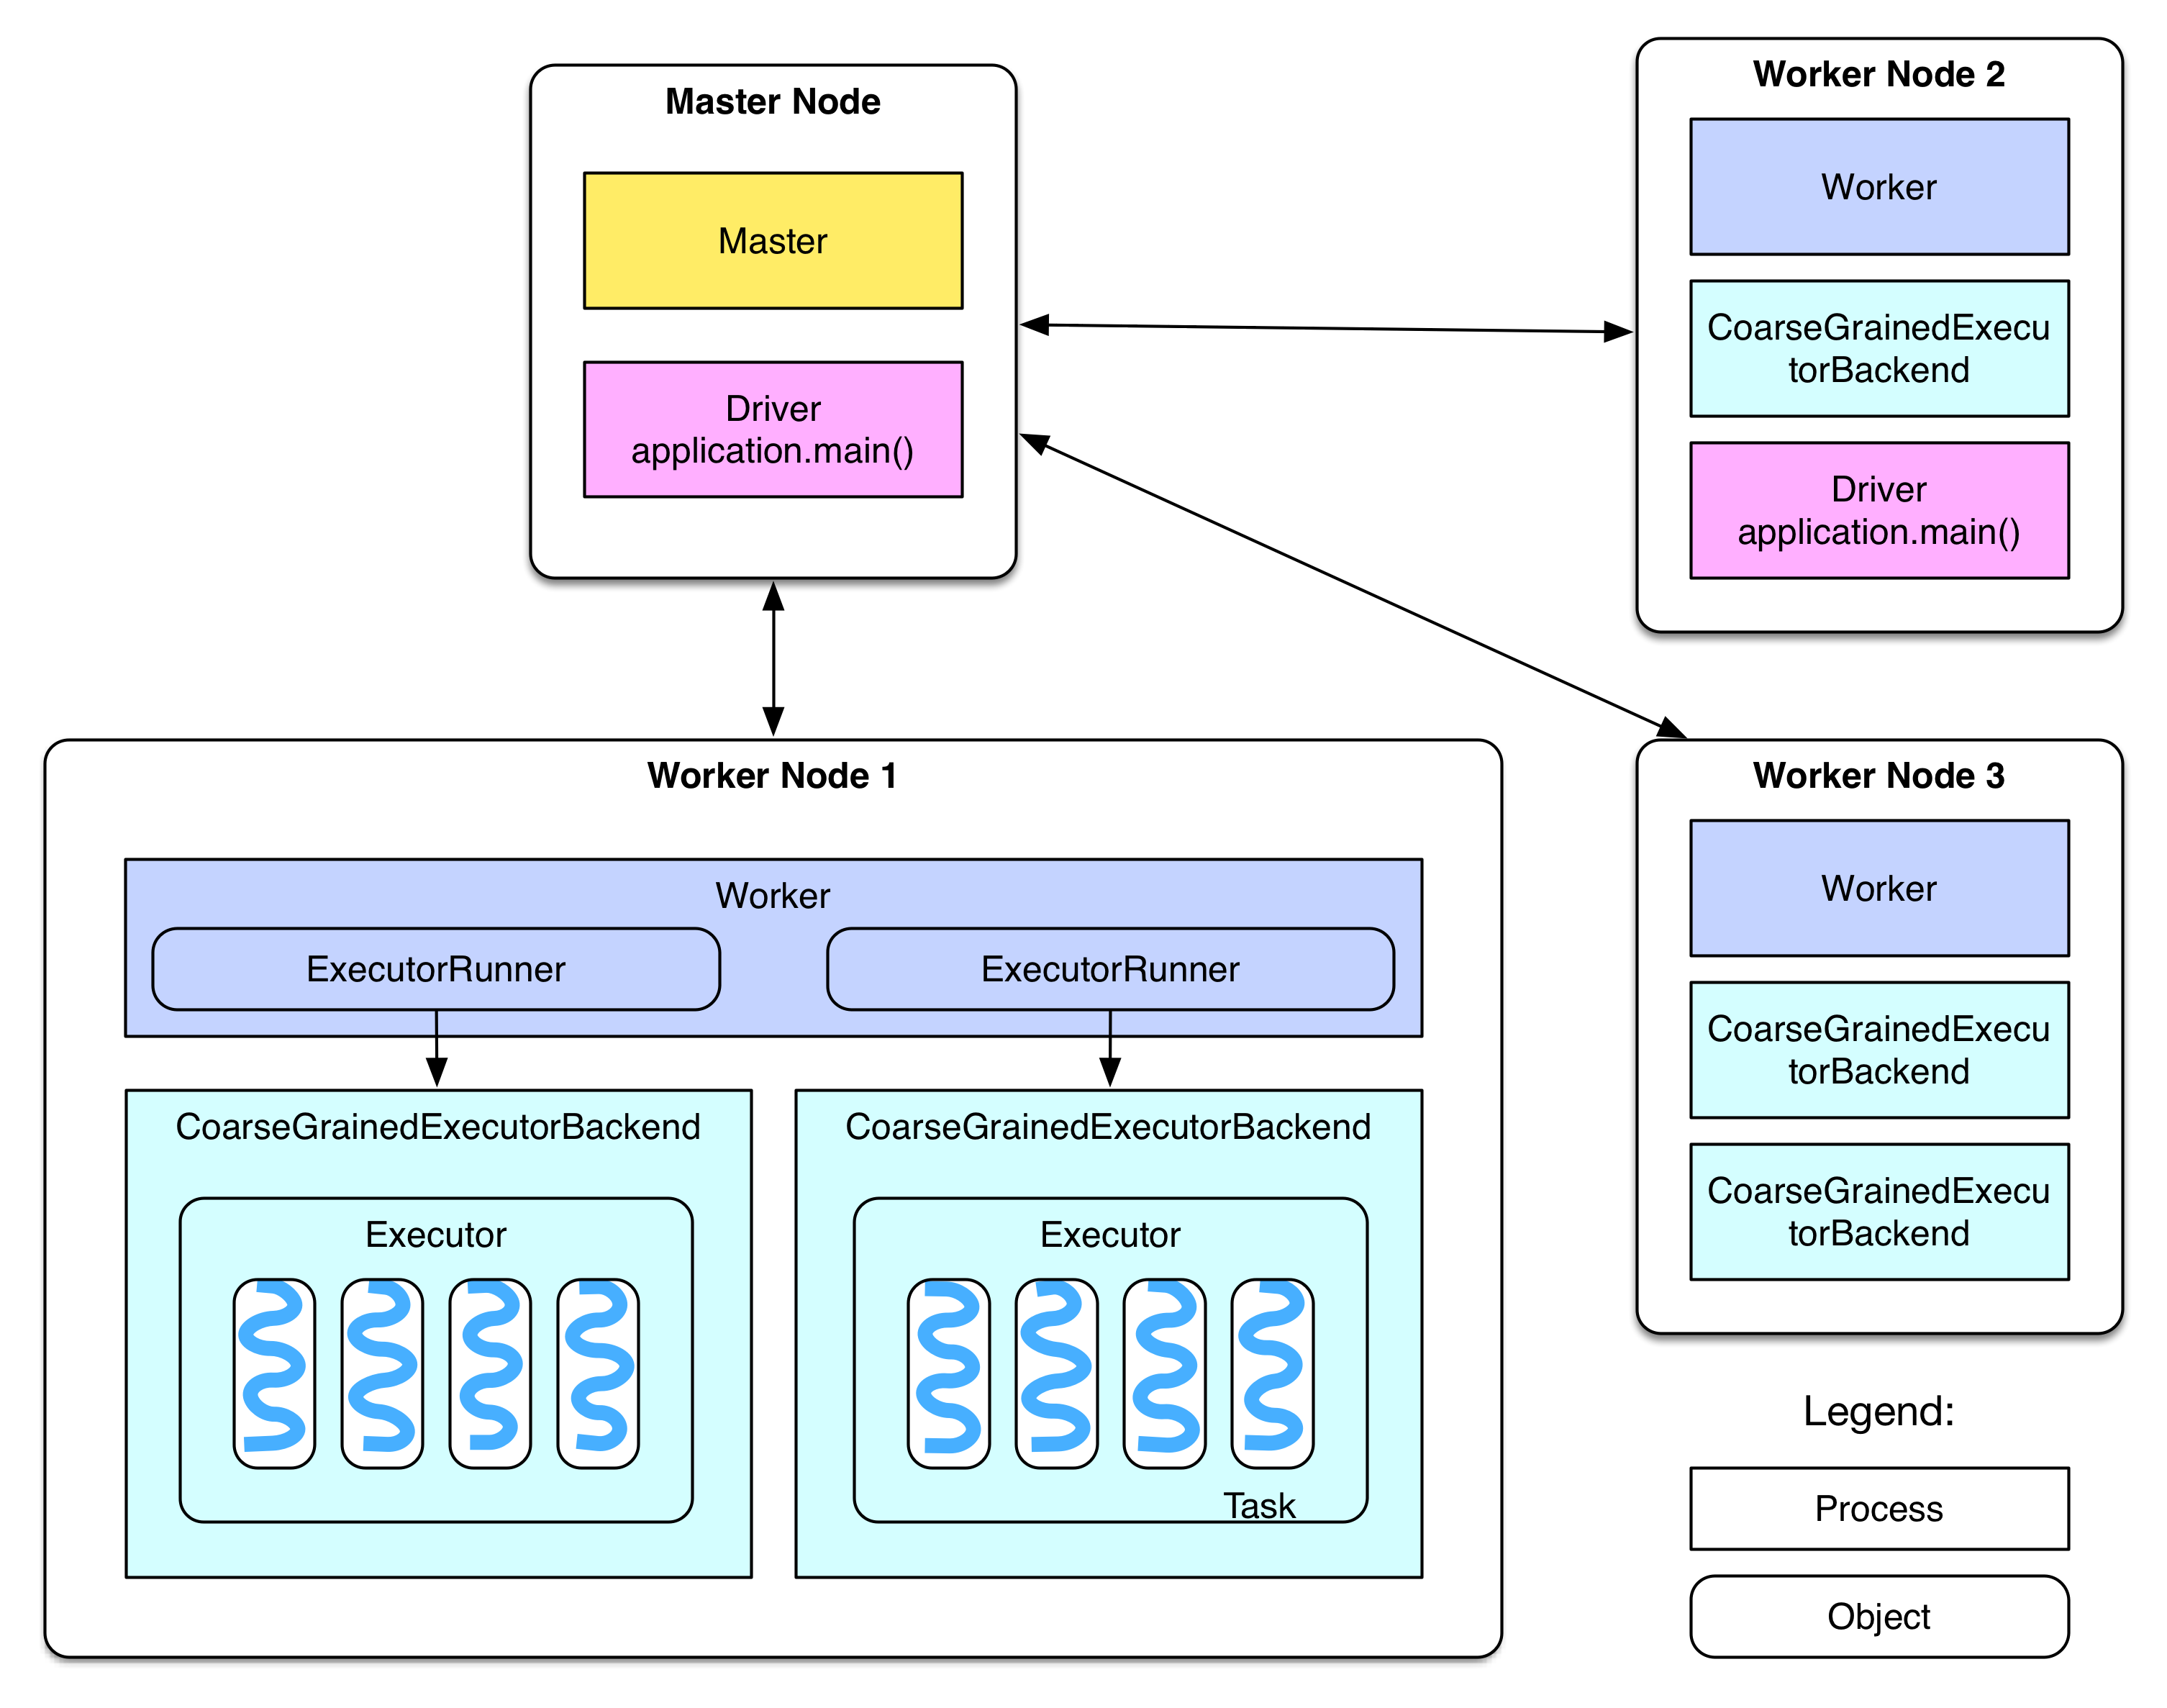
在Stage层次及以上接受DAGScheduler的调度,而TaskScheduler则调度一个Taskset。在Spark on Yarn模式下,CoarseGrainedExecutorBackend和Executor一一对应,它是一个独立于Worker主进程之外的一个进程,我们可以jps查看到。而Task是作为一个Executor启动的一个线程来跑的,一个Executor中可以跑多个Task。在实现上,CoarseGrainedExecutorBackend继承了ExecutorBackend这个trait,作为一个IsolatedRpcEndpoint,维护Executor对象实例,并通过创建的DriverEndpoint实例的与Driver进行交互。在进程启动时,CoarseGrainedExecutorBackend调用onStart()方法向Driver注册自己,并产生一条"Connecting to driver"的INFO。CoarseGrainedExecutorBackend通过DriverEndpoint.receive方法来处理来自Driver的命令,包括LaunchTaskKillTask等。这里注意一下,在scheduler中有一个CoarseGrainedSchedulerBackend,里面实现相似,在看代码时要注意区分开。

有关Executor和Driver的关系,下面这张图更加直观,需要说明的是,一个Worker上面也可能跑有多个Executor每个Task也可以在多个CPU核心上面运行

Spark上下文

在代码里我们操作一个Spark任务有两种方式,通过SparkContext,或者通过SparkSession

  1. SparkContext方式
    SparkContext是Spark自创建来一直存在的类。我们通过SparkConf直接创建SparkContext

    1
    2
    val sparkConf = new SparkConf().setAppName("AppName").setMaster("local")
    val sc = new SparkContext(sparkConf).set("spark.some.config.option", "some-value")
  2. SparkSession方式
    SparkSession是在Spark2.0之后提供的API,相比SparkContext,他提供了对SparkSQL的支持(持有SQLContext),例如createDataFrame等方法就可以通过SparkSession来访问。
    builder.getOrCreate()的过程中,虽然最终得到的是一个SparkSession,但实际上内部已经创建了一个SparkContext,并由这个SparkSession持有。

    1
    2
    3
    4
    5
    6
    7
    8
    9
    10
    11
    12
    13
    14
    15
    16
    17
    18
    19
    20
    21
    22
    23
    val spark: SparkSession = SparkSession.builder() // 得到一个Builder
    .master("local").appName("AppName").config("spark.some.config.option", "some-value")
    .getOrCreate() // 得到一个SparkSession

    // SparkSession.scala
    val sparkContext = userSuppliedContext.getOrElse {
    val sparkConf = new SparkConf()
    options.foreach { case (k, v) => sparkConf.set(k, v) }

    // set a random app name if not given.
    if (!sparkConf.contains("spark.app.name")) {
    sparkConf.setAppName(java.util.UUID.randomUUID().toString)
    }

    SparkContext.getOrCreate(sparkConf)
    // Do not update `SparkConf` for existing `SparkContext`, as it's shared by all sessions.
    }

    applyExtensions(
    sparkContext.getConf.get(StaticSQLConf.SPARK_SESSION_EXTENSIONS).getOrElse(Seq.empty),
    extensions)

    session = new SparkSession(sparkContext, None, None, extensions)

SparkEnv

SparkEnv持有一个Spark实例在运行时所需要的所有对象,包括Serializer、RpcEndpoint(在早期用的是Akka actor)、BlockManager、MemoryManager、BroadcastManager、SecurityManager、MapOutputTrackerMaster/Worker等等。SparkEnv由SparkContext创建,并在之后通过伴生对象SparkEnvget方法来访问。在创建时,Driver端的SparkEnv是SparkContext创建的时候调用SparkEnv.createDriverEnv创建的。Executor端的是其守护进程CoarseGrainedExecutorBackend创建的时候调用SparkEnv.createExecutorEnv方法创建的。这两个方法最后都会调用create方法

1
2
3
4
5
6
7
8
9
10
11
12
13
14
15
16
17
18
19
20
21
22
23
24
// Driver端
private[spark] def createSparkEnv(
conf: SparkConf,
isLocal: Boolean,
listenerBus: LiveListenerBus): SparkEnv = {
SparkEnv.createDriverEnv(conf, isLocal, listenerBus, SparkContext.numDriverCores(master, conf))
}
_env = createSparkEnv(_conf, isLocal, listenerBus)
SparkEnv.set(_env)

// Executor端
// CoarseGrainedExecutorBackend.scala
val env = SparkEnv.createExecutorEnv(driverConf, arguments.executorId, arguments.bindAddress,
arguments.hostname, arguments.cores, cfg.ioEncryptionKey, isLocal = false)

env.rpcEnv.setupEndpoint("Executor", backendCreateFn(env.rpcEnv, arguments, env))
arguments.workerUrl.foreach { url =>
env.rpcEnv.setupEndpoint("WorkerWatcher", new WorkerWatcher(env.rpcEnv, url))
}
env.rpcEnv.awaitTermination()

// SparkEnv.scala
// create函数
val blockManager = new BlockManager(...)

Spark的任务调度

Spark的操作可以分为两种,Transform操作是lazy的,而Action操作是Eager的。每一个Action会产生一个Job。
Spark的Transform操作可以分为宽依赖(ShuffleDependency)和窄依赖(NarrowDependency)操作两种,其中窄依赖还有两个子类OneToOneDependencyRangeDependency。窄依赖操作表示父RDD的每个分区只被子RDD的一个分区所使用,例如unionmapfilter等的操作;而宽依赖恰恰相反。宽依赖需要shuffle操作,因为需要将父RDD的结果需要复制给不同节点用来生成子RDD,有关ShuffleDependency将在下面的Shuffle源码分析中详细说明。当DAG的执行中出现宽依赖操作时,Spark会将其前后划分为不同的Stage,在下一章节中将具体分析相关代码。这里需要注意的一点是coalesce这样的操作也是窄依赖,因为它涉及的输入分区是有限的。

在Stage之下,就是若干个Task了。这些Task也就是Spark的并行单元,通常来说,按照当前Stage的最后一个RDD的分区数来计算,每一个分区都会启动一个Task来进行计算。我们可以通过rdd.partitions.size来获取一个RDD有多少个分区。一般来说,初始的partition数是在HDFS中文件block的数量

Task具有两种类型,ShuffleMapTaskResultTask。其中ResultTaskResultStage的Task,也就是最后一个Stage的Task。

下面提出几个有趣的问题:

  1. Job是可并行的么?
    官网指出,within each Spark application, multiple “jobs” (Spark actions) may be running concurrently if they were submitted by different threads。所以如果你用多线程跑多个Action,确实是可以的。这也是容易理解的,因为跑一个Action相当于就是向Spark的DAGScheduler去提交一个任务嘛。
  2. Stage是可并行的么?
    可以。Stage描述了宽依赖间的RDD的变化过程,而RDD的变化总体上是一个DAG。因此可以认识到,对于两个NarrowDependency的Stage,它们确实是可以并行的。

启动一个任务

Executor

1
2
3
4
5
6
7
8
9
10
11
12
13
14
15
16
private[spark] class Executor(
executorId: String,
executorHostname: String,
env: SparkEnv,
userClassPath: Seq[URL] = Nil,
isLocal: Boolean = false,
uncaughtExceptionHandler: UncaughtExceptionHandler = new SparkUncaughtExceptionHandler)
extends Logging {

def launchTask(context: ExecutorBackend, taskDescription: TaskDescription): Unit = {
val tr = new TaskRunner(context, taskDescription)
runningTasks.put(taskDescription.taskId, tr)
threadPool.execute(tr)
}

...

TaskRunner

1
2
3
4
5
6
7
8
9
10
11
12
13
14
15
16
17
18
19
20
21
22
23
24
25
26
27
28
29
30
31
32
33
34
35
36
37
38
39
40
41
42
43
44
45
46
47
48
49
50
51
52
53
54
55
56
57
58
59
60
61
62
63
64
65
66
67
68
69
70
71
72
73
74
75
76
77
78
79
80
81
82
83
84
85
86
87
88
89
90
91
92
93
94
95
96
97
98
99
100
101
102
103
104
105
106
107
108
109
110
111
112
113
114
115
116
117
118
119
120
121
122
123
124
125
126
127
128
129
130
131
132
133
134
135
136
137
138
139
140
141
142
143
144
145
146
147
148
149
150
151
152
153
154
155
156
157
158
159
160
161
162
163
164
165
166
167
168
169
170
171
172
173
174
175
176
177
178
179
180
181
182
183
184
185
186
187
188
189
190
191
192
193
194
195
196
197
198
199
200
201
202
203
204
205
206
207
208
209
210
211
212
213
214
215
216
217
218
219
220
221
222
223
224
225
226
227
228
229
230
231
232
233
234
235
236
237
238
239
240
241
class TaskRunner(
execBackend: ExecutorBackend,
private val taskDescription: TaskDescription)
extends Runnable {

override def run(): Unit = {
threadId = Thread.currentThread.getId
Thread.currentThread.setName(threadName)
val threadMXBean = ManagementFactory.getThreadMXBean
val taskMemoryManager = new TaskMemoryManager(env.memoryManager, taskId)
val deserializeStartTime = System.currentTimeMillis()
val deserializeStartCpuTime = if (threadMXBean.isCurrentThreadCpuTimeSupported) {
threadMXBean.getCurrentThreadCpuTime
} else 0L
Thread.currentThread.setContextClassLoader(replClassLoader)
val ser = env.closureSerializer.newInstance()
logInfo(s"Running $taskName (TID $taskId)")
execBackend.statusUpdate(taskId, TaskState.RUNNING, EMPTY_BYTE_BUFFER)
var taskStartTime: Long = 0
var taskStartCpu: Long = 0
startGCTime = computeTotalGcTime()

try {
// Must be set before updateDependencies() is called, in case fetching dependencies
// requires access to properties contained within (e.g. for access control).
Executor.taskDeserializationProps.set(taskDescription.properties)

updateDependencies(taskDescription.addedFiles, taskDescription.addedJars)
task = ser.deserialize[Task[Any]](
taskDescription.serializedTask, Thread.currentThread.getContextClassLoader)
task.localProperties = taskDescription.properties
task.setTaskMemoryManager(taskMemoryManager)

// If this task has been killed before we deserialized it, let's quit now. Otherwise,
// continue executing the task.
val killReason = reasonIfKilled
if (killReason.isDefined) {
// Throw an exception rather than returning, because returning within a try{} block
// causes a NonLocalReturnControl exception to be thrown. The NonLocalReturnControl
// exception will be caught by the catch block, leading to an incorrect ExceptionFailure
// for the task.
throw new TaskKilledException(killReason.get)
}

// The purpose of updating the epoch here is to invalidate executor map output status cache
// in case FetchFailures have occurred. In local mode `env.mapOutputTracker` will be
// MapOutputTrackerMaster and its cache invalidation is not based on epoch numbers so
// we don't need to make any special calls here.
if (!isLocal) {
logDebug("Task " + taskId + "'s epoch is " + task.epoch)
env.mapOutputTracker.asInstanceOf[MapOutputTrackerWorker].updateEpoch(task.epoch)
}

// Run the actual task and measure its runtime.
taskStartTime = System.currentTimeMillis()
taskStartCpu = if (threadMXBean.isCurrentThreadCpuTimeSupported) {
threadMXBean.getCurrentThreadCpuTime
} else 0L
var threwException = true
val value = Utils.tryWithSafeFinally {
val res = task.run(
taskAttemptId = taskId,
attemptNumber = taskDescription.attemptNumber,
metricsSystem = env.metricsSystem)
threwException = false
res
} {
val releasedLocks = env.blockManager.releaseAllLocksForTask(taskId)
val freedMemory = taskMemoryManager.cleanUpAllAllocatedMemory()

if (freedMemory > 0 && !threwException) {
val errMsg = s"Managed memory leak detected; size = $freedMemory bytes, TID = $taskId"
if (conf.getBoolean("spark.unsafe.exceptionOnMemoryLeak", false)) {
throw new SparkException(errMsg)
} else {
logWarning(errMsg)
}
}

if (releasedLocks.nonEmpty && !threwException) {
val errMsg =
s"${releasedLocks.size} block locks were not released by TID = $taskId:\n" +
releasedLocks.mkString("[", ", ", "]")
if (conf.getBoolean("spark.storage.exceptionOnPinLeak", false)) {
throw new SparkException(errMsg)
} else {
logInfo(errMsg)
}
}
}
task.context.fetchFailed.foreach { fetchFailure =>
// uh-oh. it appears the user code has caught the fetch-failure without throwing any
// other exceptions. Its *possible* this is what the user meant to do (though highly
// unlikely). So we will log an error and keep going.
logError(s"TID ${taskId} completed successfully though internally it encountered " +
s"unrecoverable fetch failures! Most likely this means user code is incorrectly " +
s"swallowing Spark's internal ${classOf[FetchFailedException]}", fetchFailure)
}
val taskFinish = System.currentTimeMillis()
val taskFinishCpu = if (threadMXBean.isCurrentThreadCpuTimeSupported) {
threadMXBean.getCurrentThreadCpuTime
} else 0L

// If the task has been killed, let's fail it.
task.context.killTaskIfInterrupted()

val resultSer = env.serializer.newInstance()
val beforeSerialization = System.currentTimeMillis()
val valueBytes = resultSer.serialize(value)
val afterSerialization = System.currentTimeMillis()

// Deserialization happens in two parts: first, we deserialize a Task object, which
// includes the Partition. Second, Task.run() deserializes the RDD and function to be run.
task.metrics.setExecutorDeserializeTime(
(taskStartTime - deserializeStartTime) + task.executorDeserializeTime)
task.metrics.setExecutorDeserializeCpuTime(
(taskStartCpu - deserializeStartCpuTime) + task.executorDeserializeCpuTime)
// We need to subtract Task.run()'s deserialization time to avoid double-counting
task.metrics.setExecutorRunTime((taskFinish - taskStartTime) - task.executorDeserializeTime)
task.metrics.setExecutorCpuTime(
(taskFinishCpu - taskStartCpu) - task.executorDeserializeCpuTime)
task.metrics.setJvmGCTime(computeTotalGcTime() - startGCTime)
task.metrics.setResultSerializationTime(afterSerialization - beforeSerialization)

// Expose task metrics using the Dropwizard metrics system.
// Update task metrics counters
executorSource.METRIC_CPU_TIME.inc(task.metrics.executorCpuTime)
...
executorSource.METRIC_MEMORY_BYTES_SPILLED.inc(task.metrics.memoryBytesSpilled)

// Note: accumulator updates must be collected after TaskMetrics is updated
val accumUpdates = task.collectAccumulatorUpdates()
// TODO: do not serialize value twice
val directResult = new DirectTaskResult(valueBytes, accumUpdates)
val serializedDirectResult = ser.serialize(directResult)
val resultSize = serializedDirectResult.limit()

// directSend = sending directly back to the driver
val serializedResult: ByteBuffer = {
if (maxResultSize > 0 && resultSize > maxResultSize) {
logWarning(s"Finished $taskName (TID $taskId). Result is larger than maxResultSize " +
s"(${Utils.bytesToString(resultSize)} > ${Utils.bytesToString(maxResultSize)}), " +
s"dropping it.")
ser.serialize(new IndirectTaskResult[Any](TaskResultBlockId(taskId), resultSize))
} else if (resultSize > maxDirectResultSize) {
val blockId = TaskResultBlockId(taskId)
env.blockManager.putBytes(
blockId,
new ChunkedByteBuffer(serializedDirectResult.duplicate()),
StorageLevel.MEMORY_AND_DISK_SER)
logInfo(
s"Finished $taskName (TID $taskId). $resultSize bytes result sent via BlockManager)")
ser.serialize(new IndirectTaskResult[Any](blockId, resultSize))
} else {
logInfo(s"Finished $taskName (TID $taskId). $resultSize bytes result sent to driver")
serializedDirectResult
}
}

setTaskFinishedAndClearInterruptStatus()
execBackend.statusUpdate(taskId, TaskState.FINISHED, serializedResult)

} catch {
case t: TaskKilledException =>
logInfo(s"Executor killed $taskName (TID $taskId), reason: ${t.reason}")

val (accums, accUpdates) = collectAccumulatorsAndResetStatusOnFailure(taskStartTime)
val serializedTK = ser.serialize(TaskKilled(t.reason, accUpdates, accums))
execBackend.statusUpdate(taskId, TaskState.KILLED, serializedTK)

case _: InterruptedException | NonFatal(_) if
task != null && task.reasonIfKilled.isDefined =>
val killReason = task.reasonIfKilled.getOrElse("unknown reason")
logInfo(s"Executor interrupted and killed $taskName (TID $taskId), reason: $killReason")

val (accums, accUpdates) = collectAccumulatorsAndResetStatusOnFailure(taskStartTime)
val serializedTK = ser.serialize(TaskKilled(killReason, accUpdates, accums))
execBackend.statusUpdate(taskId, TaskState.KILLED, serializedTK)

case t: Throwable if hasFetchFailure && !Utils.isFatalError(t) =>
val reason = task.context.fetchFailed.get.toTaskFailedReason
if (!t.isInstanceOf[FetchFailedException]) {
// there was a fetch failure in the task, but some user code wrapped that exception
// and threw something else. Regardless, we treat it as a fetch failure.
val fetchFailedCls = classOf[FetchFailedException].getName
logWarning(s"TID ${taskId} encountered a ${fetchFailedCls} and " +
s"failed, but the ${fetchFailedCls} was hidden by another " +
s"exception. Spark is handling this like a fetch failure and ignoring the " +
s"other exception: $t")
}
setTaskFinishedAndClearInterruptStatus()
execBackend.statusUpdate(taskId, TaskState.FAILED, ser.serialize(reason))

case CausedBy(cDE: CommitDeniedException) =>
val reason = cDE.toTaskCommitDeniedReason
setTaskFinishedAndClearInterruptStatus()
execBackend.statusUpdate(taskId, TaskState.KILLED, ser.serialize(reason))

case t: Throwable =>
// Attempt to exit cleanly by informing the driver of our failure.
// If anything goes wrong (or this was a fatal exception), we will delegate to
// the default uncaught exception handler, which will terminate the Executor.
logError(s"Exception in $taskName (TID $taskId)", t)

// SPARK-20904: Do not report failure to driver if if happened during shut down. Because
// libraries may set up shutdown hooks that race with running tasks during shutdown,
// spurious failures may occur and can result in improper accounting in the driver (e.g.
// the task failure would not be ignored if the shutdown happened because of premption,
// instead of an app issue).
if (!ShutdownHookManager.inShutdown()) {
val (accums, accUpdates) = collectAccumulatorsAndResetStatusOnFailure(taskStartTime)

val serializedTaskEndReason = {
try {
ser.serialize(new ExceptionFailure(t, accUpdates).withAccums(accums))
} catch {
case _: NotSerializableException =>
// t is not serializable so just send the stacktrace
ser.serialize(new ExceptionFailure(t, accUpdates, false).withAccums(accums))
}
}
setTaskFinishedAndClearInterruptStatus()
execBackend.statusUpdate(taskId, TaskState.FAILED, serializedTaskEndReason)
} else {
logInfo("Not reporting error to driver during JVM shutdown.")
}

// Don't forcibly exit unless the exception was inherently fatal, to avoid
// stopping other tasks unnecessarily.
if (!t.isInstanceOf[SparkOutOfMemoryError] && Utils.isFatalError(t)) {
uncaughtExceptionHandler.uncaughtException(Thread.currentThread(), t)
}
} finally {
runningTasks.remove(taskId)
}
}

private def hasFetchFailure: Boolean = {
task != null && task.context != null && task.context.fetchFailed.isDefined
}
}
1
2
3
4
5
6
7
8
9
10
11
12
13
14
15
16
17
18
19
20
21
22
23
24
25
26
27
28
29
30
31
32
33
34
35
36
37
38
39
40
41
42
43
44
45
46
47
48
49
50
51
52
53
54
55
56
57
58
59
60
61
62
63
64
65
66
67
68
69
70
71
72
73
74
75
76
77
78
79
80
81
82
83
84
85
86
87
88
89
90
91
92
93
94
95
96
97
98
99
100
101
102
103
104
105
106
107
108
private[spark] abstract class Task[T](
val stageId: Int,
val stageAttemptId: Int,
val partitionId: Int,
@transient var localProperties: Properties = new Properties,
// The default value is only used in tests.
serializedTaskMetrics: Array[Byte] =
SparkEnv.get.closureSerializer.newInstance().serialize(TaskMetrics.registered).array(),
val jobId: Option[Int] = None,
val appId: Option[String] = None,
val appAttemptId: Option[String] = None,
val isBarrier: Boolean = false) extends Serializable {

...

/**
* Called by [[org.apache.spark.executor.Executor]] to run this task.
*
* @param taskAttemptId an identifier for this task attempt that is unique within a SparkContext.
* @param attemptNumber how many times this task has been attempted (0 for the first attempt)
* @return the result of the task along with updates of Accumulators.
*/
final def run(
taskAttemptId: Long,
attemptNumber: Int,
metricsSystem: MetricsSystem): T = {
SparkEnv.get.blockManager.registerTask(taskAttemptId)
// TODO SPARK-24874 Allow create BarrierTaskContext based on partitions, instead of whether
// the stage is barrier.
val taskContext = new TaskContextImpl(
stageId,
stageAttemptId, // stageAttemptId and stageAttemptNumber are semantically equal
partitionId,
taskAttemptId,
attemptNumber,
taskMemoryManager,
localProperties,
metricsSystem,
metrics)

context = if (isBarrier) {
new BarrierTaskContext(taskContext)
} else {
taskContext
}

InputFileBlockHolder.initialize()
TaskContext.setTaskContext(context)
taskThread = Thread.currentThread()

if (_reasonIfKilled != null) {
kill(interruptThread = false, _reasonIfKilled)
}

new CallerContext(
"TASK",
SparkEnv.get.conf.get(APP_CALLER_CONTEXT),
appId,
appAttemptId,
jobId,
Option(stageId),
Option(stageAttemptId),
Option(taskAttemptId),
Option(attemptNumber)).setCurrentContext()

try {
runTask(context)
} catch {
case e: Throwable =>
// Catch all errors; run task failure callbacks, and rethrow the exception.
try {
context.markTaskFailed(e)
} catch {
case t: Throwable =>
e.addSuppressed(t)
}
context.markTaskCompleted(Some(e))
throw e
} finally {
try {
// Call the task completion callbacks. If "markTaskCompleted" is called twice, the second
// one is no-op.
context.markTaskCompleted(None)
} finally {
try {
Utils.tryLogNonFatalError {
// Release memory used by this thread for unrolling blocks
SparkEnv.get.blockManager.memoryStore.releaseUnrollMemoryForThisTask(MemoryMode.ON_HEAP)
SparkEnv.get.blockManager.memoryStore.releaseUnrollMemoryForThisTask(
MemoryMode.OFF_HEAP)
// Notify any tasks waiting for execution memory to be freed to wake up and try to
// acquire memory again. This makes impossible the scenario where a task sleeps forever
// because there are no other tasks left to notify it. Since this is safe to do but may
// not be strictly necessary, we should revisit whether we can remove this in the
// future.
val memoryManager = SparkEnv.get.memoryManager
memoryManager.synchronized { memoryManager.notifyAll() }
}
} finally {
// Though we unset the ThreadLocal here, the context member variable itself is still
// queried directly in the TaskRunner to check for FetchFailedExceptions.
TaskContext.unset()
InputFileBlockHolder.unset()
}
}
}
}
...

失败重试

  1. spark.yarn.maxAppAttempts
    YARN申请资源的重试次数。
  2. spark.yarn.max.executor.failures
    Spark应用程序的最大Executor失败次数,默认numExecutors*2

Spark的存储管理

为了实现与底层细节的解耦,Spark的存储基于BlockManager给计算部分提供服务。类似于Driver和Executor,BlockManager机制也分为BlockManagerMaster和BlockManager。Driver上的BlockManagerMaster对于存在与Executor上的BlockManager统一管理。BlockManager只是负责管理所在Executor上的Block。
BlockManagerMaster和BlockManager都是在SparkEnv中创建的,

1
2
3
4
5
6
7
8
9
10
11
12
13
14
15
16
17
18
19
20
21
22
23
24
25
26
27
28
29
30
31
32
33
34
35
36
37
38
39
// Mapping from block manager id to the block manager's information.
val blockManagerInfo = new concurrent.TrieMap[BlockManagerId, BlockManagerInfo]()
val blockManagerMaster = new BlockManagerMaster(
registerOrLookupEndpoint(
BlockManagerMaster.DRIVER_ENDPOINT_NAME,
new BlockManagerMasterEndpoint(
rpcEnv,
isLocal,
conf,
listenerBus,
// 是否使用ExternalShuffleService读取持久化在磁盘上的数据
if (conf.get(config.SHUFFLE_SERVICE_FETCH_RDD_ENABLED)) {
externalShuffleClient
} else {
None
}, blockManagerInfo)),
registerOrLookupEndpoint(
BlockManagerMaster.DRIVER_HEARTBEAT_ENDPOINT_NAME,
new BlockManagerMasterHeartbeatEndpoint(rpcEnv, isLocal, blockManagerInfo)),
conf,
isDriver)

val blockTransferService =
new NettyBlockTransferService(conf, securityManager, bindAddress, advertiseAddress,
blockManagerPort, numUsableCores, blockManagerMaster.driverEndpoint)

// NB: blockManager is not valid until initialize() is called later.
val blockManager = new BlockManager(
executorId,
rpcEnv,
blockManagerMaster,
serializerManager,
conf,
memoryManager,
mapOutputTracker,
shuffleManager,
blockTransferService,
securityManager,
externalShuffleClient)

Driver节点和Executor节点的BlockManager之间的交互可以使用下图来描述,在此就不详细说明。
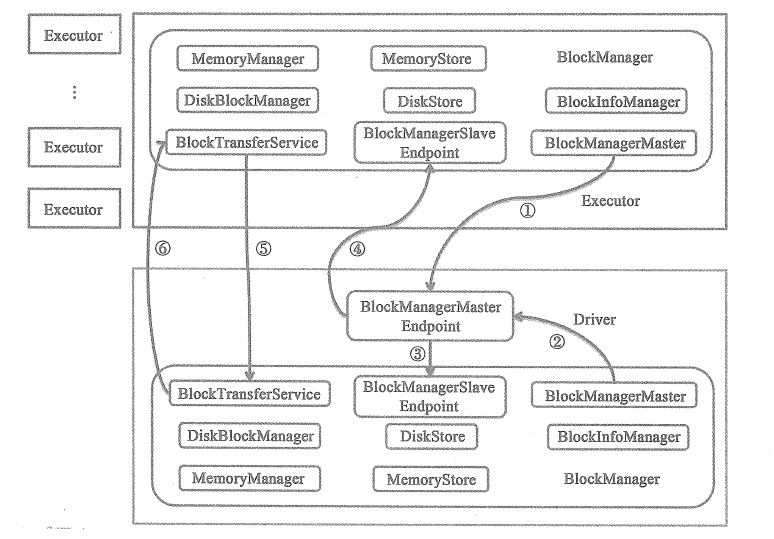
BlockId和BlockInfo

抽象类BlockId被用来唯一标识一个Block,具有全局唯一的名字,通常和一个文件相对应。BlockId有着确定的命名规则,并且和它实际的类型有关。
如果它是用来Shuffle的ShuffleBlockId,那么他的命名就是

1
String = "shuffle_" + shuffleId + "_" + mapId + "_" + reduceId

抑或它是用来Broadcast的BroadcastBlockId,他的命名就是

1
"broadcast_" + broadcastId + (if (field == "") "" else "_" + field)

或者它是一个RDD,它的命名就是

1
"rdd_" + rddId + "_" + splitIndex

通过在Spark.log里面跟踪这些block名字,我们可以了解到当前Spark任务的执行和存储情况。

BlockInfo中的level项表示这个block的存储级别。

1
2
3
4
5
// BlockInfoManager.scala
private[storage] class BlockInfo(
val level: StorageLevel,
val classTag: ClassTag[_],
val tellMaster: Boolean) {

持久化

Spark提供了如下的持久化级别,其中选项为useDiskuseMemoryuseOffHeapdeserializedreplication,分别表示是否采用磁盘、内存、堆外内存、反序列化以及持久化维护的副本数。其中反序列化为false时(好绕啊),会对对象进行序列化存储,能够节省一定空间,但同时会消耗计算资源。需要注意的是,cache操作是persist的一个特例,等于MEMORY_ONLY的persist。所有的广播对象都是MEMORY_AND_DISK的存储级别

1
2
3
4
5
6
7
8
9
10
11
12
13
14
object StorageLevel extends scala.AnyRef with scala.Serializable {
val NONE = new StorageLevel(false, false, false, false)
val DISK_ONLY = new StorageLevel(true, false, false, false)
val DISK_ONLY_2 = new StorageLevel(true, false, false, false, 2)
val MEMORY_ONLY = new StorageLevel(false, true, false, true) // 默认存储类别
val MEMORY_ONLY_2 = new StorageLevel(false, true, false, true, 2)
val MEMORY_ONLY_SER = new StorageLevel(false, true, false, false)
val MEMORY_ONLY_SER_2 = new StorageLevel(false, true, false, false, 2)
val MEMORY_AND_DISK = new StorageLevel(true, true, false, true)
val MEMORY_AND_DISK_2 = new StorageLevel(true, true, false, true, 2)
val MEMORY_AND_DISK_SER = new StorageLevel(true, true, false, false)
val MEMORY_AND_DISK_SER_2 = new StorageLevel(true, true, false, false, 2)
val OFF_HEAP = new StorageLevel(true, true, true, false, 1)
}

想在Spark任务完成之后检查每一个RDD的缓存状况是比较困难的,虽然在Spark EventLog中,我们也能看到在每一个RDD的RDD Info中有一个StorageLevel的条目。RDDInfo的源码建议我们可以通过(Use Disk||Use Memory)&&NumberofCachedPartitions这样的条件来判断一个RDD到底有没有被cache。但实际上,似乎EventLog里面的NumberofCachedPartitionsMemory SizeDisk Size永远是0,这可能是只能在执行过程中才能看到这些字段的值,毕竟WebUI的Storage标签就只在执行时能看到。不过(Use Disk||Use Memory)在cache调用的RDD上是true的,所以可以以这个RDD为根做一个BFS,将所有不需要计算的RDD找出来。

Checkpoint

Save

相对于持久化,这里指的是保存数据到文件或者数据表。

RDD的overwrite问题

一个蛋疼的事情是RDD的诸如saveAsTextFile不能够像DF的API一样直接指定overwrite为true,导致无法复写的情况。为此,需要借助于hdfs的API手动来判断是否exist。

1
2
3
4
5
6
7
8
9
val conf = new org.apache.hadoop.conf.Configuration()
// 注意,可能需要手动指定集群,因为Spark的默认集群可能不对,
// 届时可能产生Wrong FS的错误
val fs = FileSystem.get(new java.net.URI("hdfs根"), conf)
// val fs = FileSystem.get(sc.hadoopConfiguration)
val path = new org.apache.hadoop.fs.Path("需要删除的目录")
if (fs.exists(path)){
fs.delete(path, true)
}

RDD的save问题

saveAsTextFile会写到多个文件里面,如下所示,如果我们save到这个文件夹,那么会在下面创建_SUCCESSpart-000000这样的文件

那么我们读的时候,比较方便的是用下面的方法

1
spark.read.text(path).rdd.collect().mkString("")

但这样会导致读出来的string周围有中括号包起来。因此要用下面的办法去掉

1
2
3
4
5
text = if(textRaw.endsWith("]")){
textRaw.substring(1, textRaw.length - 1)
}else{
textRaw
}

不过,我们有另一种办法,就是绕过spark,而直接用hadoop的api来读取。

1
2
3
4
5
6
val conf: Configuration
val path = new Path(fileName)
val fileSystem = path.getFileSystem(conf)
val writer = new BufferedWriter(new OutputStreamWriter(fileSystem.create(path)))
writer.write(s)
writer.close()

BlockInfoManager

BlockInfoManager用来管理Block的元信息,例如它维护了所有BlockId的BlockInfo信息infos: mutable.HashMap[BlockId, BlockInfo]。不过它最主要的功能还是为读写Block提供锁服务

本地读Block

本地读方法位于BlockManager.scala中,从前叫getBlockData,现在叫getLocalBlockData,名字更易懂了。getLocalBlockData的主要内容就对Block的性质进行讨论,如果是Shuffle的,那么就借助于ShuffleBlockResolver
ShuffleBlockResolver是一个trait,它有两个子类IndexShuffleBlockResolverExternalShuffleBlockResolver,它们定义如何从一个logical shuffle block identifier(例如map、reduce或shuffle)中取回Block。这个类维护Block和文件的映射关系,维护index文件,向BlockStore提供抽象。

1
2
3
4
5
6
7
8
9
10
11
12
13
14
15
16
17
18
19
// BlockManager.scala
override def getLocalBlockData(blockId: BlockId): ManagedBuffer = {
if (blockId.isShuffle) {
// 如果这个BlockId是Shuffle的,那么就通过shuffleManager的shuffleBlockResolver来获取BlockData
shuffleManager.shuffleBlockResolver.getBlockData(blockId)
} else {
// 否则使用getLocalBytes
getLocalBytes(blockId) match {
case Some(blockData) =>
new BlockManagerManagedBuffer(blockInfoManager, blockId, blockData, true)
case None =>
// If this block manager receives a request for a block that it doesn't have then it's
// likely that the master has outdated block statuses for this block. Therefore, we send
// an RPC so that this block is marked as being unavailable from this block manager.
reportBlockStatus(blockId, BlockStatus.empty)
throw new BlockNotFoundException(blockId.toString)
}
}
}

我们看getLocalBytes函数,它带锁地调用doGetLocalBytes

1
2
3
4
5
def getLocalBytes(blockId: BlockId): Option[BlockData] = {
logDebug(s"Getting local block $blockId as bytes")
assert(!blockId.isShuffle, s"Unexpected ShuffleBlockId $blockId")
blockInfoManager.lockForReading(blockId).map { info => doGetLocalBytes(blockId, info) }
}

上面的这一段代码会在spark.log中产生类似下面的Log,我们由此可以对Block的用途,存储级别等进行分析。

1
2
3
4
19/11/26 17:24:52 DEBUG BlockManager: Getting local block broadcast_3_piece0 as bytes
19/11/26 17:24:52 TRACE BlockInfoManager: Task -1024 trying to acquire read lock for broadcast_3_piece0
19/11/26 17:24:52 TRACE BlockInfoManager: Task -1024 acquired read lock for broadcast_3_piece0
19/11/26 17:24:52 DEBUG BlockManager: Level for block broadcast_3_piece0 is StorageLevel(disk, memory, 1 replicas)

doGetLocalBytes负责根据Block的存储级别,以最小的代价取到序列化后的数据。从下面的代码中可以看到,Spark认为序列化一个对象的开销是高于从磁盘中读取一个已经序列化之后的对象的开销的,因为它宁可从磁盘里面取也不愿意直接从内存序列化。

1
2
3
4
5
6
7
8
9
10
11
12
13
14
15
16
17
18
19
20
21
22
23
24
25
26
27
28
29
30
31
32
33
34
private def doGetLocalBytes(blockId: BlockId, info: BlockInfo): BlockData = {
val level = info.level
logDebug(s"Level for block $blockId is $level")
// 如果内容是序列化的,先尝试读序列化的到内存和磁盘。
// 如果内容是非序列化的,尝试序列化内存中的对象,最后抛出异常表示不存在
if (level.deserialized) {
// 因为内存中是非序列化的,尝试能不能先从磁盘中读到非序列化的。
if (level.useDisk && diskStore.contains(blockId)) {
// Note: Spark在这里故意不将block放到内存里面,因为这个if分支是处理非序列化块的,
// 这个块可能被按照非序列化对象的形式存在内存里面,因此没必要在在内存里面存一份序列化了的。
diskStore.getBytes(blockId)
} else if (level.useMemory && memoryStore.contains(blockId)) {
// 不在硬盘上,就序列化内存中的对象
new ByteBufferBlockData(serializerManager.dataSerializeWithExplicitClassTag(
blockId, memoryStore.getValues(blockId).get, info.classTag), true)
} else {
handleLocalReadFailure(blockId)
}
} else {
// 如果存在已经序列化的对象
if (level.useMemory && memoryStore.contains(blockId)) {
// 先找内存
new ByteBufferBlockData(memoryStore.getBytes(blockId).get, false)
} else if (level.useDisk && diskStore.contains(blockId)) {
// 再找磁盘
val diskData = diskStore.getBytes(blockId)
maybeCacheDiskBytesInMemory(info, blockId, level, diskData)
.map(new ByteBufferBlockData(_, false))
.getOrElse(diskData)
} else {
handleLocalReadFailure(blockId)
}
}
}

Spark的内存管理

在Spark 1.6之后,内存管理模式发生了大变化,从前版本的内存管理需要通过指定spark.memory.useLegacyMode来手动启用,因此在这里只对之后的进行论述。

Spark内存布局

如下图所示,Spark的堆内存空间可以分为Spark托管区、用户区和保留区三块。

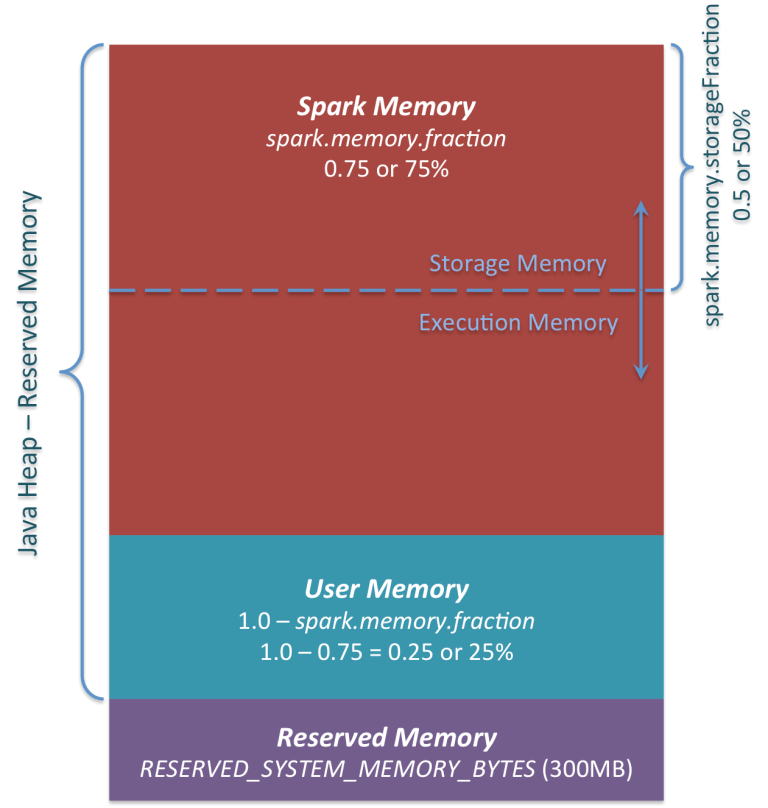
其中保留区占300MB,是固定的。托管区的大小由spark.memory.fraction节制,而1 - spark.memory.fraction的部分用户区。这个值越小,就越容易Spill或者Cache evict。这个设置的用途是将internal metadata、user data structures区分开来。从而减少对稀疏的或者不常出现的大对象的大小的不准确估计造成的影响(限定词有点多,是翻译的注释、、、)。默认spark.memory.fraction是0.6。

1
2
3
// package.scala
private[spark] val MEMORY_FRACTION = ConfigBuilder("spark.memory.fraction")
.doc("...").doubleConf.createWithDefault(0.6)

Spark的托管区又分为Execution和Storage两个部分。其中Storage主要用来缓存RDD、Broadcast之类的对象,Execution被用来存Mapside的Shuffle数据。Storage和Execution共享的内存,spark.storage.storageFraction(现在应该已经改成了spark.memory.storageFraction)表示对eviction免疫的Storage部分的大小,它的值越大,Execution内存就越小,Task就越容易Spill。反之,Cache就越容易被evict。默认spark.memory.storageFraction是0.5。

1
2
3
// package.scala
private[spark] val MEMORY_STORAGE_FRACTION = ConfigBuilder("spark.memory.storageFraction")
.doc("...").doubleConf.checkValue(v => v >= 0.0 && v < 1.0, "Storage fraction must be in [0,1)").createWithDefault(0.5)

Storage可以借用任意多的Execution内存,直到Execution重新要回。此时被Cache的块会被从内存中evict掉(具体如何evict,根据每个Block的存储级别)。Execution也可以借用任意多的Storage的,但是Execution的借用不能被Storage驱逐,原因是因为实现起来很复杂。我们在稍后将看到,Spark没有一个统一的资源分配的入口。

除了堆内内存,Spark还可以使用堆外内存。为什么要有这个东西呢?原因是提高内存使用率、提高Shuffle时排序的效率等。由于Spark任务的性质,使用堆外内存能够更精细化地管理,而不需要通过JVM里面的GC,并且序列化数据的占用空间也可以被精确计算。此外,序列化也能节省内存开销。堆外内存在Spark 2.0之后由Tachyon迁移到了JDK Unsafe API实现。可通过配置spark.memory.offHeap.enabled参数启用堆外内存,并由spark.memory.offHeap.size参数设定堆外空间的大小。除了没有other 空间,堆外内存与堆内内存的划分方式相同,所有运行中的并发任务共享存储内存和执行内存。

MemoryManager

Spark中负责文件管理的类是MemoryManager,它是一个抽象类,被SparkEnv持有。在1.6版本后引入的UnifiedMemoryManager是它的一个实现。

1
2
// SparkEnv.scala
val memoryManager: MemoryManager = UnifiedMemoryManager(conf, numUsableCores)

UnifiedMemoryManager实现了诸如acquireExecutionMemory等方法来分配内存。通过在acquireExecutionMemory时传入一个MemoryMode可以告知是从堆内请求还是从堆外请求。需要注意的是,这类的函数并不像malloc一样直接去请求一段内存,并返回内存的地址,而是全局去维护每个Task所使用的内存大小。每一个Task在申请内存(new对象)之前都会去检查一下自己有没有超标,否则就去Spill。也就是说MemoryManager实际上是一个外挂式的内存管理系统,它不实际上托管内存,整个内存还是由JVM管理的。
对Task的Execution内存使用进行跟踪的这个机制被实现ExecutionMemoryPool中,如下面的代码所示。

1
2
3
// ExecutionMemoryPool.scala 
// 保存每一个Task所占用的内存大小
private val memoryForTask = new mutable.HashMap[Long, Long]()

当然,有ExecutionMemoryPool就也有StorageMemoryPool,他们都不出所料继承了MemoryPool。而以上这些Pool最后都被MemoryManager所持有。

1
2
3
4
5
6
7
8
9
// MemoryManager.scala
@GuardedBy("this")
protected val onHeapStorageMemoryPool = new StorageMemoryPool(this, MemoryMode.ON_HEAP)
@GuardedBy("this")
protected val offHeapStorageMemoryPool = new StorageMemoryPool(this, MemoryMode.OFF_HEAP)
@GuardedBy("this")
protected val onHeapExecutionMemoryPool = new ExecutionMemoryPool(this, MemoryMode.ON_HEAP)
@GuardedBy("this")
protected val offHeapExecutionMemoryPool = new ExecutionMemoryPool(this, MemoryMode.OFF_HEAP)

请求内存的流程

我们知道,在Shuffle操作中有两个内存使用大户ExecutorSorterExternalAppendOnlyMap,都继承了Spillable,从而实现了在内存不足时进行Spill。我们查看对应的maybeSpill方法,它调用了自己父类MemoryConsumer中的acquireExecutionMemory方法。由于从代码注释上看似乎MemoryConsumer包括它引用到的TaskMemoryManager类都与Tungsten有关,所以我们将在稍后进行研究。目前只是列明调用过程,因为如果其中涉及要向Spark托管内存请求分配,最终调用的还是UnifiedMemoryManager中的对应方法。

1
2
3
4
5
6
7
8
9
10
11
12
13
14
15
16
17
18
19
20
21
22
23
// Spillable.scala
// 在maybeSpill方法中
val granted = acquireMemory(amountToRequest)

// MemoryConsumer.scala
public long acquireMemory(long size) {
long granted = taskMemoryManager.acquireExecutionMemory(size, this);
used += granted;
return granted;
}

// TaskMemoryManager.java
public long acquireExecutionMemory(long required, MemoryConsumer consumer) {
assert(required >= 0);
assert(consumer != null);
MemoryMode mode = consumer.getMode();
synchronized (this) {
long got = memoryManager.acquireExecutionMemory(required, taskAttemptId, mode);
...

// Executor.scala
// TaskMemoryManager中的memoryManager,其实就是一个UnifiedMemoryManager
val taskMemoryManager = new TaskMemoryManager(env.memoryManager, taskId)

下面,我们来看acquireExecutionMemory的详细实现。它前面会首先根据memoryMode选择使用的MemoryPool,是堆内的,还是堆外的。然后它会有个函数maybeGrowExecutionPool,用来处理在需要的情况下从Storage部分挤占一些内存回来。我们可以在稍后详看这个方法。现在,我们发现acquireExecutionMemory会往对应的MemoryPool发一个调用acquireMemory

1
2
3
4
5
6
7
8
9
10
11
// UnifiedMemoryManager.scala
override private[memory] def acquireExecutionMemory(
...
// 实际上是一个ExecutionMemoryPool
executionPool.acquireMemory(
numBytes, taskAttemptId, maybeGrowExecutionPool, () => computeMaxExecutionPoolSize)
}

// MemoryManager.scala
@GuardedBy("this")
protected val onHeapExecutionMemoryPool = new ExecutionMemoryPool(this, MemoryMode.ON_HEAP)

由于我们讨论的场景就是请求堆内的执行内存,所以就进入ExecutionMemoryPool.scala查看相关代码。在Spark中,会尝试保证每个Task能够得到合理份额的内存,而不是让某些Task的内存持续增大到一定的数量,然后导致其他人持续地Spill到Disk。
如果有N个任务,那么保证每个Task在Spill前可以获得至少1 / 2N的内存,并且最多只能获得1 / N。因为N是持续变化的,所以我们需要跟踪活跃Task集合,并且持续在等待Task集合中更新1 / 2N1 / N的值。这个是借助于同步机制实现的,在1.6之前,是由ShuffleMemoryManager来仲裁的。

1
2
3
4
5
6
7
8
9
10
11
12
13
14
15
16
17
18
19
20
21
22
23
24
25
26
27
28
29
30
31
32
33
34
35
36
37
38
39
40
41
42
43
44
45
46
47
48
49
50
51
52
53
54
55
// ExecutionMemoryPool.scala 

// 保存每一个Task所占用的内存大小
private val memoryForTask = new mutable.HashMap[Long, Long]()
private[memory] def acquireMemory(
numBytes: Long,
taskAttemptId: Long,
maybeGrowPool: Long => Unit = (additionalSpaceNeeded: Long) => Unit,
computeMaxPoolSize: () => Long = () => poolSize): Long = lock.synchronized {
assert(numBytes > 0, s"invalid number of bytes requested: $numBytes")

// TODO: clean up this clunky method signature

// 如果我们没有Track到这个Task,那么就加到memoryForTask
if (!memoryForTask.contains(taskAttemptId)) {
memoryForTask(taskAttemptId) = 0L
// 通知wait集合中的Task更新自己的numTasks
lock.notifyAll()
}

// TODO: simplify this to limit each task to its own slot
// 尝试寻找,直到要么我们确定我们不愿意给它内存(因为超过1/N)了,
// 或者我们有足够的内存提供。注意我们保证每个Task的1/2N的底线
while (true) {
val numActiveTasks = memoryForTask.keys.size
val curMem = memoryForTask(taskAttemptId)

// 在每一次迭代中,首先尝试从Storage借用的内存中拿回部分内存。
// 这是必要的,否则可能发生竞态,此时新的Storage Block会再把这个Task需要的执行内存拿回来。
maybeGrowPool(numBytes - memoryFree)

// maxPoolSize是内存池扩容之后可能的最大大小。
// 通过这个值,可以计算所谓的1/N和1/2N具体有多大。在计算时必须考虑可能被释放的内存(例如evicting cached blocks),否则就会导致SPARK-12155的问题
val maxPoolSize = computeMaxPoolSize()
val maxMemoryPerTask = maxPoolSize / numActiveTasks
val minMemoryPerTask = poolSize / (2 * numActiveTasks)

// 最多再给这么多内存
val maxToGrant = math.min(numBytes, math.max(0, maxMemoryPerTask - curMem))
// 实际上能给这么多内存
val toGrant = math.min(maxToGrant, memoryFree)

// 虽然我们尝试让每个Task尽可能得到1/2N的内存,
// 但由于Task数量是动态变化的,可能在N增长前,老的Task就把内存吃完了
// 所以如果我们给不了这么多内存的话,就让它睡在wait上面
if (toGrant < numBytes && curMem + toGrant < minMemoryPerTask) {
logInfo(s"TID $taskAttemptId waiting for at least 1/2N of $poolName pool to be free")
lock.wait()
} else {
memoryForTask(taskAttemptId) += toGrant
return toGrant
}
}
0L // Never reached
}

Tungsten内存管理机制

Tungsten不依赖于Java对象,所以堆内和堆外的内存分配都可以支持。序列化时间相比原生的要加快很多。其优化主要包含三点:

  1. Memory Management and Binary Processing
  2. Cache-aware computation
  3. Code generation
    这个是为了解决在Spark 2.0之前SparkSQL使用的Volcano中大量的链式next()导致的性能(虚函数等)问题。

在内存管理部分,能看到诸如TaskMemoryManager.java的文件;在稍后的Shuffle部分,能看到诸如UnsafeWriter.java的文件。这些Java文件在实现上就有对Tungsten的使用,因为用到了sun.misc.Unsafe的API,所以使用Tungsten的shuffle又叫Unsafe shuffle。

MemoryManager中持有了Tungsten内存管理机制的核心类tungstenMemoryAllocator: MemoryAllocator。并设置了tungstenMemoryMode指示其分配内存的默认位置,如果MEMORY_OFFHEAP_ENABLED是打开的且MEMORY_OFFHEAP_SIZE是大于0的,那么默认使用堆外内存。

TaskMemoryManager

TaskMemoryManager这个对象被用来管理一个Task的堆内和对外内存分配,因此它能够调度一个Task中各个组件的内存使用情况。当组件需要使用TaskMemoryManager提供的内存时,他们需要继承一个MemoryConsumer类,以便向TaskMemoryManager请求内存。TaskMemoryManager中集成了普通的内存分配机制和Tungsten内存分配机制。

普通分配acquireExecutionMemory

我们跟踪TaskMemoryManager.acquireExecutionMemory相关代码,它先尝试从MemoryManager直接请求内存

1
2
3
4
5
6
7
8
9
10
// TaskMemoryManager.scala
public long acquireExecutionMemory(long required, MemoryConsumer consumer) {
assert(required >= 0);
assert(consumer != null);
MemoryMode mode = consumer.getMode();
// 如果我们在分配堆外内存的页,并且受到一个对堆内内存的请求,
// 那么没必要去Spill,因为怎么说也只是Spill的堆外内存。
// 不过现在改这个风险很大。。。。
synchronized (this) {
long got = memoryManager.acquireExecutionMemory(required, taskAttemptId, mode);

如果请求不到,那么先尝试让同一个TaskMemoryManager上的其他的Consumer Spill,以减少Spill频率,从而减少Spill出来的小文件数量。主要是根据每个Consumer的内存使用排个序,从而避免重复对同一个Consumer进行Spill,导致产生很多小文件。

1
2
3
4
5
6
7
8
9
10
11
12
...
if (got < required) {
TreeMap<Long, List<MemoryConsumer>> sortedConsumers = new TreeMap<>();
for (MemoryConsumer c: consumers) {
if (c != consumer && c.getUsed() > 0 && c.getMode() == mode) {
long key = c.getUsed();
List<MemoryConsumer> list =
sortedConsumers.computeIfAbsent(key, k -> new ArrayList<>(1));
list.add(c);
}
}
...

现在,我们对排序得到的一系列sortedConsumers进行spill,一旦成功释放出内存,就立刻向MemoryManager去请求这些内存,相关代码没啥可看的,故省略。如果内存还是不够,就Spill自己,如果成功了,就向MemoryManager请求内存。

1
2
3
4
5
6
7
8
9
10
11
12
13
14
15
16
17
18
19
20
...
// call spill() on itself
if (got < required) {
try {
long released = consumer.spill(required - got, consumer);
if (released > 0) {
logger.debug("Task {} released {} from itself ({})", taskAttemptId,
Utils.bytesToString(released), consumer);
got += memoryManager.acquireExecutionMemory(required - got, taskAttemptId, mode);
}
} catch (ClosedByInterruptException e) {
...
}
}

consumers.add(consumer);
logger.debug("Task {} acquired {} for {}", taskAttemptId, Utils.bytesToString(got), consumer);
return got;
}
}

Tungsten分配allocatePage

TaskMemoryManager还有个allocatePage方法,用来获得MemoryBlock,这个是通过Tungsten机制分配的。TaskMemoryManager使用了类似操作系统中分页的机制来操控内存。每个“页”,也就是MemoryBlock对象,维护了一段堆内或者堆外的内存。页的总数由PAGE_NUMBER_BITS来决定,即对于一个64位的地址,高PAGE_NUMBER_BITS(默认13)位表示一个页,而后面的位表示在页内的偏移。当然,如果是堆外内存,那么这个64位就直接是内存地址了。有关使用分页机制的原因在TaskMemoryManager.java有介绍,我暂时没看懂。

需要注意的是,即使使用Tungsten分配,仍然不能绕开UnifiedMemoryManager机制的管理,所以我们看到在allocatePage方法中先要通过acquireExecutionMemory方法注册,请求到逻辑内存之后,再通过下面的方法请求物理内存

1
2
3
4
5
6
// TaskMemoryManager.scala
long acquired = acquireExecutionMemory(size, consumer);
if (acquired <= 0) {
return null;
}
page = memoryManager.tungstenMemoryAllocator().allocate(acquired);

Spark Job执行流程分析

Job阶段

下面我们通过一个RDD上的Action操作count,查看Spark的Job是如何运行和调度的。特别注意的是,在SparkSQL中,Action操作有不同的执行流程,所以宜对比着看。count通过全局的SparkContext.runJob启动一个Job,这个函数转而调用DAGScheduler.runJobUtils.getIteratorSize实际上就是遍历一遍迭代器,以便统计count。

1
2
3
4
5
6
7
8
9
10
11
// RDD.scala
def count(): Long = sc.runJob(this, Utils.getIteratorSize _).sum
// Utils.scala
def getIteratorSize(iterator: Iterator[_]): Long = {
var count = 0L
while (iterator.hasNext) {
count += 1L
iterator.next()
}
count
}

在参数列表里面的下划线_的作用是将方法转为函数,而方法和函数的定义和区别可参考我的另一篇文章
下面查看runJob函数。比较有趣的是clean函数,它调用ClosureCleaner.clean方法,这个方法用来清理$outer域中未被引用的变量。因为我们要将闭包func序列化,并从Driver发送到Executor上面。序列化闭包的过程就是为每一个闭包生成一个可序列化类,在生成时,会将这个闭包所引用的外部对象也序列化。容易发现,如果我们为了使用外部对象的某些字段,而序列化整个对象,那么开销是很大的,因此通过clean来清除不需要的部分以减少序列化开销。此外,getCallSite用来生成诸如s"$lastSparkMethod at $firstUserFile:$firstUserLine"这样的字符串,它实际上会回溯调用栈,找到第一个不是在Spark包中的函数,即$lastSparkMethod,它是导致一个RDD创建的函数,比如各种Transform操作、sc.parallelize等。

1
2
3
4
5
6
7
8
9
10
11
12
13
14
15
16
17
18
19
20
21
22
23
24
// SparkContext.scala
def runJob[T, U: ClassTag](
rdd: RDD[T],
func: (TaskContext, Iterator[T]) => U,
partitions: Seq[Int],
resultHandler: (Int, U) => Unit): Unit = {
if (stopped.get()) {
throw new IllegalStateException("SparkContext has been shutdown")
}
val callSite = getCallSite
val cleanedFunc = clean(func)
logInfo("Starting job: " + callSite.shortForm)
if (conf.getBoolean("spark.logLineage", false)) {
logInfo("RDD's recursive dependencies:\n" + rdd.toDebugString)
}
dagScheduler.runJob(rdd, cleanedFunc, partitions, callSite, resultHandler, localProperties.get)
progressBar.foreach(_.finishAll())
// CheckPoint机制
rdd.doCheckpoint()
}
private[spark] def clean[F <: AnyRef](f: F, checkSerializable: Boolean = true): F = {
ClosureCleaner.clean(f, checkSerializable)
f
}

我们发现,传入的func只接受一个Iterator[_]参数,但是其形参声明却是接受TaskContextIterator[T]两个参数。这是为什么呢?这是因为runJob有不少重载函数,例如下面的这个

1
2
3
4
5
6
7
def runJob[T, U: ClassTag](
rdd: RDD[T],
func: Iterator[T] => U,
partitions: Seq[Int]): Array[U] = {
val cleanedFunc = clean(func)
runJob(rdd, (ctx: TaskContext, it: Iterator[T]) => cleanedFunc(it), partitions)
}

下面我们查看DAGScheduler.runJob函数,它实际上就是调用submitJob,然后等待Job执行的结果。由于Spark的DAGScheduler是基于事件循环的,它拥有一个DAGSchedulerEventProcessLoop类型的变量eventProcessLoop,不同的对象向它post事件,然后在它的onReceive循环中会依次对这些事件调用处理函数。
我们需要注意的是partitions不同于我们传入的rdd.partitions,前者是一个Array[Int],后者是一个Array[Partition]。并且在逻辑意义上,前者表示需要计算的partition,对于如first之类的Action操作来说,它只是rdd的所有partition的一个子集,我们将在稍后的submitMissingTasks函数中继续看到这一点。

1
2
3
4
5
6
7
8
9
10
11
12
13
14
15
16
17
18
19
20
21
22
23
24
25
26
27
28
29
30
31
32
33
34
35
36
37
38
39
40
41
42
43
44
45
46
47
48
49
50
51
52
53
54
55
56
57
58
59
60
61
62
63
def runJob[T, U](...): Unit = {
val start = System.nanoTime
val waiter = submitJob(rdd, func, partitions, callSite, resultHandler, properties)

// 下面就是在等了
ThreadUtils.awaitReady(waiter.completionFuture, Duration.Inf)
waiter.completionFuture.value.get match {
case scala.util.Success(_) =>
logInfo("Job %d finished: %s, took %f s".format
(waiter.jobId, callSite.shortForm, (System.nanoTime - start) / 1e9))
case scala.util.Failure(exception) =>
logInfo("Job %d failed: %s, took %f s".format
(waiter.jobId, callSite.shortForm, (System.nanoTime - start) / 1e9))
// SPARK-8644: Include user stack trace in exceptions coming from DAGScheduler.
val callerStackTrace = Thread.currentThread().getStackTrace.tail
exception.setStackTrace(exception.getStackTrace ++ callerStackTrace)
throw exception
}
}

def submitJob[T, U](
rdd: RDD[T], // target RDD to run tasks on,就是被执行count的RDD
func: (TaskContext, Iterator[T]) => U, // 在RDD每一个partition上需要跑的函数
partitions: Seq[Int],
callSite: CallSite, // 被调用的位置
resultHandler: (Int, U) => Unit,
properties: Properties): JobWaiter[U] = {
// 检查是否在一个不存在的分区上创建一个Task
val maxPartitions = rdd.partitions.length
partitions.find(p => p >= maxPartitions || p < 0).foreach { p =>
throw new IllegalArgumentException( "Attempting to access a non-existent partition: " + p + ". " + "Total number of partitions: " + maxPartitions)}

// jobId是从后往前递增的
val jobId = nextJobId.getAndIncrement()
if (partitions.isEmpty) {
val time = clock.getTimeMillis()
// listenerBus是一个LiveListenerBus对象,从DAGScheduler构造时得到,用来做event log
// SparkListenerJobStart定义在SparkListener.scala文件中
listenerBus.post(SparkListenerJobStart(jobId, time, Seq[Info](), SerializationUtils.clone(properties)))
listenerBus.post(SparkListenerJobEnd(jobId, time, JobSucceeded))
// 如果partitions是空的,那么就直接返回
return new JobWaiter[U](this, jobId, 0, resultHandler)
}

assert(partitions.nonEmpty)
val func2 = func.asInstanceOf[(TaskContext, Iterator[_]) => _]
val waiter = new JobWaiter[U](this, jobId, partitions.size, resultHandler)
// 我们向eventProcessLoop提交一个JobSubmitted事件
eventProcessLoop.post(JobSubmitted(
jobId, rdd, func2, partitions.toArray, callSite, waiter,
SerializationUtils.clone(properties)))
waiter
}
// DAGSchedulerEvent.scala
private[scheduler] case class JobSubmitted(
jobId: Int,
finalRDD: RDD[_],
func: (TaskContext, Iterator[_]) => _,
partitions: Array[Int],
callSite: CallSite,
listener: JobListener,
properties: Properties = null)
extends DAGSchedulerEvent

下面我们具体看看对JobSubmitted的响应

1
2
3
4
5
6
7
8
9
10
11
12
13
14
15
16
17
18
19
20
21
22
23
24
// DAGScheduler.scala
private[scheduler] def handleJobSubmitted(...) {
var finalStage: ResultStage = null
// 首先我们尝试创建一个`finalStage: ResultStage`,这是整个Job的最后一个Stage。
try {
// func: (TaskContext, Iterator[_]) => _
// 下面的语句是可能抛BarrierJobSlotsNumberCheckFailed或者其他异常的,
// 例如一个HadoopRDD所依赖的HDFS文件被删除了
finalStage = createResultStage(finalRDD, func, partitions, jobId, callSite)
} catch {
...

// DAGScheduler.scala
private def createResultStage(...): ResultStage = {
checkBarrierStageWithDynamicAllocation(rdd)
checkBarrierStageWithNumSlots(rdd)
checkBarrierStageWithRDDChainPattern(rdd, partitions.toSet.size)
val parents = getOrCreateParentStages(rdd, jobId)
val id = nextStageId.getAndIncrement()
val stage = new ResultStage(id, rdd, func, partitions, parents, jobId, callSite)
stageIdToStage(id) = stage
updateJobIdStageIdMaps(jobId, stage)
stage
}

这里createResultStage所返回的ResultStage继承了Stage类。Stage类有个rdd参数,对ResultStage而言就是finalRDD,对ShuffleMapStage而言就是ShuffleDependency.rdd

1
2
3
4
5
// DAGScheduler.scala
def createShuffleMapStage[K, V, C](
shuffleDep: ShuffleDependency[K, V, C], jobId: Int): ShuffleMapStage = {
val rdd = shuffleDep.rdd
...

下面我们来看看checkBarrierStageWithNumSlots这个函数,因为它会抛出BarrierJobSlotsNumberCheckFailed这个异常,被handleJobSubmitted捕获。这个函数主要是为了检测是否有足够的slots去运行所有的barrier task。屏障调度器是Spark为了支持深度学习在2.4.0版本所引入的一个特性。它要求在barrier stage中同时启动所有的Task,当任意的task执行失败的时候,总是重启整个barrier stage。这么麻烦是因为Spark希望能够在Task中提供一个barrier以供显式同步。

1
2
3
4
5
6
7
8
9
10
11
12
13
14
15
16
17
18
19
20
21
22
23
24
25
26
27
28
29
30
31
32
33
34
35
36
37
38
39
40
41
42
43
44
// DAGScheduler.scala
private def checkBarrierStageWithNumSlots(rdd: RDD[_]): Unit = {
val numPartitions = rdd.getNumPartitions
val maxNumConcurrentTasks = sc.maxNumConcurrentTasks
if (rdd.isBarrier() && numPartitions > maxNumConcurrentTasks) {
throw new BarrierJobSlotsNumberCheckFailed(numPartitions, maxNumConcurrentTasks)
}
}

// DAGScheduler.scala
...
case e: BarrierJobSlotsNumberCheckFailed =>
// If jobId doesn't exist in the map, Scala coverts its value null to 0: Int automatically.
// barrierJobIdToNumTasksCheckFailures是一个ConcurrentHashMap,表示对每个BarrierJob上失败的Task数量
val numCheckFailures = barrierJobIdToNumTasksCheckFailures.compute(jobId,
(_: Int, value: Int) => value + 1)

...

if (numCheckFailures <= maxFailureNumTasksCheck) {
messageScheduler.schedule(
new Runnable {
override def run(): Unit = eventProcessLoop.post(JobSubmitted(jobId, finalRDD, func,
partitions, callSite, listener, properties))
},
timeIntervalNumTasksCheck,
TimeUnit.SECONDS
)
return
} else {
// Job failed, clear internal data.
barrierJobIdToNumTasksCheckFailures.remove(jobId)
listener.jobFailed(e)
return
}

case e: Exception =>
logWarning("Creating new stage failed due to exception - job: " + jobId, e)
listener.jobFailed(e)
return
}
// Job submitted, clear internal data.
barrierJobIdToNumTasksCheckFailures.remove(jobId)
...

下面开始创建Job。ActiveJob表示在DAGScheduler里面运行的一个Job。

1
2
3
4
5
6
7
8
9
10
11
12
13
14
15
16
17
18
19
// DAGScheduler.scala
...
val job = new ActiveJob(jobId, finalStage, callSite, listener, properties)
clearCacheLocs()
// 在这里会打印四条日志,这个可以被用来在Spark.log里面定位事件
logInfo("Got job %s (%s) with %d output partitions".format(
job.jobId, callSite.shortForm, partitions.length))
logInfo("Final stage: " + finalStage + " (" + finalStage.name + ")")
logInfo("Parents of final stage: " + finalStage.parents)
logInfo("Missing parents: " + getMissingParentStages(finalStage))

...

val stageIds = jobIdToStageIds(jobId).toArray
val stageInfos = stageIds.flatMap(id => stageIdToStage.get(id).map(_.latestInfo))
listenerBus.post(SparkListenerJobStart(job.jobId, jobSubmissionTime, stageInfos, properties))
// 从最后一个stage开始调用submitStage
submitStage(finalStage)
}

Job只负责向“叶子”Stage要结果,而之前Stage的运行是由DAGScheduler来调度的。这是因为若干Job可能共用同一个Stage的计算结果,所以将某个Stage强行归属到某个Job是不符合Spark设计逻辑的。我这么说的原因有一下两点

  1. 在下面的论述中可以看到,在getMissingParentStages中会调用getOrCreateShuffleMapStage去取某个Stage。
  2. 根据爆栈网Stage中定义了一个jobIds,它是一个HashSet,也暗示了其可以被复用。
    1
    2
    3
    4
    private[scheduler] abstract class Stage(...) extends Logging {
    ...
    /** Set of jobs that this stage belongs to. */
    val jobIds = new HashSet[Int]

Stage阶段

Stage是如何划分的呢?又是如何计算Stage之间的依赖的?我们继续查看submitStage这个函数,对于一个Stage,首先调用getMissingParentStages看看它的父Stage能不能直接用,也就是说这个Stage的rdd所依赖的所有父RDD能不能直接用,如果不行的话,就要先算父Stage的。在前面的论述里,我们知道,若干Job可能共用同一个Stage的计算结果,而不同的Stage也可能依赖同一个RDD。

1
2
3
4
5
6
7
8
9
10
11
12
13
14
15
16
17
18
19
20
21
22
23
24
25
private def submitStage(stage: Stage) {
// 找到这个stage所属的job
val jobId = activeJobForStage(stage)
if (jobId.isDefined) {
logDebug("submitStage(" + stage + ")")
if (!waitingStages(stage) && !runningStages(stage) && !failedStages(stage)) {
// 如果依赖之前的Stage,先列出来,并且按照id排序
val missing = getMissingParentStages(stage).sortBy(_.id)
logDebug("missing: " + missing)
if (missing.isEmpty) {
// 运行这个Stage
logInfo("Submitting " + stage + " (" + stage.rdd + "), which has no missing parents")
submitMissingTasks(stage, jobId.get)
} else {
// 先提交所有的parent stage
for (parent <- missing) {
submitStage(parent)
}
waitingStages += stage
}
}
} else {
abortStage(stage, "No active job for stage " + stage.id, None)
}
}

下面具体查看getMissingParentStages这个函数,可以看到,Stage的计算链是以最后一个RDD为树根逆着向上遍历得到的,而这个链条的终点要么是一个ShuffleDependency,要么是一个所有分区都被缓存了的RDD。

1
2
3
4
5
6
7
8
9
10
11
12
13
14
15
16
17
18
19
20
21
22
23
24
25
26
27
28
29
30
31
32
33
34
35
36
private def getMissingParentStages(stage: Stage): List[Stage] = {
val missing = new HashSet[Stage]
val visited = new HashSet[RDD[_]]
val waitingForVisit = new ListBuffer[RDD[_]]
// 这里是个**DFS**,栈是手动维护的,主要是为了防止爆栈
waitingForVisit += stage.rdd
def visit(rdd: RDD[_]): Unit = {
if (!visited(rdd)) {
visited += rdd
val rddHasUncachedPartitions = getCacheLocs(rdd).contains(Nil)
if (rddHasUncachedPartitions) {
// 如果这个RDD有没有被缓存的Partition,那么它就需要被计算
for (dep <- rdd.dependencies) {
// 我们检查这个RDD的所有依赖
dep match {
case shufDep: ShuffleDependency[_, _, _] =>
// 我们发现一个宽依赖,因此我们创建一个新的Shuffle Stage,并加入到missing中(如果不存在)
// 由于是宽依赖,所以我们不需要向上找了
val mapStage = getOrCreateShuffleMapStage(shufDep, stage.firstJobId)
if (!mapStage.isAvailable) {
missing += mapStage
}
case narrowDep: NarrowDependency[_] =>
// 如果是一个窄依赖,就加入到waitingForVisit中
// prepend是在头部加,+=是在尾部加
waitingForVisit.prepend(narrowDep.rdd)
}
}
}
}
}
while (waitingForVisit.nonEmpty) {
visit(waitingForVisit.remove(0))
}
missing.toList
}

Task阶段

下面是重头戏submitMissingTasks,这个方法负责生成TaskSet,并且将它提交给TaskScheduler低层调度器。
partitionsToCompute计算有哪些分区是待计算的。根据Stage类型的不同,findMissingPartitions的计算方法也不同。

1
2
3
4
5
6
7
8
9
10
11
12
13
14
15
16
17
18
19
20
21
22
23
24
25
26
27
28
29
30
31
32
// DAGScheduler.scala
private def submitMissingTasks(stage: Stage, jobId: Int) {
logDebug("submitMissingTasks(" + stage + ")")

// First figure out the indexes of partition ids to compute.
val partitionsToCompute: Seq[Int] = stage.findMissingPartitions()
...

// ResultStage.scala
override def findMissingPartitions(): Seq[Int] = {
val job = activeJob.get
(0 until job.numPartitions).filter(id => !job.finished(id))
}
// ActiveJob.scala
val numPartitions = finalStage match {
// 对于ResultStage,不一定得到当前rdd的所有分区,例如first()和lookup()的Action,
// 因此这里是r.partitions而不是r.rdd.partitions
case r: ResultStage => r.partitions.length
case m: ShuffleMapStage => m.rdd.partitions.length
}

// ShuffleMapStage.scala
override def findMissingPartitions(): Seq[Int] = {
mapOutputTrackerMaster
.findMissingPartitions(shuffleDep.shuffleId)
.getOrElse(0 until numPartitions)
}

// MapOutputTrackerMaster.scala
def findMissingPartitions(shuffleId: Int): Option[Seq[Int]] = {
shuffleStatuses.get(shuffleId).map(_.findMissingPartitions())
}

这个outputCommitCoordinator是由SparkEnv维护的OutputCommitCoordinator对象,它决定到底谁有权利向HDFS写数据。在Executor上的请求会通过他持有的Driver的OutputCommitCoordinatorEndpoint的引用发送给Driver处理

1
2
3
4
5
6
7
8
9
10
11
12
13
14
15
16
17
18
// DAGScheduler.scala
...
// Use the scheduling pool, job group, description, etc. from an ActiveJob associated
// with this Stage
val properties = jobIdToActiveJob(jobId).properties

runningStages += stage
// 在检测Tasks是否serializable之前,就要SparkListenerStageSubmitted,
// 如果不能serializable,那就在这**之后**给一个SparkListenerStageCompleted

stage match {
case s: ShuffleMapStage =>
outputCommitCoordinator.stageStart(stage = s.id, maxPartitionId = s.numPartitions - 1)
case s: ResultStage =>
outputCommitCoordinator.stageStart(
stage = s.id, maxPartitionId = s.rdd.partitions.length - 1)
}
...

getPreferredLocs计算每个分区的最佳计算位置,它实际上是调用getPreferredLocsInternal这个函数。这个函数是一个关于visit: HashSet[(RDD[_], Int)]的递归函数,visit用(rdd, partition)元组唯一描述一个分区。getPreferredLocs的计算逻辑是这样的:

  1. 如果已经visit过了,就返回Nil
  2. 如果是被cached的,通过getCacheLocs返回cache的位置
  3. 如果RDD有自己的偏好位置,例如输入RDD,那么使用rdd.preferredLocations返回它的偏好位置
  4. 如果还没返回,但RDD有窄依赖,那么遍历它的所有依赖项,返回第一个具有位置偏好的依赖项的值

理论上,一个最优的位置选取应该尽可能靠近数据源以减少网络传输,但目前版本的Spark还没有实现

1
2
3
4
5
6
7
8
9
10
11
12
13
14
15
16
17
18
19
20
21
22
// DAGScheduler.scala
...
val taskIdToLocations: Map[Int, Seq[TaskLocation]] = try {
stage match {
case s: ShuffleMapStage =>
partitionsToCompute.map { id => (id, getPreferredLocs(stage.rdd, id))}.toMap
case s: ResultStage =>
partitionsToCompute.map { id =>
val p = s.partitions(id)
(id, getPreferredLocs(stage.rdd, p))
}.toMap
}
} catch {
case NonFatal(e) =>
// 如果有非致命异常就创建一个新的Attempt,并且abortStage(这还不致命么)
stage.makeNewStageAttempt(partitionsToCompute.size)
listenerBus.post(SparkListenerStageSubmitted(stage.latestInfo, properties))
abortStage(stage, s"Task creation failed: $e\n${Utils.exceptionString(e)}", Some(e))
runningStages -= stage
return
}
...

下面,我们开始attempt这个Stage,我们需要将RDD对象和依赖通过closureSerializer序列化成taskBinaryBytes,然后广播得到taskBinary。当广播变量过大时,会产生一条Broadcasting large task binary with size的INFO。

1
2
3
4
5
6
7
8
9
10
11
12
13
14
15
16
17
18
19
20
21
22
23
24
25
26
27
28
29
30
31
32
33
34
35
36
37
38
39
40
// DAGScheduler.scala
...
stage.makeNewStageAttempt(partitionsToCompute.size, taskIdToLocations.values.toSeq)

// 如果没有Task要执行,实际上就是skip了,那么就没有Submission Time这个字段
if (partitionsToCompute.nonEmpty) {
stage.latestInfo.submissionTime = Some(clock.getTimeMillis())
}
listenerBus.post(SparkListenerStageSubmitted(stage.latestInfo, properties))

// TODO: 也许可以将`taskBinary`放到Stage里面以避免对它序列化多次。
// 一堆注释看不懂
var taskBinary: Broadcast[Array[Byte]] = null
var partitions: Array[Partition] = null
try {
var taskBinaryBytes: Array[Byte] = null
// taskBinaryBytes and partitions are both effected by the checkpoint status. We need
// this synchronization in case another concurrent job is checkpointing this RDD, so we get a
// consistent view of both variables.
RDDCheckpointData.synchronized {
taskBinaryBytes = stage match {
case stage: ShuffleMapStage =>
JavaUtils.bufferToArray(closureSerializer.serialize((stage.rdd, stage.shuffleDep): AnyRef))
case stage: ResultStage =>
// 注意这里的stage.func已经被ClosureCleaner清理过了
JavaUtils.bufferToArray(closureSerializer.serialize((stage.rdd, stage.func): AnyRef))
}

partitions = stage.rdd.partitions
}
...
// 广播
taskBinary = sc.broadcast(taskBinaryBytes)
} catch {
// In the case of a failure during serialization, abort the stage.
case e: NotSerializableException =>
abortStage(stage, "Task not serializable: " + e.toString, Some(e))
runningStages -= stage
...
}

下面,我们根据Stage的类型生成Task。

1
2
3
4
5
6
7
8
9
10
11
12
13
14
15
16
17
18
19
20
21
22
23
24
25
26
27
28
29
30
// DAGScheduler.scala
...
val tasks: Seq[Task[_]] = try {
val serializedTaskMetrics = closureSerializer.serialize(stage.latestInfo.taskMetrics).array()
stage match {
case stage: ShuffleMapStage =>
stage.pendingPartitions.clear()
partitionsToCompute.map { id =>
val locs = taskIdToLocations(id)
val part = partitions(id)
stage.pendingPartitions += id
new ShuffleMapTask(stage.id, stage.latestInfo.attemptNumber,
taskBinary, part, locs, properties, serializedTaskMetrics, Option(jobId),
Option(sc.applicationId), sc.applicationAttemptId, stage.rdd.isBarrier())
}

case stage: ResultStage =>
partitionsToCompute.map { id =>
val p: Int = stage.partitions(id)
val part = partitions(p)
val locs = taskIdToLocations(id)
new ResultTask(stage.id, stage.latestInfo.attemptNumber,
taskBinary, part, locs, id, properties, serializedTaskMetrics,
Option(jobId), Option(sc.applicationId), sc.applicationAttemptId,
stage.rdd.isBarrier())
}
}
} catch {
...
}

我们将生成的tasks包装成一个TaskSet,并且提交给taskScheduler

1
2
3
4
5
6
7
8
// DAGScheduler.scala
...
if (tasks.nonEmpty) {
logInfo(s"Submitting ${tasks.size} missing tasks from $stage (${stage.rdd}) (first 15 " +
s"tasks are for partitions ${tasks.take(15).map(_.partitionId)})")
taskScheduler.submitTasks(new TaskSet(
tasks.toArray, stage.id, stage.latestInfo.attemptNumber, jobId, properties))
} else {

如果tasks是空的,说明任务就已经完成了,打上DEBUG日志,并且调用submitWaitingChildStages

1
2
3
4
5
6
7
8
9
10
11
12
13
14
15
16
17
    // Because we posted SparkListenerStageSubmitted earlier, we should mark
// the stage as completed here in case there are no tasks to run
markStageAsFinished(stage, None)

stage match {
case stage: ShuffleMapStage =>
logDebug(s"Stage ${stage} is actually done; " +
s"(available: ${stage.isAvailable}," +
s"available outputs: ${stage.numAvailableOutputs}," +
s"partitions: ${stage.numPartitions})")
markMapStageJobsAsFinished(stage)
case stage : ResultStage =>
logDebug(s"Stage ${stage} is actually done; (partitions: ${stage.numPartitions})")
}
submitWaitingChildStages(stage)
}
}

Shuffle

Shuffle机制是Spark Core的核心内容。在Stage和Stage之间,Spark需要Shuffle数据。这个流程包含上一个Stage上的Shuffle Write,中间的数据传输,以及下一个Stage的Shuffle Read。如下图所示

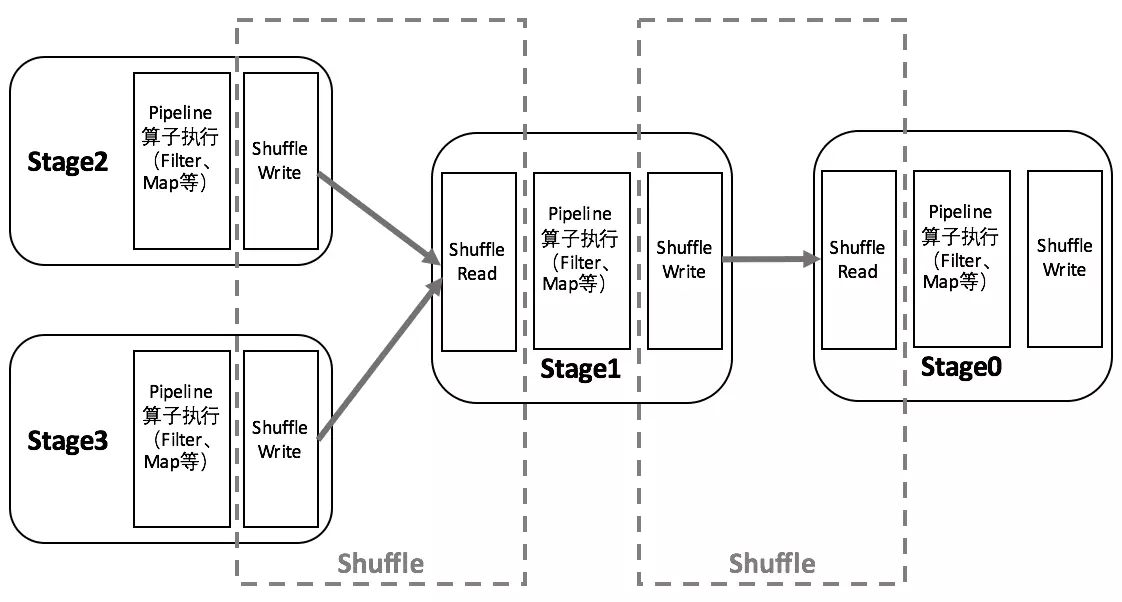
Shuffle类操作常常发生在宽依赖的RDD之间,这类算子需要将多个节点上的数据拉取到同一节点上进行计算,其中存在大量磁盘IO、序列化和网络传输开销,它们可以分为以下几点来讨论。
当Spark中的某个节点故障之后,常常需要重算RDD中的某几个分区。对于窄依赖而言,父RDD的一个分区只对应一个子RDD分区,因此丢失子RDD的分区,重算整个父RDD分区是必要的。而对于宽依赖而言,父RDD会被多个子RDD使用,而可能当前丢失的子RDD只使用了父RDD中的某几个分区的数据,而我们仍然要重新计算整个父RDD,这造成了计算资源的浪费。
当使用Aggregate类(如groupByKey)或者Join类这种Shuffle算子时,如果选择的key上的数据是倾斜(skew)的,会导致部分节点上的负载增大。对于这种情况除了可以增加Executor的内存,还可以重新选择分区函数(例如在之前的key上加盐)来平衡分区。
Shuffle Read操作容易产生OOM,其原因是尽管在BlockStoreShuffleReader中会产生外部排序的resultIter,但在这之前,ExternalAppendOnlyMap先要从BlockManager拉取数据(k, v)到自己的currentMap中,如果这里的v很大,那么就会导致Executor的OOM问题。可以从PairRDDFunctions的文档中佐证这一点。在Dataset中并没有reduceByKey,原因可能与Catalyst Optimizer的优化有关,但考虑到groupByKey还是比较坑的,感觉这个举措并不明智。

Map side combine

Map side combine指的是将聚合操作下推到每个计算节点,在这些节点上预先聚合(Aggregate),将预聚合的结果拉到Driver上进行最终的聚合。这有点类似于Hadoop的Combine操作,目的是为了减少通信,以及为了通信产生的序列化反序列化开销。

Map side combine可以体现在一些新的算子的替换,例如groupByKey -> reduceByKey

Shuffle考古

在Spark0.8版本前,Spark只有Hash Based Shuffle的机制。在这种方式下,假定Shuffle Write阶段(有的也叫Map阶段)有W个Task,在Shuffle Read阶段(有的也叫Reduce阶段)有R个Task,那么就会产生W*R个文件,分别表示从W中某个Task传递到R中的某个Task。这样的坏处是对文件系统产生很大压力,并且IO也差(随机读写)。由于这些文件是先全量在内存里面构造,再dump到磁盘上,所以Shuffle在Write阶段就很可能OOM。

为了解决这个问题,在Spark 0.8.1版本加入了File Consolidation,以求将W个Task的输出尽可能合并。现在,Executor上的每一个执行单位都生成自己独一份的文件。假定所有的Executor总共有C个核心,每个Task占用T个核心,那么总共有C/T个执行单位。考虑极端情况,如果C==T,那么任务实际上是串行的,所以写一个文件就行了。因此,最终会生成C/T*R个文件。

但这个版本仍然没有解决OOM的问题。虽然对于reduce这类操作,比如count,因为是来一个combine一个,所以只要你的V不是数组,一般都没有较大的内存问题。但有的时候我们可能会强行把结果concat成一个数组。考虑执行groupByKey这样的操作,在Read阶段,每个Task需要得到得到自己负责的key对应的所有value,而Shuffle Write产生的是若干很大的文件,里面的key是杂乱无章的。如果我们需要得到一个key对应的所有value,那么我们就需要遍历这个文件,将key和对应的value全部存放在一个结构比如HashMap中,并进行合并。因此,我们必须保证这个HashMap足够大。既然如此,我们很容易想到一个基于外部排序的方案,我们为什么不能对key进行外排呢?确实在Hadoop MapReduce中会做归并排序,因此Reducer侧的数据按照key组织好的了。但Spark在下一个版本才这么做。

在Spark 0.9版本之后,引入了ExternalAppendOnlyMap,通过这个结构,SparkShuffle在combine的时候如果内存不够,就能Spill到磁盘,并在Spill的时候进行排序。当然,内存还是要能承载一个KV的,我们将在稍后的源码分析中深入研究这个问题。

终于在Spark1.1版本之后引入了Sorted Based Shuffle。此时,Shuffle Write阶段会按照Partition ID以及key对记录进行排序。同时将全部结果写到一个数据文件中,同时生成一个索引文件,Shuffle Read的Task可以通过该索引文件获取相关的数据。

在Spark 1.5,Tungsten内存管理机制成为了Spark的默认选项。如果关闭spark.sql.tungsten.enabled,Spark将采用基于Kryo序列化的列式存储格式。
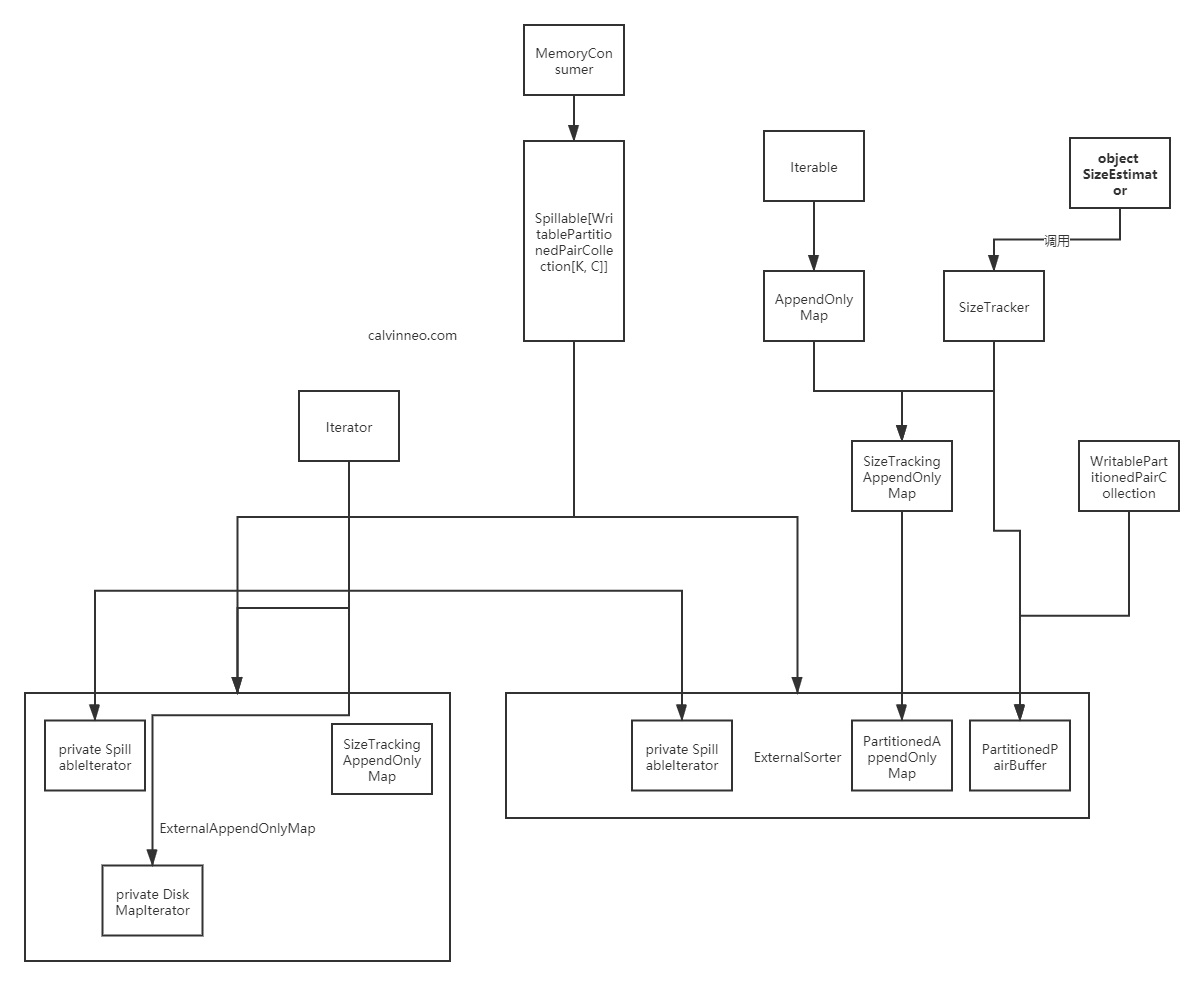
常见对象关系简介

ShuffleManager/SortShuffleManager

ShuffleManager是一个Trait,它的两个实现就是org.apache.spark.shuffle.hash.HashShuffleManager
org.apache.spark.shuffle.sort.SortShuffleManager

如果partition的数量小于spark.shuffle.sort.bypassMergeThreshold,并且我们不需要做map side combine,那么就使用BypassMergeSortShuffleHandle。输出numPartitions个文件,并且在最后merge起来。这么做可以避免普通流程中对Spill的文件进行序列化和反序列化的过程。不好的是需要同时打开多个文件,并且导致很多内存分配。

如果可以进行序列化,就使用SerializedShuffleHandle。

否则就使用BaseShuffleHandle。

1
2
3
4
5
6
7
8
9
10
11
12
13
14
15
16
17
18
19
20
21
22
private[spark] class SortShuffleManager(conf: SparkConf) extends ShuffleManager with Logging {

...
/**
* Obtains a [[ShuffleHandle]] to pass to tasks.
*/
override def registerShuffle[K, V, C](
shuffleId: Int,
numMaps: Int,
dependency: ShuffleDependency[K, V, C]): ShuffleHandle = {
if (SortShuffleWriter.shouldBypassMergeSort(conf, dependency)) {
new BypassMergeSortShuffleHandle[K, V](
shuffleId, numMaps, dependency.asInstanceOf[ShuffleDependency[K, V, V]])
} else if (SortShuffleManager.canUseSerializedShuffle(dependency)) {
// Otherwise, try to buffer map outputs in a serialized form, since this is more efficient:
new SerializedShuffleHandle[K, V](
shuffleId, numMaps, dependency.asInstanceOf[ShuffleDependency[K, V, V]])
} else {
// Otherwise, buffer map outputs in a deserialized form:
new BaseShuffleHandle(shuffleId, numMaps, dependency)
}
}

shouldBypassMergeSort主要判断下面几点:

  1. 是否有Map Side Combine
  2. Partition的数量是否小于bypassMergeThreshold
1
2
3
4
5
6
7
8
9
10
11
private[spark] object SortShuffleWriter {
def shouldBypassMergeSort(conf: SparkConf, dep: ShuffleDependency[_, _, _]): Boolean = {
// We cannot bypass sorting if we need to do map-side aggregation.
if (dep.mapSideCombine) {
false
} else {
val bypassMergeThreshold: Int = conf.getInt("spark.shuffle.sort.bypassMergeThreshold", 200)
dep.partitioner.numPartitions <= bypassMergeThreshold
}
}
}

canUseSerializedShuffle主要判断下面几点:

  1. 是否支持序列化文件
  2. 是否允许Map-side Combine
1
2
3
4
5
6
7
8
9
10
11
12
13
14
15
16
17
18
19
20
21
22
23
24
25
26
27
28
29
30
31
32
33
34
35
private[spark] object SortShuffleManager extends Logging {

/**
* The maximum number of shuffle output partitions that SortShuffleManager supports when
* buffering map outputs in a serialized form. This is an extreme defensive programming measure,
* since it's extremely unlikely that a single shuffle produces over 16 million output partitions.
* */
val MAX_SHUFFLE_OUTPUT_PARTITIONS_FOR_SERIALIZED_MODE =
PackedRecordPointer.MAXIMUM_PARTITION_ID + 1

/**
* Helper method for determining whether a shuffle should use an optimized serialized shuffle
* path or whether it should fall back to the original path that operates on deserialized objects.
*/
def canUseSerializedShuffle(dependency: ShuffleDependency[_, _, _]): Boolean = {
val shufId = dependency.shuffleId
val numPartitions = dependency.partitioner.numPartitions
if (!dependency.serializer.supportsRelocationOfSerializedObjects) {
log.debug(s"Can't use serialized shuffle for shuffle $shufId because the serializer, " +
s"${dependency.serializer.getClass.getName}, does not support object relocation")
false
} else if (dependency.mapSideCombine) {
log.debug(s"Can't use serialized shuffle for shuffle $shufId because we need to do " +
s"map-side aggregation")
false
} else if (numPartitions > MAX_SHUFFLE_OUTPUT_PARTITIONS_FOR_SERIALIZED_MODE) {
log.debug(s"Can't use serialized shuffle for shuffle $shufId because it has more than " +
s"$MAX_SHUFFLE_OUTPUT_PARTITIONS_FOR_SERIALIZED_MODE partitions")
false
} else {
log.debug(s"Can use serialized shuffle for shuffle $shufId")
true
}
}
}

Shuffle完,产生多少个分区呢?这取决于具体的Partitioner,默认是200个。如果指定了Partitioner,通常是有产生Shuffle的时候计算的。例如coalesce会产生一个包装ShuffledRDD的CoalescedRDD。

1
2
3
4
val SHUFFLE_PARTITIONS = buildConf("spark.sql.shuffle.partitions")
.doc("The default number of partitions to use when shuffling data for joins or aggregations.")
.intConf
.createWithDefault(200)

Shuffle Read端源码分析

Shuffle Read一般位于一个Stage的开始,这时候上一个Stage会给我们留下一个ShuffledRDD。在它的compute方法中会首先取出shuffleManager: ShuffleManager

1
2
3
4
5
override def compute(split: Partition, context: TaskContext): Iterator[(K, C)] = {
val dep = dependencies.head.asInstanceOf[ShuffleDependency[K, V, C]]
val metrics = context.taskMetrics().createTempShuffleReadMetrics()
SparkEnv.get.shuffleManager // 由SparkEnv维护的ShuffleManager
...

接着,我们调用shuffleManager.getReader方法返回一个BlockStoreShuffleReader,它用来读取[split.index, split.index + 1)这个区间内的Shuffle数据。接着,它会调用SparkEnv.get.mapOutputTrackergetMapSizesByExecutorId方法。getMapSizesByExecutorId返回一个迭代器Iterator[(BlockManagerId, Seq[(BlockId, Long, Int)])],表示对于某个BlockManagerId,它所存储的Shuffle Write中间结果,包括BlockId、大小和index。
具体实现上,这个方法首先从传入的dep.shuffleHandle中获得当前Shuffle过程的唯一标识shuffleId,然后它会从自己维护的shuffleStatuses中找到shuffleId对应的MapStatus,它应该有endPartition-startPartition这么多个。接着,对这些MapStatus,调用convertMapStatuses获得迭代器。在compute中,实际上就只取当前split这一个Partition的Shuffle元数据。

1
2
3
4
...
.getReader(dep.shuffleHandle, split.index, split.index + 1, context, metrics) // 返回一个BlockStoreShuffleReader
.read().asInstanceOf[Iterator[(K, C)]]
}

ShuffleManager通过调用BlockStoreShuffleReader.read返回一个迭代器Iterator[(K, C)]。在BlockStoreShuffleReader.read方法中,首先得到一个ShuffleBlockFetcherIterator

1
2
3
4
5
6
// BlockStoreShuffleReader.scala
override def read(): Iterator[Product2[K, C]] = {
val wrappedStreams = new ShuffleBlockFetcherIterator(
...
) // 返回一个ShuffleBlockFetcherIterator
.toCompletionIterator // 返回一个Iterator[(BlockId, InputStream)]

ShuffleBlockFetcherIteratorfetchUpToMaxBytes()fetchLocalBlocks()分别读取remote和local的Block。在拉取远程数据的时候,会统计bytesInFlightreqsInFlight等信息,并使用maxBytesInFlightmaxReqsInFlight节制。同时,为了允许5个并发同时拉取数据,还会设置targetRemoteRequestSize = math.max(maxBytesInFlight / 5, 1L)去请求每次拉取数据的最大大小。通过ShuffleBlockFetcherIterator.splitLocalRemoteBytes,现在改名叫partitionBlocksByFetchMode函数,可以将blocks分为Local和Remote的。关于两个函数的具体实现,将单独讨论。

1
2
3
4
5
6
7
8
9
10
11
12
13
14
15
16
17
18
19
20
val serializerInstance = dep.serializer.newInstance()

// Create a key/value iterator for each stream
val recordIter = wrappedStreams.flatMap { case (blockId, wrappedStream) =>
serializerInstance.deserializeStream(wrappedStream).asKeyValueIterator
}

// Update the context task metrics for each record read.
// CompletionIterator相比普通的Iterator的区别就是在结束之后会调用一个completion函数
// CompletionIterator通过它伴生对象的apply方法创建,传入第二个参数即completionFunction
val metricIter = CompletionIterator[(Any, Any), Iterator[(Any, Any)]](
recordIter.map { record =>
readMetrics.incRecordsRead(1)
record
},
context.taskMetrics().mergeShuffleReadMetrics())

// An interruptible iterator must be used here in order to support task cancellation
val interruptibleIter = new InterruptibleIterator[(Any, Any)](context, metricIter)
...

经过一系列转换,我们得到一个interruptibleIter。接下来,根据是否有Map Side Combine对它进行聚合。这里的dep来自于BaseShuffleHandle对象,它是一个ShuffleDependency。在前面Spark的任务调度中已经提到,ShuffleDependency就是宽依赖。

1
2
3
4
5
6
7
8
9
10
11
12
13
14
15
16
17
// BlockStoreShuffleReader.scala
...
val aggregatedIter: Iterator[Product2[K, C]] = if (dep.aggregator.isDefined) {
if (dep.mapSideCombine) {
// We are reading values that are already combined
val combinedKeyValuesIterator = interruptibleIter.asInstanceOf[Iterator[(K, C)]]
dep.aggregator.get.combineCombinersByKey(combinedKeyValuesIterator, context)
} else {
// We don't know the value type, but also don't care -- the dependency *should*
// have made sure its compatible w/ this aggregator, which will convert the value
// type to the combined type C
val keyValuesIterator = interruptibleIter.asInstanceOf[Iterator[(K, Nothing)]]
dep.aggregator.get.combineValuesByKey(keyValuesIterator, context)
}
} else {
interruptibleIter.asInstanceOf[Iterator[Product2[K, C]]]
}

这里的aggregatorAggregator[K, V, C],这里的KVC与熟悉combineByKey的是一样的。需要注意的是,在combine的过程中借助了ExternalAppendOnlyMap,这是之前提到的在Spark 0.9中引入的重要特性。通过调用insertAll方法能够将interruptibleIter内部的数据添加到ExternalAppendOnlyMap中,并在之后更新MemoryBytesSpilledDiskBytesSpilledPeakExecutionMemory三个统计维度,这也是我们在Event Log中所看到的统计维度。

1
2
3
4
5
6
7
8
9
10
11
12
13
14
15
16
17
18
19
20
21
22
23
24
25
26
27
28
29
30
31
// Aggregator.scala
case class Aggregator[K, V, C] (
createCombiner: V => C,
mergeValue: (C, V) => C,
mergeCombiners: (C, C) => C) {

def combineValuesByKey(
iter: Iterator[_ <: Product2[K, V]],
context: TaskContext): Iterator[(K, C)] = {
val combiners = new ExternalAppendOnlyMap[K, V, C](createCombiner, mergeValue, mergeCombiners)
combiners.insertAll(iter)
updateMetrics(context, combiners)
combiners.iterator
}

def combineCombinersByKey(
iter: Iterator[_ <: Product2[K, C]],
context: TaskContext): Iterator[(K, C)] = {
val combiners = new ExternalAppendOnlyMap[K, C, C](identity, mergeCombiners, mergeCombiners)
// 同上
}

/** Update task metrics after populating the external map. */
private def updateMetrics(context: TaskContext, map: ExternalAppendOnlyMap[_, _, _]): Unit = {
Option(context).foreach { c =>
c.taskMetrics().incMemoryBytesSpilled(map.memoryBytesSpilled)
c.taskMetrics().incDiskBytesSpilled(map.diskBytesSpilled)
c.taskMetrics().incPeakExecutionMemory(map.peakMemoryUsedBytes)
}
}
}

在获得Aggregate迭代器之后,最后一步,我们要进行排序,这时候就需要用到ExternalSorter这个对象。

1
2
3
4
5
6
7
8
9
10
11
12
13
14
15
16
17
// BlockStoreShuffleReader.scala
...
val resultIter = dep.keyOrdering match {
case Some(keyOrd: Ordering[K]) =>
val sorter = new ExternalSorter[K, C, C](context, ordering = Some(keyOrd), serializer = dep.serializer)
sorter.insertAll(aggregatedIter)
context.taskMetrics().incMemoryBytesSpilled(sorter.memoryBytesSpilled)
context.taskMetrics().incDiskBytesSpilled(sorter.diskBytesSpilled)
context.taskMetrics().incPeakExecutionMemory(sorter.peakMemoryUsedBytes)
// Use completion callback to stop sorter if task was finished/cancelled.
context.addTaskCompletionListener[Unit](_ => {
sorter.stop()
})
CompletionIterator[Product2[K, C], Iterator[Product2[K, C]]](sorter.iterator, sorter.stop())
case None =>
aggregatedIter
}

Spillable

从常见对象关系简介图中可以发现,其实Spillable是一个核心类,它定义了内存不够时的溢出行为。查看定义,发现它继承了MemoryConsumer

1
2
private[spark] abstract class Spillable[C](taskMemoryManager: TaskMemoryManager)
extends MemoryConsumer(taskMemoryManager) with Logging {

另一点有趣的是这个C没有任何诸如上下界的约束,我以为Spark这边会至少给能Spill的容器一点约束啥的。
在这里,我们先来分析一下它的几个主要方法。

maybeSpill是Spillable的主要逻辑,负责调用其他的抽象方法。
我们将在单独的章节论述SizeTracker如何估计集合大小,先看具体的Spill过程,可以梳理出shouldSpill==true的情况:

  1. elementsRead % 32 == 0
  2. currentMemory >= myMemoryThreshold,其中后者默认值为spark.shuffle.spill.initialMemoryThreshold = 5 * 1024 * 1024,随着内存的分配会不断增大。前者为当前估计的Collection的内存大小。
  3. 通过acquireMemory请求的内存不足以扩展到2 * currentMemory的大小,关于这一步骤已经在内存管理部分详细说明了,在这就不详细说了
1
2
3
4
5
6
7
8
9
10
11
12
13
14
15
16
17
18
19
20
// Spillable.scala
protected def maybeSpill(collection: C, currentMemory: Long): Boolean = {
var shouldSpill = false
if (elementsRead % 32 == 0 && currentMemory >= myMemoryThreshold) {
val amountToRequest = 2 * currentMemory - myMemoryThreshold
// 调用对应MemoryConsumer的acquireMemory方法,先尝试获得内存
val granted = acquireMemory(amountToRequest)
myMemoryThreshold += granted
// 如果当前的Collection的内存大于myMemoryThreshold,就说明内存没有被分配足够,这时候要启动spill流程。
shouldSpill = currentMemory >= myMemoryThreshold
}
shouldSpill = shouldSpill || _elementsRead > numElementsForceSpillThreshold
...

// MemoryConsumer.scala
public long acquireMemory(long size) {
long granted = taskMemoryManager.acquireExecutionMemory(size, this);
used += granted;
return granted;
}

下面就是真正Spill的过程了,其实就是调用可能被重载的spill函数。注意_memoryBytesSpilled就是我们在Event Log里面看到的Memory Spill的统计量,他表示在Spill之后我们能够释放多少内存

1
2
3
4
5
6
7
8
9
10
11
12
13
// Spillable.scala
...
// Actually spill
if (shouldSpill) {
_spillCount += 1 // 统计Spill的次数
logSpillage(currentMemory)
spill(collection) // 这个方法有对应的重载
_elementsRead = 0 // 重置强制Spill计数器_elementsRead
_memoryBytesSpilled += currentMemory
releaseMemory()
}
shouldSpill
}

protected def spill(collection: C): Unit 是由子类自己实现的逻辑。


override def spill(size: Long, trigger: MemoryConsumer): Long 是来自MemoryConsumer的接口,会调用forceSpill


protected def forceSpill(): Boolean
这个完全由子类来实现。
一个容易想到的问题是,spillforceSpill有啥区别呢?前者嘛,肯定是被maybeSpill调用的,而后者,根据注释,是会被TaskMemoryManager调用的。当这个任务没有足够多的内存的时候,会调用override def spill(size: Long, trigger: MemoryConsumer): Long这个方法,而这个方法会调用forceSpill


logSpillage函数。其实按道理,只要用到继承了Spillalbe的类,那么就会在Spark.log里面看到相应的log字符串,但我观察了一下,并没有看到在Shuffle密集任务里面看到有过多的Spill。只有观察到UnsafeExternalSorter里面有Thread 102 spilling sort data of 1664.0 MB to disk(0 time so far)

1
2
3
4
5
6
@inline private def logSpillage(size: Long) {
val threadId = Thread.currentThread().getId
logInfo("Thread %d spilling in-memory map of %s to disk (%d time%s so far)"
.format(threadId, org.apache.spark.util.Utils.bytesToString(size),
_spillCount, if (_spillCount > 1) "s" else ""))
}

当然,Spillable也不是一上来就Spill的,也会有个先申请内存的过程。这体现了在maybeSpill中,会先尝试调用自己MemoryConsumer基类的acquireMemory方法尝试获得足够数量的内存。

1
2
3
4
5
6
7
8
9
10
11
12
13
// Initial threshold for the size of a collection before we start tracking its memory usage
// For testing only
private[this] val initialMemoryThreshold: Long =
SparkEnv.get.conf.get(SHUFFLE_SPILL_INITIAL_MEM_THRESHOLD)

// Force this collection to spill when there are this many elements in memory
// For testing only
private[this] val numElementsForceSpillThreshold: Int =
SparkEnv.get.conf.get(SHUFFLE_SPILL_NUM_ELEMENTS_FORCE_SPILL_THRESHOLD)

// Threshold for this collection's size in bytes before we start tracking its memory usage
// To avoid a large number of small spills, initialize this to a value orders of magnitude > 0
@volatile private[this] var myMemoryThreshold = initialMemoryThreshold

SizeTracker

上面讲解了Spillable的特点,在这一章节中,继续介绍Spillable过程中用到的SizeTracker的实现。我们知道非序列化对象在内存存储上是不连续的,我们需要通过遍历迭代器才能知道对象的具体大小,而这个开销是比较大的。因此通过SizeTracker我们可以得到一个内存空间占用的估计值,从来用来判定是否需要Spill。
首先在每次集合更新之后,会调用afterUpdate,当到达采样的阈值nextSampleNum之后,会takeSample

1
2
3
4
5
6
7
// SizeTracker.scala
protected def afterUpdate(): Unit = {
numUpdates += 1
if (nextSampleNum == numUpdates) {
takeSample()
}
}

需要注意,这里不是每一次都要takeSample一次,原因是这个计算开销还是蛮大的(主要是下面要讲的estimate方法)。我们查看定义

1
2
3
4
5
6
7
8
9
10
11
12
/**
* A general interface for collections to keep track of their estimated sizes in bytes.
* We sample with a slow exponential back-off using the SizeEstimator to amortize the time,
* as each call to SizeEstimator is somewhat expensive (order of a few milliseconds).
*/
private[spark] trait SizeTracker {
import SizeTracker._
/**
* Controls the base of the exponential which governs the rate of sampling.
* E.g., a value of 2 would mean we sample at 1, 2, 4, 8, ... elements.
*/
private val SAMPLE_GROWTH_RATE = 1.1

在开头,提到一个exponential back-off。这里的exponential back-off实际上就是每次更新后,随着numUpdates的增大,会更新nextSampleNum,导致调用的次数也会越来越不频繁。而这个nextSampleNum的值是numUpdates*SAMPLE_GROWTH_RATE,默认值是1.1。
takeSample函数中第一句话就涉及多个对象,一个一个来看。

1
2
3
4
// SizeTracker.scala
private def takeSample(): Unit = {
samples.enqueue(Sample(SizeEstimator.estimate(this), numUpdates))
...

SizeEstimator.estimate的实现类似去做一个state队列上的BFS。

1
2
3
4
5
6
7
8
private def estimate(obj: AnyRef, visited: IdentityHashMap[AnyRef, AnyRef]): Long = {
val state = new SearchState(visited)
state.enqueue(obj)
while (!state.isFinished) {
visitSingleObject(state.dequeue(), state)
}
state.size
}

visitSingleObject来具体做这个BFS,会特殊处理Array类型。我们不处理反射,因为反射包里面会引用到很多全局反射对象,这个对象又会应用到很多全局的大对象。同理,我们不处理ClassLoader,因为它里面会应用到整个REPL。反正ClassLoaders和Classes是所有对象共享的

1
2
3
4
5
6
7
8
9
10
11
12
13
14
15
16
17
18
19
20
21
private def visitSingleObject(obj: AnyRef, state: SearchState): Unit = {
val cls = obj.getClass
if (cls.isArray) {
visitArray(obj, cls, state)
} else if (cls.getName.startsWith("scala.reflect")) {

} else if (obj.isInstanceOf[ClassLoader] || obj.isInstanceOf[Class[_]]) {
// Hadoop JobConfs created in the interpreter have a ClassLoader.
} else {
obj match {
case s: KnownSizeEstimation =>
state.size += s.estimatedSize
case _ =>
val classInfo = getClassInfo(cls)
state.size += alignSize(classInfo.shellSize)
for (field <- classInfo.pointerFields) {
state.enqueue(field.get(obj))
}
}
}
}

然后我们创建一个Sample,并且放到队列samples

1
2
3
private object SizeTracker {
case class Sample(size: Long, numUpdates: Long)
}

下面的主要工作就是计算一个bytesPerUpdate

1
2
3
4
5
6
7
8
9
10
11
12
13
14
15
  ...
// Only use the last two samples to extrapolate
// 如果sample太多了,就删除掉一些
if (samples.size > 2) {
samples.dequeue()
}
val bytesDelta = samples.toList.reverse match {
case latest :: previous :: tail =>
(latest.size - previous.size).toDouble / (latest.numUpdates - previous.numUpdates)
// If fewer than 2 samples, assume no change
case _ => 0
}
bytesPerUpdate = math.max(0, bytesDelta)
nextSampleNum = math.ceil(numUpdates * SAMPLE_GROWTH_RATE).toLong
}

我们统计到上次估算之后经历的update数量,并乘以bytesPerUpdate,即可得到总大小

1
2
3
4
5
6
// SizeTracker.scala
def estimateSize(): Long = {
assert(samples.nonEmpty)
val extrapolatedDelta = bytesPerUpdate * (numUpdates - samples.last.numUpdates)
(samples.last.size + extrapolatedDelta).toLong
}

AppendOnlyMap

赋值

下面的代码是AppendOnlyMap.changeValue的实现,它接受一个updateFunc用来更新一个指定K的值。updateFunc接受第一个布尔值,用来表示是不是首次出现这个key。我们需要注意,AppendOnlyMap里面null是一个合法的键,但同时null又作为它里面的哈希表的默认填充,因此它里面有个对null特殊处理的过程。也就是说,如果key是null,会提前将它替换为一个nullValue的值,这个key不会存放到哈希表data里面。这里介绍一下null.asInstanceOf[V]的花里胡哨的语法,

1
2
3
4
5
6
7
8
9
10
11
12
13
14
15
16
17
18
19
20
21
22
23
24
25
26
27
28
29
30
31
32
33
34
35
36
37
38
39
40
41
42
43
44
45
// AppendOnlyMap.scala
// 这里的nullValue和haveNullValue是用来单独处理k为null的情况的,下面会详细说明
private var haveNullValue = false
private var nullValue: V = null.asInstanceOf[V]

def changeValue(key: K, updateFunc: (Boolean, V) => V): V = {
// updateFunc就是从insertAll传入的update
assert(!destroyed, destructionMessage)
val k = key.asInstanceOf[AnyRef]
if (k.eq(null)) {
if (!haveNullValue) {
// 如果这时候还没有null的这个key,就新创建一个
incrementSize()
}
nullValue = updateFunc(haveNullValue, nullValue)
haveNullValue = true
return nullValue
}
var pos = rehash(k.hashCode) & mask
var i = 1
while (true) {
// 乘以2的原因是他按照K1 V1 K2 V2这样放的
val curKey = data(2 * pos)
if (curKey.eq(null)) {
// 如果对应的key不存在,就新创建一个
// 这也是为什么前面要单独处理null的原因,这里的null被用来做placeholder了
// 可以看到,第一个参数传的false,第二个是花里胡哨的null
val newValue = updateFunc(false, null.asInstanceOf[V])
data(2 * pos) = k
data(2 * pos + 1) = newValue.asInstanceOf[AnyRef]
incrementSize()
return newValue
} else if (k.eq(curKey) || k.equals(curKey)) { // 又是从Java继承下来的花里胡哨的特性
val newValue = updateFunc(true, data(2 * pos + 1).asInstanceOf[V])
data(2 * pos + 1) = newValue.asInstanceOf[AnyRef]
return newValue
} else {
// 再散列
val delta = i
pos = (pos + delta) & mask
i += 1
}
}
null.asInstanceOf[V] // Never reached but needed to keep compiler happy
}

下面,我们看看incrementSize的实现,这是一个很经典的以2为底的递增的内存分配。当目前元素数量达到(LOAD_FACTOR * capacity)后,就考虑扩容。

1
2
3
4
5
6
7
8
9
10
11
12
13
/** Increase table size by 1, rehashing if necessary */
private def incrementSize(): Unit = {
curSize += 1
if (curSize > growThreshold) {
growTable()
}
}

private val LOAD_FACTOR = 0.7
private var capacity = nextPowerOf2(initialCapacity)
private var mask = capacity - 1
private var curSize = 0
private var growThreshold = (LOAD_FACTOR * capacity).toInt

迭代器

先来看看destructiveSortedIterator的实现,相比它提供的另一个iterator方法,这个方法同样返回一个Iterator,但是经过排序的。这里destructive的意思是inplace的,会改变原来的容器的状态,因此它不需要使用额外的内存。

1
2
3
4
5
6
7
8
9
10
11
12
13
14
15
16
17
18
19
20
21
22
23
24
25
26
27
28
29
30
31
32
33
34
35
36
37
38
39
40
41
// AppendOnlyMap.scala
/**
* Return an iterator of the map in sorted order. This provides a way to sort the map without
* using additional memory, at the expense of destroying the validity of the map.
*/
def destructiveSortedIterator(keyComparator: Comparator[K]): Iterator[(K, V)] = {
destroyed = true
var keyIndex, newIndex = 0
// 下面这个循环将哈希表里面散乱的KV对压缩到最前面
while (keyIndex < capacity) {
if (data(2 * keyIndex) != null) {
data(2 * newIndex) = data(2 * keyIndex)
data(2 * newIndex + 1) = data(2 * keyIndex + 1)
newIndex += 1
}
keyIndex += 1
}
// 因为nullValue不会存放到哈希表data里面,所以这里除了netIndex,如果说有null的话,还要额外加上1。
assert(curSize == newIndex + (if (haveNullValue) 1 else 0))

new Sorter(new KVArraySortDataFormat[K, AnyRef]).sort(data, 0, newIndex, keyComparator)

// 这是一个经典的iterator的实现,在后面我们也会看到非常类似的写法
new Iterator[(K, V)] {
var i = 0
var nullValueReady = haveNullValue
// 如果没遍历完newIndex,或者nullValue还没遍历到,那么都有next。
def hasNext: Boolean = (i < newIndex || nullValueReady)
def next(): (K, V) = {
if (nullValueReady) {
// 每次都优先返回nullValue
nullValueReady = false
(null.asInstanceOf[K], nullValue)
} else {
val item = (data(2 * i).asInstanceOf[K], data(2 * i + 1).asInstanceOf[V])
i += 1
item
}
}
}
}

ExternalAppendOnlyMap

我们查看ExternalAppendOnlyMap的实现。ExternalAppendOnlyMap拥有一个currentMap管理在内存中存储的键值对们。和一个DiskMapIterator的数组spilledMaps,表示Spill到磁盘上的键值对们。

1
2
@volatile private[collection] var currentMap = new SizeTrackingAppendOnlyMap[K, C]
private val spilledMaps = new ArrayBuffer[DiskMapIterator]

插入

下面,我们来看insertAll这个方法,这个方法也就是将一些KV对,加入ExternalAppendOnlyMap中。
这里的currentMap是一个SizeTrackingAppendOnlyMap。这个东西实际上就是一个AppendOnlyMap,不过给它加上了统计数据大小的功能,主要是借助于SizeTrackerafterUpdateresetSamples两个方法。

1
2
3
4
5
6
7
8
9
10
11
12
13
14
15
16
17
18
19
20
21
22
23
24
25
26
27
28
29
30
31
32
33
34
35
36
// ExternalAppendOnlyMap.scala
def insertAll(entries: Iterator[Product2[K, V]]): Unit = {
if (currentMap == null) {
throw new IllegalStateException(
"Cannot insert new elements into a map after calling iterator")
}
// 我们复用update函数,从而避免每一次都创建一个新的闭包(编程环境这么恶劣的么。。。)
var curEntry: Product2[K, V] = null
val update: (Boolean, C) => C = (hadVal, oldVal) => {
if (hadVal)
// 如果不是第一个V,就merge,类似于reduce的func
// mergeValue: (C, V) => C,
mergeValue(oldVal, curEntry._2)
else
// 如果是第一个V,就新建一个C,类似于return函数
// createCombiner: V => C,
createCombiner(curEntry._2)
}

while (entries.hasNext) {
curEntry = entries.next()
// SizeTracker的特性
val estimatedSize = currentMap.estimateSize()
if (estimatedSize > _peakMemoryUsedBytes) {
_peakMemoryUsedBytes = estimatedSize
}
if (maybeSpill(currentMap, estimatedSize)) {
// 如果发生了Spill,就重新创建一个currentMap
currentMap = new SizeTrackingAppendOnlyMap[K, C]
}

// key: K, updateFunc: (Boolean, C) => C
currentMap.changeValue(curEntry._1, update)
addElementsRead()
}
}

可以看出,在insertAll中主要做了两件事情:

  1. 遍历curEntry <- entries,并通过传入的update函数进行Combine
    在内部存储上,AppendOnlyMap,包括后面将看到的一些其他KV容器,都倾向于将(K, V)对放到哈希表的相邻两个位置,这样的好处应该是避免访问时再进行一次跳转。有关changeValue的实现,我们已经在AppendOnlyMap上进行了讨论。
  2. 估计currentMap的当前大小,并调用currentMap.maybeSpill向磁盘Spill。Spill相关的过程,我们已经在Spillable相关章节进行了说明

读出

下面查看ExternalAppendOnlyMap.iterator这个方法,可以发现如果spilledMaps都是空的,也就是没有Spill的话,就返回内存里面currentMapiterator,否则就返回一个ExternalIterator
对于第一种情况,会用SpillableIterator包裹一下。这个类在很多地方有定义,包括ExternalAppendOnlyMap.scalaExternalSorter.scala里面。在当前使用的实现中,它实际上就是封装了一下Iterator,使得能够spill,转换成CompletionIterator等。我们稍后来看一下这个迭代器的实现。
对于第二种情况,ExternalIterator比较有趣,将在稍后进行讨论。

1
2
3
4
5
6
7
8
9
10
11
12
13
14
15
16
// ExternalAppendOnlyMap.scala
override def iterator: Iterator[(K, C)] = {
...
if (spilledMaps.isEmpty) {
// 如果没有发生Spill
destructiveIterator(currentMap.iterator)
} else {
// 如果发生了Spill
new ExternalIterator()
}
}

def destructiveIterator(inMemoryIterator: Iterator[(K, C)]): Iterator[(K, C)] = {
readingIterator = new SpillableIterator(inMemoryIterator)
readingIterator.toCompletionIterator
}

currentMap.iterator实际上就是一个朴素无华的迭代器的实现。

1
2
3
4
5
6
7
8
9
10
11
12
13
14
15
16
// AppendOnlyMap.scala
def nextValue(): (K, V) = {
if (pos == -1) { // Treat position -1 as looking at the null value
if (haveNullValue) {
return (null.asInstanceOf[K], nullValue)
}
pos += 1
}
while (pos < capacity) {
if (!data(2 * pos).eq(null)) {
return (data(2 * pos).asInstanceOf[K], data(2 * pos + 1).asInstanceOf[V])
}
pos += 1
}
null
}

Spill细节和SpillableIterator的实现

而Spill实际上是走的spillMemoryIteratorToDisk函数

ExternalIterator

下面我们来看ExternalAppendOnlyMapExternalIterator的实现。它是一个典型的外部排序的实现,有一个PQ用来merge。不过这次的迭代器换成了destructiveSortedIterator,sorted的意思就是我们都是排序的了。这个道理也是显而易见的,不sort一下,我们怎么和硬盘上的数据做聚合呢?

1
2
3
4
5
6
7
8
9
10
11
12
13
14
15
// ExternalAppendOnlyMap.scala
val mergeHeap = new mutable.PriorityQueue[StreamBuffer]
val sortedMap = destructiveIterator(currentMap.destructiveSortedIterator(keyComparator))
// 我们得到一个Array的迭代器
val inputStreams = (Seq(sortedMap) ++ spilledMaps).map(it => it.buffered)

inputStreams.foreach { it =>
val kcPairs = new ArrayBuffer[(K, C)]
// 读完所有具有所有相同hash(key)的序列,并创建一个StreamBuffer
// 需要注意的是,由于哈希碰撞的原因,里面可能有多个key
readNextHashCode(it, kcPairs)
if (kcPairs.length > 0) {
mergeHeap.enqueue(new StreamBuffer(it, kcPairs))
}
}

destructiveSortedIterator的实现已经在AppendOnlyMap中进行了介绍。
下面我们来看看实现的ExternalAppendOnlyMap.next()接口函数,它是外部排序中的一个典型的归并过程。我们需要注意的是minBuffer是一个StreamBuffer,维护一个hash(K), VArrayBuffer,类似H1 V1 H1 V2 H2 V3这样的序列,而不是我们想的(K, V)流。因此其中是可能有哈希碰撞的。我们从mergeHeapdequeue出来的StreamBuffer是当前hash(K)最小的所有K的集合。

1
2
3
4
5
6
7
8
9
10
11
12
13
14
15
16
17
18
19
20
21
22
23
24
25
26
27
28
29
30
31
32
33
34
35
36
37
38
39
40
41
// ExternalAppendOnlyMap.scala
override def next(): (K, C) = {
if (mergeHeap.isEmpty) {
// 如果堆是空的,就再见了
throw new NoSuchElementException
}
// Select a key from the StreamBuffer that holds the lowest key hash
// mergeHeap选择所有StreamBuffer中最小hash的,作为minBuffer
val minBuffer = mergeHeap.dequeue()
// minPairs是一个ArrayBuffer[T],表示这个StreamBuffer维护的所有KV对
val minPairs = minBuffer.pairs
val minHash = minBuffer.minKeyHash
// 从一个ArrayBuffer[T]中移出Index为0的项目
val minPair = removeFromBuffer(minPairs, 0)
// 得到非哈希的 (minKey, minCombiner)
val minKey = minPair._1
var minCombiner = minPair._2
assert(hashKey(minPair) == minHash)

// For all other streams that may have this key (i.e. have the same minimum key hash),
// merge in the corresponding value (if any) from that stream
val mergedBuffers = ArrayBuffer[StreamBuffer](minBuffer)
while (mergeHeap.nonEmpty && mergeHeap.head.minKeyHash == minHash) {
val newBuffer = mergeHeap.dequeue()
// 如果newBuffer的key和minKey相等的话(考虑哈希碰撞),就合并
minCombiner = mergeIfKeyExists(minKey, minCombiner, newBuffer)
mergedBuffers += newBuffer
}

// Repopulate each visited stream buffer and add it back to the queue if it is non-empty
mergedBuffers.foreach { buffer =>
if (buffer.isEmpty) {
readNextHashCode(buffer.iterator, buffer.pairs)
}
if (!buffer.isEmpty) {
mergeHeap.enqueue(buffer)
}
}

(minKey, minCombiner)
}

ExternalSorter

ExternalSorter的作用是对输入的(K, V)进行排序,以产生新的(K, C)对,排序过程中可选择进行combine,否则输出的C == V。需要注意的是ExternalSorter不仅被用在Shuffle Read端,也被用在了Shuffle Write端,所以在后面会提到Map-side combine的概念。ExternalSorter具有如下的参数,在给定ordering之后,ExternalSorter就会按照它来排序。在Spark源码中建议如果希望进行Map-side combining的话,就指定ordering,否则就可以设置orderingnull

1
2
3
4
5
6
7
private[spark] class ExternalSorter[K, V, C](
context: TaskContext,
aggregator: Option[Aggregator[K, V, C]] = None,
partitioner: Option[Partitioner] = None,
ordering: Option[Ordering[K]] = None,
serializer: Serializer = SparkEnv.get.serializer)
extends Spillable[WritablePartitionedPairCollection[K, C]](context.taskMemoryManager())

由于ExternalSorter支持有combine和没有combine的两种模式,因此对应设置了两个对象。map = new PartitionedAppendOnlyMap[K, C],以及buffer = new PartitionedPairBuffer[K, C]。其中,PartitionedAppendOnlyMap就是一个SizeTrackingAppendOnlyMap,支持按key进行combine。PartitionedPairBuffer则继承了WritablePartitionedPairCollection,由于不需要按照key进行combine,所以它的实现接近于一个Array。

相比之前的aggregator,ExternalSorter不仅能aggregate,还能sort。ExternalSorter在Shuffle Read和Write都有使用,而ExternalAppendOnlyMap只有在Shuffle Read中使用。所以为啥不直接搞一个ExternalSorter而是还要在前面垫一个ExternalAppendOnlyMap呢?为此,我们总结比较一下这两者:
首先,在insertAll时,ExternalAppendOnlyMap是一定要做combine的,而ExternalSorter可以选择是否做combine,为此还有PartitionedAppendOnlyMapPartitionedPairBuffer两种数据结构。
其次,在做排序时,ExternalAppendOnlyMap默认对内存中的对象不进行排序,只有当要Spill的时候才会返回AppendOnlyMap.destructiveSortedIterator的方式将内存里面的东西有序写入磁盘。在返回迭代器时,如果没有发生Spill,那么ExternalAppendOnlyMap返回没有经过排序的currentMap,否则才通过ExternalIterator进行排序。而对ExternalSorter而言排序与否在于有没有指定ordering。如果进行排序的话,那么它会首先考虑Partition,再考虑Key。

插入

ExternalSorter.insertAll方法和之前看到的ExternalAppendOnlyMap方法是大差不差的,他也会对可以聚合的特征进行聚合,并且TODO上还说如果聚合之后的reduction factor不够明显,就停止聚合。根据是否定义了aggregator,会分别采用之前提到的map和buffer来承载加入的数据。

1
2
3
4
5
6
7
8
9
10
11
12
13
14
15
16
17
18
19
20
21
22
23
24
25
26
27
28
29
// ExternalSorter.scala
def insertAll(records: Iterator[Product2[K, V]]): Unit = {
// TODO: stop combining if we find that the reduction factor isn't high
val shouldCombine = aggregator.isDefined

if (shouldCombine) {
// Combine values in-memory first using our AppendOnlyMap
val mergeValue = aggregator.get.mergeValue
val createCombiner = aggregator.get.createCombiner
var kv: Product2[K, V] = null
val update = (hadValue: Boolean, oldValue: C) => {
if (hadValue) mergeValue(oldValue, kv._2) else createCombiner(kv._2)
}
while (records.hasNext) {
addElementsRead()
kv = records.next()
map.changeValue((getPartition(kv._1), kv._1), update)
maybeSpillCollection(usingMap = true)
}
} else {
// Stick values into our buffer
while (records.hasNext) {
addElementsRead()
val kv = records.next()
buffer.insert(getPartition(kv._1), kv._1, kv._2.asInstanceOf[C])
maybeSpillCollection(usingMap = false)
}
}
}

容易看出,这里面用到maybeSpillCollection来尝试管理内存,这个应该是和spill相关的,我们检查一下其实现,发现其实就是一个代理,对于是否使用map的情况,进行了分类讨论。而maybeSpill就是Spillable里面的定义了。

1
2
3
4
5
6
7
8
9
10
11
12
13
14
15
16
17
18
private def maybeSpillCollection(usingMap: Boolean): Unit = {
var estimatedSize = 0L
if (usingMap) {
estimatedSize = map.estimateSize()
if (maybeSpill(map, estimatedSize)) {
map = new PartitionedAppendOnlyMap[K, C]
}
} else {
estimatedSize = buffer.estimateSize()
if (maybeSpill(buffer, estimatedSize)) {
buffer = new PartitionedPairBuffer[K, C]
}
}

if (estimatedSize > _peakMemoryUsedBytes) {
_peakMemoryUsedBytes = estimatedSize
}
}

Shuffle Write端源码分析

Shuffle Write端的实现主要依赖ShuffleManager中的ShuffleWriter对象,目前使用的ShuffleManagerSortShuffleManager,因此只讨论它。它是一个抽象类,主要有SortShuffleWriterUnsafeShuffleWriterBypassMergeSortShuffleWriter等实现。

SortShuffleWriter

1
2
3
4
5
6
7
8
private[spark] abstract class ShuffleWriter[K, V] {
/** Write a sequence of records to this task's output */
@throws[IOException]
def write(records: Iterator[Product2[K, V]]): Unit

/** Close this writer, passing along whether the map completed */
def stop(success: Boolean): Option[MapStatus]
}

SortShuffleWriter的实现可以说很简单了,就是将records放到一个ExternalSorter里面,然后创建一个ShuffleMapOutputWritershuffleExecutorComponents实际上是一个LocalDiskShuffleExecutorComponentsShuffleMapOutputWriter是一个Java接口,实际上被创建的是LocalDiskShuffleMapOutputWriter

1
2
3
4
5
6
7
8
9
10
11
12
13
14
15
16
17
18
19
// SortShuffleWriter
override def write(records: Iterator[Product2[K, V]]): Unit = {
sorter = if (dep.mapSideCombine) {
new ExternalSorter[K, V, C](
context, dep.aggregator, Some(dep.partitioner), dep.keyOrdering, dep.serializer)
} else {
// 如果不需要进行mapSideCombine,那么我们传入空的aggregator和ordering,
// 我们在map端不负责对key进行排序,统统留给reduce端吧
new ExternalSorter[K, V, V](
context, aggregator = None, Some(dep.partitioner), ordering = None, dep.serializer)
}
sorter.insertAll(records)

// Don't bother including the time to open the merged output file in the shuffle write time,
// because it just opens a single file, so is typically too fast to measure accurately
// (see SPARK-3570).
val mapOutputWriter = shuffleExecutorComponents.createMapOutputWriter(
dep.shuffleId, mapId, dep.partitioner.numPartitions)
...

紧接着,调用ExternalSorter.writePartitionedMapOutput将自己维护的map或者buffer(根据是否有Map Side Aggregation)写到mapOutputWriter提供的partitionWriter里面。其过程用到了一个destructiveSortedWritablePartitionedIterator的迭代器,相比destructiveSortedIterator,它是多了Writable和Partitioned两个词。前者的意思是我可以写到文件,后者的意思是我先按照partitionId排序,然后在按照给定的Comparator排序。
接着就是commitAllPartitions,这个函数调用writeIndexFileAndCommit

1
2
3
4
// 
...
sorter.writePartitionedMapOutput(dep.shuffleId, mapId, mapOutputWriter)
val partitionLengths = mapOutputWriter.commitAllPartitions()

MapStatus被用来保存Shuffle Write操作的metadata。

1
2
3
4
5
6
7
8
9
10
11
12
13
...
mapStatus = MapStatus(blockManager.shuffleServerId, partitionLengths, mapId)
}

// LocalDiskShuffleMapOutputWriter.java
@Override
public long[] commitAllPartitions() throws IOException {
...
cleanUp();
File resolvedTmp = outputTempFile != null && outputTempFile.isFile() ? outputTempFile : null;
blockResolver.writeIndexFileAndCommit(shuffleId, mapId, partitionLengths, resolvedTmp);
return partitionLengths;
}

writeIndexFileAndCommit负责为传入的文件dataTmp创建一个索引文件,并原子地提交。注意到,到当前版本,每一个执行单元只会生成一份数据文件和一份索引。

1
2
// IndexShuffleBlockResolver.java
def writeIndexFileAndCommit(shuffleId: Int, mapId: Long, lengths: Array[Long], dataTmp: File): Unit

根据writeIndexFileAndCommit的注释,getBlockData会来读它写的块,这个getBlockData同样位于我们先前介绍过的IndexShuffleBlockResolver类中。

BypassMergeSortShuffleWriter

下面我们来看看BypassMergeSortShuffleWriter的实现。它到底Bypass了什么东西呢?其实是sort和aggregate。

UnsafeShuffleWriter

SortShuffleManager还有一个子类是UnsafeShuffleWriter
UnsafeShuffleWriter使用ShuffleExternalSorter进行排序,而SortShuffleWriter使用ExternalSorter对象。
UnsafeShuffleWriter使用TaskMemoryManager作内存分配,而SortShuffleWriter没有明确指定。

fetchLocalBlocks和fetchUpToMaxBytes的实现

简单说明一下fetchLocalBlocksfetchUpToMaxBytes的实现

1
2
3
4
5
6
7
8
9
10
11
12
13
14
15
16
17
18
// ShuffleBlockFetcherIterator.scala
private[this] val localBlocks = scala.collection.mutable.LinkedHashSet[BlockId]()
private[this] def fetchLocalBlocks() {
logDebug(s"Start fetching local blocks: ${localBlocks.mkString(", ")}")
val iter = localBlocks.iterator
while (iter.hasNext) {
val blockId = iter.next()
try {
val buf = blockManager.getBlockData(blockId)
...

// BlockManager.scala
override def getBlockData(blockId: BlockId): ManagedBuffer = {
if (blockId.isShuffle) {
// 需要通过ShuffleBlockResolver来获取
shuffleManager.shuffleBlockResolver.getBlockData(blockId.asInstanceOf[ShuffleBlockId])
} else {
getLocalBytes(blockId) match {

Spark分布式部署方式

Spark自有部署方式

最常用的其实是单机模式也就是spark-submit --master local,这里local是默认选项。在程序执行过程中,只会生成一个SparkSubmit进程,不会产生Master和Worker节点,也不依赖Hadoop。当然,Windows里面可能需要winutils这个工具的,但也是直接下载,而不需要装Hadoop。
在集群化上,Spark可以部署在On Yarn和On Mesos、K8S和Standalone上面,而又分别对应了Cluster和Client两种deploy mode。

首先是Spark自带Cluster Manager的Standalone Client模式,也是我们最常用的集群测试模式,需要启动Master和Slave节点,但仍然不依赖Hadoop。

1
./bin/spark-submit --master spark://localhost:7077  --class org.apache.spark.examples.SparkPi ./examples/jars/spark-examples_2.11-2.4.4.jar 100

下面一种是Spark自带Cluster Manager的Standalone Cluster模式,一字之差,还是有不同的,用下面的方式启动

1
./bin/spark-submit --master spark://wl1:6066 --deploy-mode cluster # 默认cluster

上面两种的配置一般修改Spark的spark-defaults.conf和spark-env.sh也就可以了,不涉及hadoop。
此外,还有Connection Reset的情况,这个需要打开Connection Reset。

Yarn

Spark跑在yarn上面,这个还依赖hadoop集群,但Spark不需要自己提供Master和Worker了。Yarn同样提供了Cluster和Client两种模式,如下所示

1
2
./bin/spark-submit --master yarn-cluster
./bin/spark-submit --master yarn-client

Yarn Cluster就是通常使用的部署方式,此时Spark Driver是运行在Yarn的ApplicationMaster上的,而Client方式的Driver是在任务提交机上面运行,ApplicationMaster只负责向ResourceManager申请Executor需要的资源

我们在Spark的WebUI中常常看到诸如Container、ApplicationMaster、ResourceMaster、NodeManager这些东西,其实他们都是Yarn里面的常见概念。具体的联系可以结合下面的图来看,ResourceMaster是YARN集群的Master,负责管理整个集群的资源,而NodeManager就是YARN集群的Slave,每个Node上面都会跑一个NodeManager。而每个Node上面又可以有很多个Container。

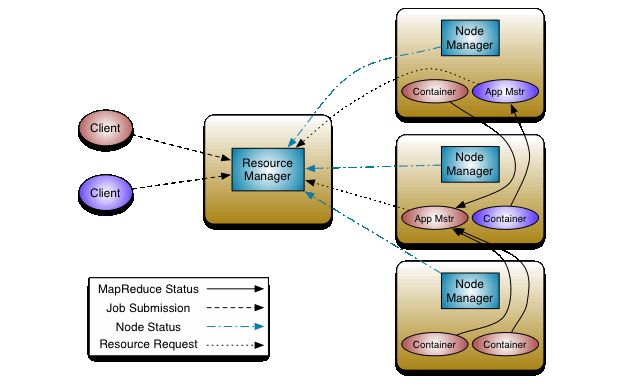
对应到Spark中,一般来说一个Driver或一个Executor跑在Yarn的一个Container里面,而ApplicationMaster是一个特殊的Container,一般为后缀_00001的container。每个SparkContext对应一个ApplicationMaster,每个Executor对应一个Container

YARN视角的架构:

  1. ResourceMaster
    1. NodeManager
      1. Container
        ApplicationMaster:类似于Spark Driver,对应一个SparkContext
      2. Container
        普通的Spark Executor
      3. Container
        普通的Spark Executor
    2. NodeManager
      1. Container
      2. Container

SparkSQL

SparkSQL由4个项目组成,分别为Spark Core、Spark Catalyst、Spark Hive和Spark Hive ThriftServer。我们主要和前两者打交道,Core中就是SparkSQL的核心,包括Dataset等类的实现。Catalyst是Spark的水晶优化器。

DataFrame和Dataset

我们可以将RDD看为一个分布式的容器M[T],我们对T是未知的。而事实上我们处理数据集往往就是个来自HBase或者其他数据仓库大宽表。如果使用RDD会导致很多的拆箱和装箱的操作。并且由于T是一个黑盒,Spark也很难对RDD的计算进行优化。为此,Spark推出了SparkSQL来解决这个问题。而SparkSQL的一个核心机制就是DataFrame和Dataset。

在Spark1.0中,DataFrame可以看做RDD[Row],但在Spark2.0对Dataset和DataFrame进行了统一,DataFrame可以看做一个Dataset[Row],所以,我们主要以Dataset来研究对象。

创建DataFrame

借助于Scala提供的implicit机制,我们可以从Seq创建DataFrame

1
2
3
4
5
6
7
8
import org.apache.spark.sql.types.{DoubleType, LongType, IntegerType, StringType, StructField, StructType}
import org.apache.spark.sql.functions.{concat, lit, udf}
import org.apache.spark.sql.{Row}
import org.apache.spark.sql.catalyst.expressions.{GenericRow, GenericRowWithSchema}
case class Person(name: String, age: Long, money: Long)
import spark.implicits._

val df = Seq(("Calvin", 18, 1000)).toDF("name", "age", "money")

但是,我们不能从一个DataFrame通过map到一个Row的方式得到另一个DataFrame

1
2
3
4
val df2 = df.map(row => Row(row.getAs[String]("name")))

<console>:32: error: Unable to find encoder for type org.apache.spark.sql.Row. An implicit Encoder[org.apache.spark.sql.Row] is needed to store org.apache.spark.sql.Row instances in a Dataset. Primitive types (Int, String, etc) and Product types (case classes) are supported by importing spark.implicits._ Support for serializing other types will be added in future releases.
val df2 = df.map(row => Row(row.getAs[String]("name")))

我们还可以通过createDataFrame从RDD创建一个DataFrame,因为RDD没有schema,所以我们要显式提供一个schema。

1
2
3
4
5
val schemaString="name,age,money"
val schema = StructType(schemaString.split(",").map(fieldName => StructField(fieldName, StringType, true)))
val sqlcontext = new org.apache.spark.sql.SQLContext(sc)
val r = sc.parallelize(Seq(Person("Calvin", 18, 1000))).map(a => Row(a.name, a.age, a._3))
val df = sqlcontext.createDataFrame(r, schema)

而这个schema可以通过下面的方法得到

1
2
3
var schema = new StructType()
.add(StructField("string1", StringType, true)) // 可能为null
.add(StructField("long1", LongType)) // 不可能为null

这里的StructTypeStringType等都是SparkSQL所提供的ADT,它们都继承AbstractDataType,例如LongType继承链是LongType->IntegralType->NumericType->AtomicType->DataType->AbstractDataTypeStructFieldadd方法的参数,用来描述一个类型。包含四个成员,如下所示

1
2
3
4
case class StructField(String name,
DataType dataType,
boolean nullable,
Metadata metadata)

当然,还有一些从外部数据源构造DataFrame的工具,如下所示,这里的路径是Driver本地路径

1
2
spark.read.json(...)
spark.read.csv(...)

此外,Spark还可以从Hive、MySQL、HBase、Avro, Parquet, Kafka等数据源中读取数据。

从RDD到DF/DS

RDD可以通过下面代码中的一个隐式转换 得到一个DatasetHolder,接着借助于DatasetHolder中提供的toDStoDF来实现到DataFrameDataset的转换。

1
2
3
implicit def rddToDatasetHolder[T : Encoder](rdd: RDD[T]): DatasetHolder[T] = {
DatasetHolder(_sqlContext.createDataset(rdd))
}

其实在上面文件里面还定义了一系列隐式转换所需要的Encoder,例如对于大多数的case class都需要调用newProductArrayEncoder。有关这部分的进一步说明,可以查看文章

同样,从Dataset/DataFrame到RDD可以通过调用.rdd方法来轻松得到。不过这个操作是Action么?在爆栈网上有相关讨论1,认为不是Action但有开销;和相关讨论2,认为是无开销的。我们查看具体代码

1
2
3
4
5
6
lazy val rdd: RDD[T] = {
val objectType = exprEnc.deserializer.dataType
rddQueryExecution.toRdd.mapPartitions { rows =>
rows.map(_.get(0, objectType).asInstanceOf[T])
}
}

从DF到DS

从DF到DS的转换需要指定一个Encoder

1
val ds = df.as[Person]

从DS到DF

1
2
3
4
5
6
7
8
9
10
11
12
@scala.annotation.varargs
def toDF(colNames: String*): DataFrame = {
require(schema.size == colNames.size,
"The number of columns doesn't match.\n" +
s"Old column names (${schema.size}): " + schema.fields.map(_.name).mkString(", ") + "\n" +
s"New column names (${colNames.size}): " + colNames.mkString(", "))

val newCols = logicalPlan.output.zip(colNames).map { case (oldAttribute, newName) =>
Column(oldAttribute).as(newName)
}
select(newCols : _*)
}

Row

Row是SparkSQL的基石。它实际上是一个trait,我们经常使用是它的子类GenericRowGenericRowWithSchema,而Row的内部实现则是InternalRow
GenericRowRowapply创建时的默认构造。它没有schema。在GenericRowWithSchema中重新实现了filedIndex这个函数,允许我们使用row.getAs[String]("colName")这样的方法。在上面的讨论中已经提到,我们不能从一个DataFrame通过map到一个Row的方式得到另一个DataFrame;反而可以从一个Seq得到。其原因就是因为DataFrame有schema而Row没有。我们通过下面的实验来检查从一个SeqDataFrame的转换

1
val df = Seq(("Calvin", 18, 1000)).toDF("name", "age", "money")

GenericRowRowapply创建时的默认构造。它没有schema。在GenericRowWithSchema中重新实现了filedIndex这个函数,允许我们使用row.getAs[String]("colName")这样的方法。如果经常使用SparkSQL的API会发现我们不能从一个DataFrame通过map到一个Row的方式得到另一个DataFrame;反而可以从一个Seq得到,我们甚至可以通过Seq(...).toDF(columns)方法来得到一个其原因就是因为DataFrame有schema而Row没有。我们通过下面的实验来检查从一个SeqDataFrame的转换

1
2
3
4
5
6
7
8
9
val ds = Seq(Person("Calvin", 22, 1)).toDS
val ds2 = Seq(Person("Neo", 23, 1)).toDS
val dfj = ds.union(ds2)
val dsj_fail = dfj.toDS // 注意DataFrame没有toDS方法,toDS是由RDD转DS用的
val dsj = dfj.as[Person]

val ds3 = Seq(("Calvin", 22, 1)).toDS
val ds4 = Seq(("Neo", 23, 1)).toDS
val dfj2 = ds3.union(ds4)

有关RowGenericRowWithSchema之间的转换,我们可以进行下面的实验

1
2
3
4
5
6
7
8
9
10
// 复用之前的头部
val df = Seq(Person("Calvin", 22, 100), Person("Neo", 33, 300)).toDF

// df的schema
scala> df.schema
res2: org.apache.spark.sql.types.StructType = StructType(StructField(name,StringType,true), StructField(age,LongType,false), StructField(money,LongType,false))

// 第1行的schema
scala> df.take(1)(0).schema
res3: org.apache.spark.sql.types.StructType = StructType(StructField(name,StringType,true), StructField(age,LongType,false), StructField(money,LongType,false))

DataFrame里面的Row不是单纯的Row,而是GenericRowWithSchema,相比之前的Row,要多了Schema。

1
2
3
4
5
6
7
8
9
10
11
12
13
14
15
// 查看type,发现是GenericRowWithSchema而不是Row
scala> df.take(1)(0).getClass.getSimpleName
res5: String = GenericRowWithSchema

// 增加一列
scala> val r = Row.unapplySeq(df.take(1)(0)).get.toArray ++ Seq("SZ")
r: Array[Any] = Array(Calvin, 22, 100, SZ)

// 对应增加一列schema
scala> val nsch = df.take(1)(0).schema.add(StructField("addr",StringType,true))
nsch: org.apache.spark.sql.types.StructType = StructType(StructField(name,StringType,true), StructField(age,LongType,false), StructField(money,LongType,false), StructField(addr,StringType,true))

// 创建一个新SchemaRow
scala> val row_sch = new GenericRowWithSchema(r, nsch)
row_sch: org.apache.spark.sql.catalyst.expressions.GenericRowWithSchema = [Calvin,22,100,SZ]

只有GenericRowWithSchema有,因此我们可以创建一个GenericRowWithSchema,其实现在org.apache.spark.sql.catalyst.expressions.{GenericRow, GenericRowWithSchema}

为什么不能在map函数中返回Row

熟悉map函数的人往往比较熟悉下面的函数签名

1
fmap :: Functor f => (a -> b) -> f a -> f b

因此容易写出下面的代码

1
2
3
df.map{
case Row(...) => Row(...)
}

乍一看,很有道理啊,f就是Datasetab都是Row,是一个很准确的代码了,但一编译发现少什么Encoder,这是怎么回事呢?这篇文章给了答案

Column

从上文中可以看到,DataFrame中的数据依旧是按照行组织的,通过外挂了一个schema,我们能够有效地识别列。在这种情况下对行的改动是容易的,但是如何对列进行改动呢?一般有两种办法

借助于withColumn

1
2
3
4
val df = Seq(Person("Calvin", 22, 100), Person("Neo", 33, 300)).toDF
// 通过cast函数进行类型转换,concat函数进行字符串连接
df.withColumn("name2", concat($"name", $"age".cast(StringType))).show()
df.withColumn("name2", $"age"+$"money").show()

当然,在$表达式之外,我们还可以使用udf,甚至带条件地进行withColumn

1
2
3
// 除了$表达式,还可以使用udf
val addMoneyUDF = udf((age: Long, money: Long) => age + money)
df.withColumn("name2", addMoneyUDF($"age", $"money"))

特别需要注意的是withColumn是存在性能开销的。如果我们在代码里频繁(例如使用一个for循环)withColumn,那么就可能出现一个Job结束,而下一个Job迟迟不开始的情况。如果我们将日志等级设置为TRACE,可以看到代码中也存在了很多Batch Resolution的情况。这是因为较深层次的依赖会导致SparkSQL不能分清到底需要缓存哪些数据以用来恢复,因此只能全部缓存。另外文章中还表示会造成大量的Analyzes开销。

1
2
3
4
5
6
7
8
9
10
11
// Analyzer.scala
Batch("Resolution", fixedPoint,
ResolveTableValuedFunctions ::
new ResolveCatalogs(catalogManager) ::
ResolveInsertInto ::
ResolveRelations ::
ResolveReferences ::
...
ResolveRandomSeed ::
TypeCoercion.typeCoercionRules(conf) ++
extendedResolutionRules : _*),

此外,伴随着withColumn的是UDF或者UDAF的使用,在Spark the definitive一书中指出,这类的算子容易导致OOM等问题。该书中还指出UDF会强迫将数据转换成JVM里面的对象,并且在一次查询中可能重复转换多次,这会产生很大的性能开销。

KeyValueGroupedDataset和RelationalGroupedDataset

不同于RDD的相关方法,DataFrame系列的groupBygroupByKey会返回两个不同的类型RelationalGroupedDatasetKeyValueGroupedDataset。一般来说,虽然groupByKey更为灵活,能够生成自定义的key用来group,但KeyValueGroupedDataset只提供相对较少的操作,所以最好还是使用groupby。另外,在group操作之后就没有诸如union的操作,我们需要再显式map回DataFrame

SparkSQL语法和用法

SparkSQL和DataFrame的交互

一个简单的问题是,在SQL中引用一个DataFrame呢?一个简单的做法是创建一个视图,即通过createOrReplaceTempView

SparkSQL的上下文

SparkSQL的上下文通过SQLContext维护,它由一个SparkSession持有,并指向其所有者,以及所有者维护的SparkContext。在Spark 2.0之后,大部分SparkSQL的逻辑工作被迁移到了SparkSession中,所以这个类可以被看做是一个兼容性的封装。

1
2
3
4
5
class SQLContext private[sql](val sparkSession: SparkSession)
extends Logging with Serializable {
private[sql] def sessionState: SessionState = sparkSession.sessionState
private[sql] def sharedState: SharedState = sparkSession.sharedState
private[sql] def conf: SQLConf = sessionState.conf

SharedState

SharedState保存不同session的共享状态,包括下面几个对象

  1. warehousePath
  2. conf, hadoopConf
  3. cacheManager
    这是SQLContext 的支持类,会自动保存query的查询结果。这样子查询在执行过程中,就可以使用这些查询结果。
  4. statusStore
  5. externalCatalog
  6. globalTempViewManager
    一个线程安全的类,用来管理global temp view,并提供create、update、remove等原子操作来管理这些view。

SessionState

SessionState则包含了这个Session中相关的组件

1
2
3
4
5
6
7
8
9
10
11
12
13
14
15
16
17
18
19
20
21
22
23
private[sql] class SessionState(
sharedState: SharedState,
val conf: SQLConf,
val experimentalMethods: ExperimentalMethods,
val functionRegistry: FunctionRegistry,
val udfRegistration: UDFRegistration,
catalogBuilder: () => SessionCatalog,
val sqlParser: ParserInterface, // 是一个ParserInterface实现
analyzerBuilder: () => Analyzer,
optimizerBuilder: () => Optimizer,
val planner: SparkPlanner,
val streamingQueryManager: StreamingQueryManager,
val listenerManager: ExecutionListenerManager,
resourceLoaderBuilder: () => SessionResourceLoader,
createQueryExecution: LogicalPlan => QueryExecution,
createClone: (SparkSession, SessionState) => SessionState,
val columnarRules: Seq[ColumnarRule]) {

// The following fields are lazy to avoid creating the Hive client when creating SessionState.
lazy val catalog: SessionCatalog = catalogBuilder()
lazy val analyzer: Analyzer = analyzerBuilder()
lazy val optimizer: Optimizer = optimizerBuilder()
lazy val resourceLoader: SessionResourceLoader = resourceLoaderBuilder()

构建SparkSession时,Spark内部会构造SessionStateSessionState会构造Parser,Analyzer,Catalog,Optimizer,Planner还有逻辑计划转化为执行计划的方法。SessionState的具体构建如下所示

1
2
3
4
5
6
7
8
9
10
11
12
13
14
15
16
17
18
19
20
21
22
/**
* State isolated across sessions, including SQL configurations, temporary tables, registered
* functions, and everything else that accepts a [[org.apache.spark.sql.internal.SQLConf]].
* If `parentSessionState` is not null, the `SessionState` will be a copy of the parent.
*
* This is internal to Spark and there is no guarantee on interface stability.
*
* @since 2.2.0
*/
@Unstable
@transient
lazy val sessionState: SessionState = {
parentSessionState
.map(_.clone(this))
.getOrElse {
val state = SparkSession.instantiateSessionState(
SparkSession.sessionStateClassName(sparkContext.conf),
self)
initialSessionOptions.foreach { case (k, v) => state.conf.setConfString(k, v) }
state
}
}

这里的SparkSession.sessionStateClassName(sparkContext.conf)具体有两个取值,在使用Hive的时候,是org.apache.spark.sql.hive.HiveSessionStateBuilder,否则是org.apache.spark.sql.internal.SessionStateBuilder,作为in-memory。
instantiateSessionState会具体构建sessionState

1
2
3
4
5
6
7
8
9
10
11
12
13
private def instantiateSessionState(
className: String,
sparkSession: SparkSession): SessionState = {
try {
// invoke `new [Hive]SessionStateBuilder(SparkSession, Option[SessionState])`
val clazz = Utils.classForName(className)
val ctor = clazz.getConstructors.head
ctor.newInstance(sparkSession, None).asInstanceOf[BaseSessionStateBuilder].build()
} catch {
case NonFatal(e) =>
throw new IllegalArgumentException(s"Error while instantiating '$className':", e)
}
}

而最终是通过一个BaseSessionStateBuilder的子类来构建的,我们以HiveSessionStateBuilder为例介绍。

1
2
3
4
5
6
7
8
9
10
11
12
13
14
15
16
17
18
19
20
// HiveSessionStateBuilder.scala and BaseSessionStateBuilder.scala
def build(): SessionState = {
new SessionState(
session.sharedState,
conf,
experimentalMethods,
functionRegistry,
udfRegistration,
() => catalog,
sqlParser,
() => analyzer,
() => optimizer,
planner,
() => streamingQueryManager,
listenerManager,
() => resourceLoader,
createQueryExecution,
createClone,
columnarRules)
}

SparkSQL的架构总览

总而言之,SparkSQL的解析与运行流程类似于一般SQL的解析与运行流程,包含:

  1. 将SQL解析得到一个逻辑计划,它是一颗AST。SparkSQL的执行目标就是树根的值,在计算过程中,父节点的计算依赖于子节点的计算结果。通过Analyzer去Resolve,通过Optimizer去优化
  2. 将逻辑计划转换为物理计划。首先需要为逻辑计划中的节点选择一个最优的物理计划(同样的逻辑计划可能对应多个物理计划),然后需要生成一个可执行的执行计划。
  3. 调用执行计划生成的RDD的action方法提交一个Job

LogicPlan类

逻辑计划的对应实现是Logical Plan继承了QueryPlan[LogicalPlan]。自己又拥有三个子类BinaryNode/UnaryNodeLeafNode,然后有产生了OrderPreservingUnaryNode等子类。这些Node被另一些子类所继承,这些basicLogicalOperators描述了包括Project/Filter/Sample/Union/Join/Limit等操作

SparkPlan类

物理计划的对应实现SparkPlan,和LogicalPlan一样,他同样继承了QueryPlan[SparkPlan]。例如逻辑计划Project就可能产生一个ProjectExec的物理计划。

处理流程

首先祭出一张图。

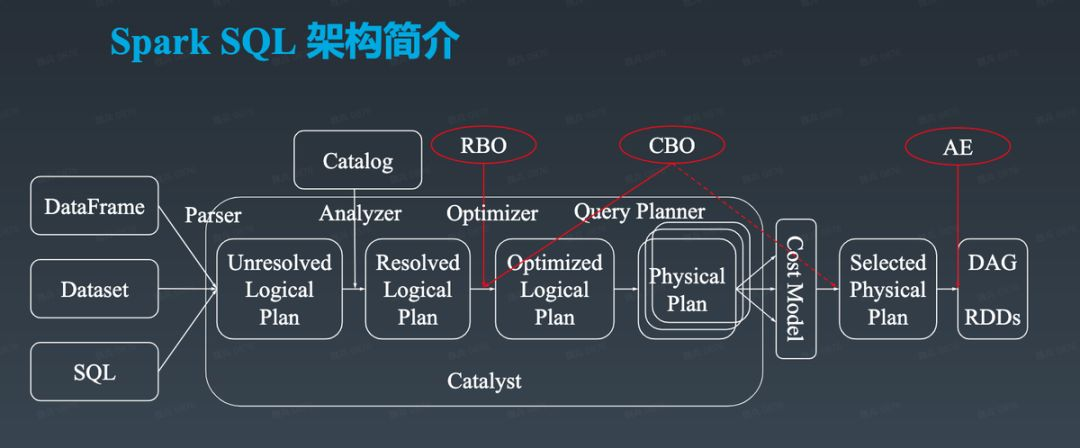
从图中可以看到,SparkSQL首先会对SQL进行Parse,得到一个Unresolved LogicalPlan。这里Unresolved的意思是诸如变量名和表名这些东西是不确定的。Catalog就是描述了SQLContext里面的诸如表之类的对象。在生产环境中,一般由 Hive Metastore提供Catalog 服务

Analyzer的阶段借助于Catalog来决议得到LogicalPlan,将Unresolved LogicalPlan决议为Logical Plan。

通过Optimizer,对Logical Plan进行优化。Catalyst主要做的是RBO,但诸如华为等公司和机构也有提出过CBO的方案。

逻辑计划不能被直接执行,它需要通过QueryPlanner.plan得到一系列物理计划,并选择其中一个。QueryPlanner是一个抽象类,它有可以有许多子类实现,这些子类负责将一系列strategies应用到输入的Logical Plan上,订得到一系列candidates: Seq[PhysicalPlan]

1
2
3
4
5
6
7
8
9
10
11
12
// QueryPlanner.scala

abstract class QueryPlanner[PhysicalPlan <: TreeNode[PhysicalPlan]] {
/** A list of execution strategies that can be used by the planner */
def strategies: Seq[GenericStrategy[PhysicalPlan]]

def plan(plan: LogicalPlan): Iterator[PhysicalPlan] = {
// Obviously a lot to do here still...

// Collect physical plan candidates.
val candidates = strategies.iterator.flatMap(_(plan))
...

在得到物理计划后,会调用prepareForExecution得到一个可执行的executedPlan

1
2
3
4
// QueryExecution.scala
protected def prepareForExecution(plan: SparkPlan): SparkPlan = {
preparations.foldLeft(plan) { case (sp, rule) => rule.apply(sp) }
}

在Spark2.0前,SparkSQL的主要是采用的Volcano查询引擎模型。Volcano是一种经典的基于行的流式迭代模型(Row-Based Streaming Iterator Model),它在例如Oracle、SQL Server、MySQL等方面都有使用。在Volcano模型中,查询计划树由这些算子组成。这些算子可以看做迭代器,每一次的next()调用,会返回一行(Row)。这next()调用实际上作用在下层算子上,它们把这个下层的输出看做一个表。Volcano具有一些性能方面的缺点,例如next()调用深度可能很深,而每次调用都是虚的,所以有很大的查阅虚表的开销,这给编译器做inline,或者CPU做分支预测都带来了困难。此外,Volcano有很好的pipeline性能,能节约内存,但每获得一次数据,都需要最顶层驱动一次,这雪上加霜。因此在Spark2.0之后加入了WholeStageCodegen机制和ExpressionCodegen机制。

SparkSQL的解析流程

SparkSQL API的执行流程

和RDD一样,Dataset同样只在Action操作才会计算。假设现在已经生成了物理计划,我们选取最典型的count()来研究,以查看物理计划是如何执行的。可以看到,count操作实际上会执行plan.executeCollect(),而这里的plan是一个SparkPlanqe是一个QueryExecution

1
2
3
4
5
6
7
8
9
10
11
12
13
14
15
16
17
// Dataset.scala
def count(): Long = withAction("count", groupBy().count().queryExecution) { plan =>
plan.executeCollect().head.getLong(0)
}

private def withAction[U](name: String, qe: QueryExecution)(action: SparkPlan => U) = {
SQLExecution.withNewExecutionId(sparkSession, qe, Some(name)) {
qe.executedPlan.foreach { plan =>
plan.resetMetrics()
}
action(qe.executedPlan)
}
}

private def withNewExecutionId[U](body: => U): U = {
SQLExecution.withNewExecutionId(sparkSession, queryExecution)(body)
}

QueryExecution用来描述整个SQL执行的上下文,从如下示例中可以看出,它维护了从Unsolved Logical Plan到Physical Plan的整个转换流程。

1
2
3
4
5
6
7
8
9
10
11
12
13
14
15
16
17
18
19
20
scala> val ds = Seq(Person("Calvin", 22, 1)).toDS
ds: org.apache.spark.sql.Dataset[Person] = [name: string, age: bigint ... 1 more field]

scala> val fds = ds.filter(p => p.age>1)
fds: org.apache.spark.sql.Dataset[Person] = [name: string, age: bigint ... 1 more field]

scala> ds.queryExecution
res9: org.apache.spark.sql.execution.QueryExecution =
== Parsed Logical Plan ==
LocalRelation [name#3, age#4L, money#5L]

== Analyzed Logical Plan ==
name: string, age: bigint, money: bigint
LocalRelation [name#3, age#4L, money#5L]

== Optimized Logical Plan ==
LocalRelation [name#3, age#4L, money#5L]

== Physical Plan ==
LocalTableScan [name#3, age#4L, money#5L]

那么,count()做的就是对qe做一些手脚,然后调用qe.executedPlan.executeCollect().head.getLong(0)。于是我们查看executeCollect()这个方法,他实际上就是execute和collect两部分。execute部分实际上是对getByteArrayRdd的一个调用,得到一个RDD。而collect部分就是调用byteArrayRdd.collect(),这个操作会触发RDD的Action操作,从而提交一个Job。整个函数最终返回一个ArrayBuffer[InternalRow]

1
2
3
4
5
6
7
8
9
10
11
12
13
// SparkPlan.scala
def executeCollect(): Array[InternalRow] = {
// byteArrayRdd是一个RDD[(Long, Array[Byte])]
val byteArrayRdd = getByteArrayRdd()

val results = ArrayBuffer[InternalRow]()
byteArrayRdd
.collect()
.foreach { countAndBytes =>
decodeUnsafeRows(countAndBytes._2).foreach(results.+=)
}
results.toArray
}

getByteArrayRdd的作用是将一系列UnsafeRow打包成一个Array[Byte]以方便序列化,这个Array[Byte]的结构是[size] [bytes of UnsafeRow] [size] [bytes of UnsafeRow] ... [-1]

1
2
3
4
5
6
7
8
9
10
11
12
13
14
15
16
17
18
19
20
21
22
private def getByteArrayRdd(n: Int = -1): RDD[(Long, Array[Byte])] = {
execute() // 得到一个RDD[InternalRow]了
.mapPartitionsInternal { iter =>
var count = 0
val buffer = new Array[Byte](4 << 10) // 4K
val codec = CompressionCodec.createCodec(SparkEnv.get.conf)
val bos = new ByteArrayOutputStream()
val out = new DataOutputStream(codec.compressedOutputStream(bos))
// `iter.hasNext` may produce one row and buffer it, we should only call it when the limit is
// not hit.
while ((n < 0 || count < n) && iter.hasNext) {
val row = iter.next().asInstanceOf[UnsafeRow]
out.writeInt(row.getSizeInBytes)
row.writeToStream(out, buffer)
count += 1
}
out.writeInt(-1)
out.flush()
out.close()
Iterator((count, bos.toByteArray))
}
}

可以看到getByteArrayRdd中调用了execute方法,execute继而调用doExecute,得到一个RDD[InternalRow]

1
2
3
4
5
6
7
final def execute(): RDD[InternalRow] = executeQuery {
if (isCanonicalizedPlan) {
throw new IllegalStateException("A canonicalized plan is not supposed to be executed.")
}
doExecute()
}
protected def doExecute(): RDD[InternalRow]

由于SparkPlan是一个抽象类,所以这里的doExecute()没有看到实现,具体的实现根据其操作对象的不同分布在objects.scala上。

那么execute()调用链的终点是什么呢?显然它一定是一个LeafNode的子类。而通过上面的解析可以看到,我们最终得到的一个物理计划是一个LocalTableScanExec,它继承于LeafNodeExec

map操作分析

在Dataset中,同样提供了诸如map之类的算子,不过它们的实现是从DatasetDataFrame之间的变换了。

1
2
3
4
5
6
7
8
9
10
11
12
13
14
15
16
17
18
19
20
21
22
23
24
25
26
27
28
29
30
31
32
33
34
35
36
def map[U : Encoder](func: T => U): Dataset[U] = withTypedPlan {
MapElements[T, U](func, logicalPlan)
}

object MapElements {
def apply[T : Encoder, U : Encoder](
func: AnyRef,
child: LogicalPlan): LogicalPlan = {
val deserialized = CatalystSerde.deserialize[T](child)
val mapped = MapElements(
func,
implicitly[Encoder[T]].clsTag.runtimeClass,
implicitly[Encoder[T]].schema,
CatalystSerde.generateObjAttr[U],
deserialized)
CatalystSerde.serialize[U](mapped)
}
}

case class MapElements(
func: AnyRef,
argumentClass: Class[_],
argumentSchema: StructType,
outputObjAttr: Attribute,
child: LogicalPlan) extends ObjectConsumer with ObjectProducer

object TypedFilter {
def apply[T : Encoder](func: AnyRef, child: LogicalPlan): TypedFilter = {
TypedFilter(
func,
implicitly[Encoder[T]].clsTag.runtimeClass,
implicitly[Encoder[T]].schema,
UnresolvedDeserializer(encoderFor[T].deserializer),
child)
}
}

Spark性能调优

一般来说,Spark可能出现瓶颈的地方有内存、网络和CPU,对于上面的这些问题,宜分为Driver和Executor两块进行考虑
内存方面的向硬盘的溢写、从gc.log中看到的GC的猛增、节点的未响应和OOM。
网络问题的主要场景是诸如Shuffle类的操作涉及在多个节点上传输,节点之间Connection reset by peer。

Spark常见性能问题和选项

总体列表

诊断 现象 解决方案
Executor内存不足 Driver端ExecutorLostFailure,Executor端gc.log显示大量GC和FullGC 需要考虑Shuffle Read数据过大,或者数据倾斜。对于前者,可以考虑增加分区数或者换个Partitioner,增加Executor内存,增加Executor数量,减少Executor上的Task并行度,提前Filter,使用序列化。
Executor内存不足 Local Bytes Read+Remote Bytes Read很大 考虑是Shuffle Read的问题,同上。需要注意的是当使用groupBy系列算子时,可能一个KV对就很大的,所以增加Executor内存会更保险
Driver内存不足 Driver端gc.log显示大量GC和FullGC,spark.log中DAGScheduler相关log显示collect算子耗时过长 考虑增大Driver内存,避免collect大量数据
Driver内存不足 Driver端gc.log显示大量GC和FullGC 减少UDF的使用,减少诸如withColumn的使用
Driver内存不足 Driver端gc.log显示大量GC和FullGC,Driver的spark.log中出现大量BlockManagerInfo: Added broadcast,并且剩余内存较少,Executor的spark.log中出现TorrentBroadcast: Reading broadcast事件且耗时过长 减少broadcast的数据量
数据倾斜 部分Task Retry比较多 repartition
数据倾斜 少数Task耗时显著高于平均值 考虑换个Partitioner,扩大spark.shuffle.file.bufferspark.reducer.maxSizeInFlightspark.shuffle.memoryFraction,打开spark.shuffle.consolidateFiles
分区过多 Task执行的时间都很短,但整个Stage耗时较长 使用coalesce减少分区数
分区过少 Task执行的时间都很长 使用repartition增加分区数
Shuffle Spill 大部分Task执行时间长,但计算量不大 增加partition数量,增大Executor内存
Shuffle Write过大 部分节点出现FetchFailedException错误
RDD重复计算 通过Eventlog,追踪Cached的RDD。在同Stage中一个RDD被Cache,那么它的子RDD也会被Cache 持久化该RDD或使用SparkSQL改写
HDFS IO过大 当并行Task过多时,会导致HDFS读取瓶颈
RM界面显示Tracking URL: UNASSIGNED 目前App还没启动运行
RM界面显示State: ACCEPTED
计算开销较大 减少UDF和UDAF的使用;减少不必要的排序
集群缺少资源 状态是ACCEPTED而不是RUNNING。Initial job has not accepted any resources; check your cluster UI to ensure that workers are registered and have sufficient resources 修改资源

替代性算子

为了避免由于Shuffle操作导致的性能问题,常用的解决方案是使用map-side-combine的算子。这个思路就是先将聚合操作下推到每个节点本地,再将每个节点上的聚合结果拉到同一节点上进行聚合,这样能够显著减少通信量。这种方法的常见实践就是采用如下所示的一些替代性算子:

原算子 替代算子 备注
groupByKey reduceByKey/aggregateByKey
reduceByKey aggregateByKey 当reduceByKey的输入和输出不一致时,创建临时对象(例如从T变为List[T])有额外开销
aggregate treeAggregate 根据实验,treeAggregate具有更好的效率
foreach foreachPartitions
filter filter+coalesce
repartition+sort repartitionAndSortWithinPartitions
repartition coalesce 如果目标分区数量小于当前分区数量
flatMap-join-groupBy cogroup 避免pack和unpack group操作

需要注意的是,减少Shuffle未必就是好的,例如对于coalesce而言,如果产生文件过少,很可能导致Executor空转,并且某些Executor OOM的问题,这就类似于说不患寡而患不均。

使用DataFrame API

使用DataFrame API在下面的几个方面有性能优势。

  1. Spark Catalyst优化器能够进行优化
  2. Tungsten优化器的引入带来了三点性能提升(见上文)

有关Persist的优化方案

根据RDD Programming Guide,即使是RDD(DF的话有优化器另说)Spark也可能会自动做persist,具体是发生在Shuffle过程中,这样可以避免在某个Node失败之后还要重新计算全部。但是对于肯定需要复用的数据,显式persist并没有坏处。这里需要注意的是我们要尽量提高RDD的复用程度。
一般来说,如果内存中能够全部放下对象,选择默认的MEMORY_ONLY级别能够最大程度利用CPU,否则就需要考虑使用序列化的MEMORY_ONLY_SER存储。当内存再不够时,就需要考虑将其持久化到磁盘上,但这会带来较高的时间代价。虽然在Spark的较新版本中,通过Unsafe Shuffle可以直接对序列化之后的对象进行sort shuffle,但这不是通用的。

一些Case

Task Retry

LolLegsTsFeature.scala

我们可以看到,在优化前Job4耗时1.6h,并且Fail了不少。

点进去看一下,发现这个Job里面7重试了两次,花了1h了。

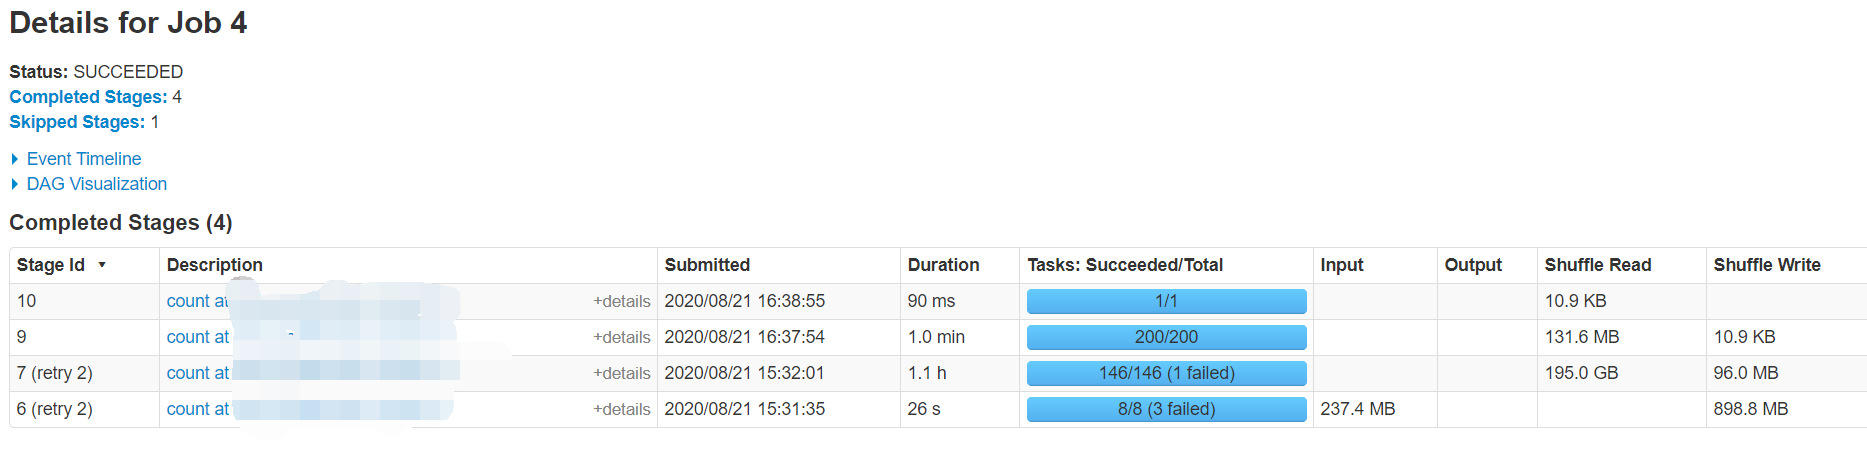
点进去这个Stage看看,他实际上就是一个rdd.join函数的调用。

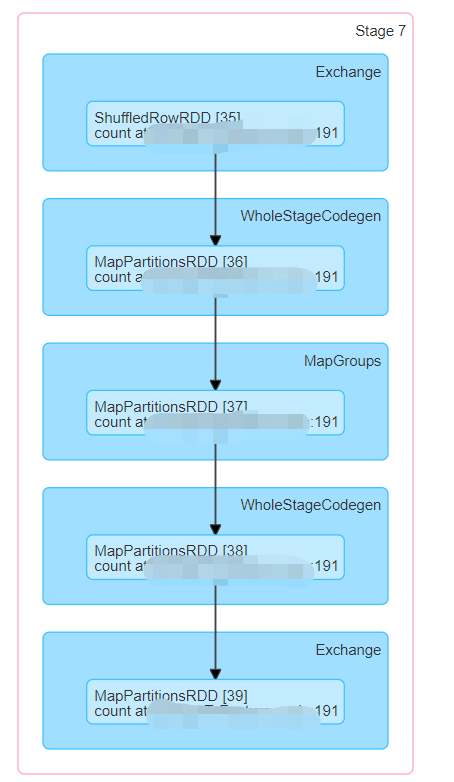
我们可以看到,某个任务的时间达到了1.0h,而其他任务的耗时都在2min左右,因此可以认为这里分区有问题。

因此,我们在这里重新repartition了一下,现在运行时间缩小到了44min。

Spark日志

Spark会记录Event log,并在History Server或者Spark UI中供访问调试使用。

HistoryServer

Spark提供了History Server以保存Event Log,以便追踪历史任务的性能。History Server部署在18080,可以使用WebUI,也可以使用18080的/api/vi/application的api来请求json版本。
这种方式需要在运行前手动export SPARK_MASTER_HOST=localhost(会被诸如start-master.sh等文件访问修改)或者sh ./sbin/start-master.sh -h localhost && ./sbin/start-slave.sh spark://localhost:7077 可以通过-h指定localhost。不然可能Slave会连不上localhost,因为他会访问你的电脑名字,例如CALVINNEO-MB0:7077而不是localhost。
spark-defaults.conf中,有关Event Log的配置项有两种,一个是在HDFS上,一个是在硬盘上。

1
2
3
4
5
# 硬盘
spark.eventLog.enabled true
spark.eventLog.dir hdfs://localhost:9000/user/spark/appHist
# HDFS
spark.history.fs.logDirectory .../spark-2.4.4-bin-hadoop2.7/conf/history/spark-events

这个在磁盘上,供给History Server用,但是实际上和HDFS的内容是一样的。需要注意的是,一旦spark.eventLog.enabled被设置为True,就需要保证9000是可以访问的,不然可能会报错。

spark log

在每个节点的spark.log记载了这个节点的Spark日志,其中日志从低到高有TRACE、DEBUG、INFO、WARN、ERROR、FATAL等级别。INFO是默认级别。

gc log

在每个节点的gc.log上记载有这个节点JVM的GC情况

常用调试方法

  1. 查看RDD的分区数

    1
    rdd.partitions.size
  2. 查看RDD的logical plan

    1
    rdd.toDebugString
  3. 查看queryExecution

    1
    d.queryExecution
  4. 查看schema

    1
    d.printSchema
  5. 查看查询计划

    1
    df.explain

Spark on YARN的配置参数

在Spark1.2之后,Spark on YARN就已经支持动态资源分配了,当然这个机制在后面的版本中进行了迭代,我们以2.x版本为主进行介绍。主要参考了文章

Executor数量

有下面的一些字段需要考虑:

  1. spark.dynamicAllocation.maxExecutors/minExecutors
  2. num-executors
  3. spark.dynamicAllocation.initialExecutors

首先可以通过spark.dynamicAllocation.maxExecutorsspark.dynamicAllocation.minExecutors来限定最大和最小的Executor数量。
一开始Spark会启动num-executors数量个节点,我们可以设置一个较多的Executor节点执行一个小型任务,并跟踪INFO yarn.YarnAllocator,可以发现,最终会减少Executor需要的数量。此外,还有个spark.dynamicAllocation.initialExecutors,根据我的实践,如果同时设定num-executorsspark.dynamicAllocation.initialExecutors,那么后者的优先级通常会更高。我的实践是采用了下面的配置

1
--conf spark.dynamicAllocation.minExecutors=2  --conf spark.dynamicAllocation.maxExecutors=20  --conf spark.dynamicAllocation.enabled=true --conf spark.dynamicAllocation.initialExecutors=3 --conf spark.dynamicAllocation.maxExecutors=10  --num-executors 0  --driver-memory 1g  --executor-memory 1g  --executor-cores 2

结果发现,一开始启动了3个Executor,最后变成了2个。


我猜想这是因为如果打开了dynamicAllocation,那么spark.dynamicAllocation相关配置就会更高优先级,而num-executors实际上是一个较为陈旧的配置。我在爆栈网上提了个问题,希望有人能证实我的思想。

与此同时,当设置了spark.dynamicAllocation.minExecutors后,就不能设置spark.dynamicAllocation.initialExecutors或者spark.executor.instances/num-executors。【Q】如果它的值小于spark.dynamicAllocation.minExecutors,对于这种情况会尝试请求spark.dynamicAllocation.minExecutors这么多个Executor。

1
2
20/07/09 15:53:29 WARN Utils: spark.dynamicAllocation.initialExecutors less than spark.dynamicAllocation.minExecutors is invalid, ignoring its setting, please update your configs.
20/07/09 15:53:29 WARN Utils: spark.executor.instances less than spark.dynamicAllocation.minExecutors is invalid, ignoring its setting, please update your configs.

initialExecutors的设置数量,我司设置是最大数量maxExecutors(然而对外叫num-executors)的平方根。

文章指出,一旦num-executors或者spark.dynamicAllocation.minExecutors配置了,并且实际被分配了,那么就永远不会少于这个数量了,但在上面的实践中感觉并不是这样。根据知乎,应该spark.dynamicAllocation.minExecutors是下限。

当Executor空闲超过spark.dynamicAllocation.executorIdleTimeout,那么就会被移出,可以设置spark.dynamicAllocation.cachedExecutorIdleTimeout来避免移除缓存了数据的Executor。当有Task等待时间超过spark.dynamicAllocation.schedulerBacklogTimeout后,会加入新的Executor。一般来说,如果一个Executor空闲60s后将被移出,而如果有Task在backlog中等待1s将会新增Executor。

需要注意的是,并不是Spark集群得不到spark.dynamicAllocation.minExecutors个节点他就不能运行了。事实上Spark任务在Accepted到Running的阶段,Yarn只会先分配给driver这一个container,然后再由Driver来申请它需要的Executor,这个过程也能从上面的log中看出。

Executor内存和CPU

对于yarn来说,每个Node有NodeManager负责管理。NodeManager主要有两个配置:

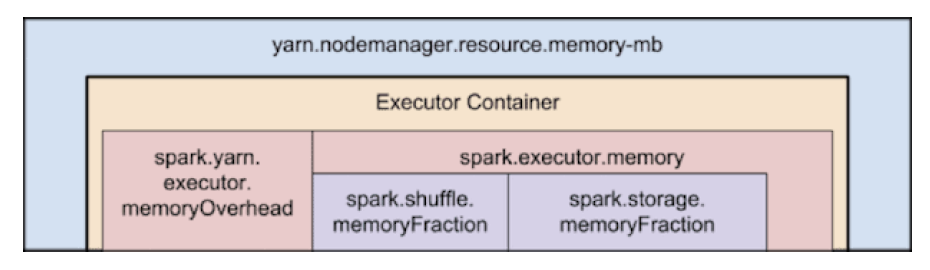
  1. yarn.nodemanager.resource.memory-mb表示每个node上,每个Container能够最多跑的内存。
    需要注意的是--executor-memory/spark.executor.memory不能和YARN中的yarn.nodemanager.resource.memory-mb直接对应,原因是Spark可以请求一些堆外内存,因此实际上要请求(1+spark.yarn.executor.memoryOverhead) * spark.executor.memory这么多的内存,这个Overhead的比例大概在7%左右。然后YARN实际分配的内存也会多一点,具体有yarn.scheduler.minimum-allocation-mbyarn.scheduler.increment-allocation-mb控制。
  2. yarn.nodemanager.resource.cpu-vcores表示每个node上,每个Container能够最多跑的核。这里的vcore应该是YARN的调度概念,申请5个executor-cores,等于要YARN调度5个vcore。
    这里需要注意的是,每个NodeManager自己最好也要保留一个核,比如说我们给每个Executor分配3个核,那么在一台16核的机器上,我们正好可以分配5台机器,剩下来的一个核心给NodeManager。

Driver内存

主要考虑collect的大小

Spark常见问题的解决方案

不得不说,Spark的相关问题很多还是比较难调试的,这是因为Spark它的错误日志在打印堆栈时往往喜欢打印它的内部状态,我们很难根据它的内部状态去trace到底是我们的什么操作导致它产生这个问题。并且Spark上处理的数据量规模一般都很大,并且都跑在诸如YARN托管的集群上,这个给Spark调试带了了更大的麻烦。

变量在节点之间共享

当我们需要在节点间共享变量,例如将某个字符串从Driver发送到Executor上时,需要这个变量能够被序列化。特别地,有一个经典的Bug就是Map#mapValues不能被序列化,这个解决方案是在mapValues之后再map(identity)一下。
特别需要注意的是因为RDD是分布式存储的,所以不能够直接当做变量处理,例如下面的代码是不能够使用的。对于这种情况,要么是将其中一个小RDD广播,要不就是将两个RDD去做个JOIN。在SparkSQL中,JOIN操作会被视情况优化为广播。

1
2
3
rdd1.map{
rdd2.filter(...)
}

scala.collection.mutable.WrappedArray$ofRef cannot be cast to Integer

根据SoF,这个错误就是把Array改成Seq就好了。

Extracting Seq[(String,String,String)] from spark DataFrame

这个错误发生在我们想往一个Row里面放一个类型为Seq的字段的时候。根据SoF,我们可以通过以下的方式来复现这个问题。我们创建了一个以Record为元素的Row,里面有一个content_processed,它的类型是Seq[Feature]),现在我们希望将Record里面的id字段搞掉,我们可以写出这样的代码

1
2
3
4
5
6
7
8
9
10
11
12
13
14
15
import org.apache.spark.sql.Row

case class Feature(lemma: String, pos_tag: String, ne_tag: String)
case class Record(id: Long, content_processed: Seq[Feature])

val df = Seq(
Record(1L, Seq(
Feature("ancient", "jj", "o"),
Feature("olympia_greece", "nn", "location")
))
).toDF

val seems_right = df.map(row => row.getAs[Seq[Feature]]("content_processed"))
// res10: org.apache.spark.sql.Dataset[Seq[Feature]] = [value: array<struct<lemma:string,pos_tag:string,ne_tag:string>>]
val err = seems_right.first

当我们对得到的seems_right执行Action触发计算时,就会得到错误

1
2
java.lang.ClassCastException: org.apache.spark.sql.catalyst.expressions.GenericRowWithSchema cannot be cast to $line67.$read$$iw$$iw$Feature
at org.apache.spark.sql.catalyst.expressions.GeneratedClass$GeneratedIteratorForCodegenStage1.serializefromobject_doConsume_0$(Unknown Source)

这个原因还是上面提到的Row的缺陷。其解决方案是借助于Dataset将Row转换为其他的数据结构,例如本命的Record,或者一个能够pattern match这个Record类的数据结构,例如(Long, Seq[(String, String, String)])

1
2
df.as[Record].map(_.content_processed).first
df.as[(Long, Seq[(String, String, String)])].map(_._2).first

考虑集群机器的问题

集群中有些机器是Power PC(PPC),这些机器可能会去报错

1
2
(Possible cause: can't load Power PC 64 LE-bit .so on a AARCH64-bit platform)
at java.lang.ClassLoader$NativeLibrary.load(Native Method)

这时候需要设置spark.blacklist.enabled=true把它们blacklist掉。

Spark SQL编写技巧

详见Spark相关机制详解中JOIN相关的章节。

Spark的其他组件的简介

GraphX

GraphX是基于Spark实现的一个图计算框架,能够对图进行建模。GraphX内置了一些实用的方法,如PageRank、SCC等,同时也提供了Pregel算法的API,我们可以利用Pregel来实现自己的一些图算法。目前GraphX似乎还没有实用的Python API,比较方便的是借助Scala。

ML和MLLib

ML和MLLib是Spark机器学习库的两个不同实现。其中MLLib是较老的基于RDD的实现,而ML是较新的基于Dataset的实现

Streaming

Spark相关机制详解

JOIN相关

Spark有三种Join方式,ShuffledHashJoin、BroadcastHashJoin、SortMergeJoin等。这三种方式都会涉及到数据的传输,所以JOIN的代价是比较大的。
前两种属于HashJoin的范畴,HashJoin一般就是将小表做为BuildTable,将大表作为ProbeTable。BuildTable采用Hash进行索引,在JOIN时,对大表进行遍历,并在BuildTable中进行查找JOIN。
后一种SortMergeJoin一般是对于两个大表而言的,将两个表都进行排序,然后采用类似归并排序的办法进行JOIN。问题是,这个过程是怎么并行的呢?一个简单的想法是如果我们Sort时候保证两个表的相同的Key都出现在一个Partition里面,那么对这个Partition做merge,就可以得到完整的结果。Spark是这样做的么?是的,Spark会先做一次Shuffle,把可能被JOIN的Key先划分到一个分区里面

Repartition相关

我们知道,rdd.repartition只是rdd.coalesce的别名,所以我们讨论后者。按照惯例,先上代码

1
2
3
4
5
6
7
8
9
10
11
12
13
14
15
16
17
18
19
20
21
22
23
24
25
26
27
28
29
30
31
32
33
34
35
36
37
38
39
40
41
42
43
44
45
46
47
48
49
50
51
// RDD.scala
/**
* Return a new RDD that is reduced into `numPartitions` partitions.
*
* This results in a narrow dependency, e.g. if you go from 1000 partitions
* to 100 partitions, there will not be a shuffle, instead each of the 100
* new partitions will claim 10 of the current partitions. If a larger number
* of partitions is requested, it will stay at the current number of partitions.
*
* However, if you're doing a drastic coalesce, e.g. to numPartitions = 1,
* this may result in your computation taking place on fewer nodes than
* you like (e.g. one node in the case of numPartitions = 1). To avoid this,
* you can pass shuffle = true. This will add a shuffle step, but means the
* current upstream partitions will be executed in parallel (per whatever
* the current partitioning is).
*
* @note With shuffle = true, you can actually coalesce to a larger number
* of partitions. This is useful if you have a small number of partitions,
* say 100, potentially with a few partitions being abnormally large. Calling
* coalesce(1000, shuffle = true) will result in 1000 partitions with the
* data distributed using a hash partitioner. The optional partition coalescer
* passed in must be serializable.
*/
def coalesce(numPartitions: Int, shuffle: Boolean = false,
partitionCoalescer: Option[PartitionCoalescer] = Option.empty)
(implicit ord: Ordering[T] = null)
: RDD[T] = withScope {
require(numPartitions > 0, s"Number of partitions ($numPartitions) must be positive.")
if (shuffle) {
/** Distributes elements evenly across output partitions, starting from a random partition. */
val distributePartition = (index: Int, items: Iterator[T]) => {
var position = new Random(hashing.byteswap32(index)).nextInt(numPartitions)
items.map { t =>
// Note that the hash code of the key will just be the key itself. The HashPartitioner
// will mod it with the number of total partitions.
position = position + 1
(position, t)
}
} : Iterator[(Int, T)]

// include a shuffle step so that our upstream tasks are still distributed
new CoalescedRDD(
new ShuffledRDD[Int, T, T](
mapPartitionsWithIndexInternal(distributePartition, isOrderSensitive = true),
new HashPartitioner(numPartitions)),
numPartitions,
partitionCoalescer).values
} else {
new CoalescedRDD(this, numPartitions, partitionCoalescer)
}
}

首先,对于有Shuffle的情况,是CoalescedRDD里面套了一个ShuffledRDD
首先来看这个ShuffledRDD,是用的HashPartitioner,这个是用key.hashCode,去模numPartitions来进行分区的,很简单。
ShuffledRDD的主要逻辑在mapPartitionsWithIndexInternal函数,它会去mapPartitions,然后加上一个表示分区索引的index。这个index是怎么指定的呢?实际上是distributePartition来做的,这个函数接受一个Int,和一个Iterator[T],表示一个分区里面所有的元素。这个函数是随机的,也就是对每个原有分区里面的项目,将它们随机分到某个分区里面,因此它并不保证原来相邻的条目最后还是会落到相邻的机器上。这里Internal的意思就是不会去调用sc.clean(f)
下面看看distributePartition的具体实现,首先scala.util.hashing.byteswap32是一个积性Hash函数,积性函数是满足f(ab)=f(a)f(b)的函数。不过我算了一下,也没看出来哪里是积性函数了。

1
2
scala.util.hashing.byteswap32(100) * scala.util.hashing.byteswap32(2) 
scala.util.hashing.byteswap32(200)

后来看了下wikipedia才知道,这里说的应该是乘法哈希,只是一种哈希算法,类似的还有除法哈希(就是mod)和Fibonacci哈希。这个产生[0..M-1]区间内的哈希值公式是

1
hash(key) = floor((k A mod W)/(W/M) )

其中:通常设置M为 2 的幂次方,W为计算机字长大小(也为2的幂次方),a为一个非常接近于W的数。它的关键思想是提取关键字k中间的几位数字。

不过无论如何,这里只是做一个随机数种子,.nextInt(numPartitions)返回一个0到n之间的随机数。
下面来看这个CoalescedRDD,它有和ShuffledRDD同样的numPartitions。这个partitionCoalescer实际上是Empty,最后用的是DefaultPartitionCoalescer。主要用在CoalescedRDD.getPartitions里面。

1
2
3
4
5
6
7
8
9
10
11
12
13
14
15
16
17
18
19
20
21
22
/**
* [performance] Spark's internal mapPartitionsWithIndex method that skips closure cleaning.
* It is a performance API to be used carefully only if we are sure that the RDD elements are
* serializable and don't require closure cleaning.
*
* @param preservesPartitioning indicates whether the input function preserves the partitioner,
* which should be `false` unless this is a pair RDD and the input
* function doesn't modify the keys.
* @param isOrderSensitive whether or not the function is order-sensitive. If it's order
* sensitive, it may return totally different result when the input order
* is changed. Mostly stateful functions are order-sensitive.
*/
private[spark] def mapPartitionsWithIndexInternal[U: ClassTag](
f: (Int, Iterator[T]) => Iterator[U],
preservesPartitioning: Boolean = false,
isOrderSensitive: Boolean = false): RDD[U] = withScope {
new MapPartitionsRDD(
this,
(_: TaskContext, index: Int, iter: Iterator[T]) => f(index, iter),
preservesPartitioning = preservesPartitioning,
isOrderSensitive = isOrderSensitive)
}

其中withScope的实现是

1
2
3
4
5
6
7
/**
* Execute a block of code in a scope such that all new RDDs created in this body will
* be part of the same scope. For more detail, see {{org.apache.spark.rdd.RDDOperationScope}}.
*
* Note: Return statements are NOT allowed in the given body.
*/
private[spark] def withScope[U](body: => U): U = RDDOperationScope.withScope[U](sc)(body)

它的作用是在给定代码块中创建的RDD具有相同的RDDOperationScopewithScope就像是一个 AOP(面向切面编程),嵌入到所有RDD 的转换和操作的函数中,RDDOperationScope会把调用栈记录下来,用于绘制Spark UI的 DAG(有向无环图,可以理解为 Spark 的执行计划)
实际上withScope就类似一个代理,为什么要做代理,是因为RDDOpertionScope需要输出一些调试信息。这有点类似于Haskell的Debug.trace一样。

Persist相关

unpersist流程

可以看到,同样是向BlockManagerMaster要求removeRdd

1
2
3
4
5
6
// SparkContext.scala
private[spark] def unpersistRDD(rddId: Int, blocking: Boolean): Unit = {
env.blockManager.master.removeRdd(rddId, blocking)
persistentRdds.remove(rddId) // 这是一个ConcurrentMap
listenerBus.post(SparkListenerUnpersistRDD(rddId)) // 前面提到过的,做Event log
}

下面就是从BlockManagerMaster里面去掉所有属于这个RDD的块。可以看到,它往所有的BlockManagerSlave发送RemoveRdd消息。

1
2
3
4
5
6
7
8
9
10
11
12
// BlockManagerMaster.scala
def removeRdd(rddId: Int, blocking: Boolean): Unit = {
val future = driverEndpoint.askSync[Future[Seq[Int]]](RemoveRdd(rddId))
future.failed.foreach(e =>
logWarning(s"Failed to remove RDD $rddId - ${e.getMessage}", e)
)(ThreadUtils.sameThread)
if (blocking) {
timeout.awaitResult(future)
}
}
// BlockManagerMessages.scala
case class RemoveRdd(rddId: Int) extends ToBlockManagerSlave

有一次,我们遇到了这样的错误

1
2
3
4
5
6
7
8
9
10
11
12
20/08/01 13:00:17 ERROR YarnClusterScheduler: Lost executor 144 on xxx: Executor heartbeat timed out after 305856 ms
20/08/01 13:00:21 ERROR YarnClusterScheduler: Lost executor 144 on xxx: Container container_xxx_01_000145 exited from explicit termination request.
20/08/01 14:03:04 ERROR ApplicationMaster: User class threw exception: org.apache.spark.rpc.RpcTimeoutException: Futures timed out after [300 seconds]. This timeout is controlled by spark.network.timeout
org.apache.spark.rpc.RpcTimeoutException: Futures timed out after [300 seconds]. This timeout is controlled by spark.network.timeout
at org.apache.spark.rpc.RpcTimeout.org$apache$spark$rpc$RpcTimeout$$createRpcTimeoutException(RpcTimeout.scala:47)
at org.apache.spark.rpc.RpcTimeout$$anonfun$addMessageIfTimeout$1.applyOrElse(RpcTimeout.scala:62)
at org.apache.spark.rpc.RpcTimeout$$anonfun$addMessageIfTimeout$1.applyOrElse(RpcTimeout.scala:58)
at scala.runtime.AbstractPartialFunction.apply(AbstractPartialFunction.scala:36)
at org.apache.spark.rpc.RpcTimeout.awaitResult(RpcTimeout.scala:76)
at org.apache.spark.storage.BlockManagerMaster.removeRdd(BlockManagerMaster.scala:131)
at org.apache.spark.SparkContext.unpersistRDD(SparkContext.scala:1844)
at org.apache.spark.rdd.RDD.unpersist(RDD.scala:217)

Demo

可以通过df.explain看物理查询计划
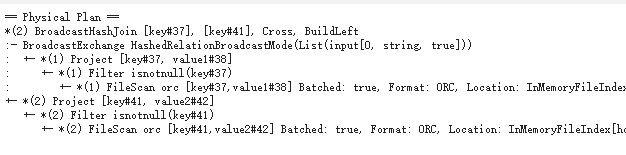
Reference

  1. https://zhuanlan.zhihu.com/p/67068559
  2. http://www.jasongj.com/spark/rbo/
  3. https://www.kancloud.cn/kancloud/spark-internals/45243
  4. https://www.jianshu.com/p/4c5c2e535da5
  5. http://jerryshao.me/2014/01/04/spark-shuffle-detail-investigation/
  6. https://github.com/hustnn/TungstenSecret
  7. https://jaceklaskowski.gitbooks.io/mastering-apache-spark/spark-shuffle-UnsafeShuffleWriter.html
  8. https://blog.k2datascience.com/batch-processing-apache-spark-a67016008167
  9. https://stackoverflow.com/questions/45553492/spark-task-memory-allocation/45570944
  10. https://0x0fff.com/spark-architecture-shuffle/
  11. https://0x0fff.com/spark-memory-management/
  12. https://www.slideshare.net/databricks/memory-management-in-apache-spark
  13. https://www.linuxprobe.com/wp-content/uploads/2017/04/unified-memory-management-spark-10000.pdf
  14. https://www.xiaoheidiannao.com/215670.html
  15. https://zhuanlan.zhihu.com/p/101797149
  16. https://mp.weixin.qq.com/s/M29AdSNy90ZoWFO6yP967Q?st=4E4EC5032168C875055B8539D8DF21E00C9505E1A359D84092C936E0CCA66518CF3DD79D1F951211AD4E74EE77C357659C0CF2B38EB5D901EEFFBBB7D1D22FF17B8290AF97D9EA29EF49B69C161D5B249ADA7B55585031E1A95FD955BBDF5FD4FFC52F892F43219C7C42DE53661D9EE72F5049491A75C067E71791364C162E767ECF5B3EE162E7D58566458BB0B55F100D4463EFD264C0E118CF40622573B62E87F319989CFEF3656FB8325659A3E1C2&vid=1688850523686960&cst=A4500263DF343A71C6A77F0747F6E08A9AAD04329A7D1B94AC827AA2C31F1654BE4E436938CB546B8839565025E35997&deviceid=24b21599-d5ef-4ce4-9465-be2e176a6aaf&version=3.1.7.3005&platform=win