Redis底层对象实现原理分析

我将直接根据github上的unstable分支代码分析。主要是2018年7月版本(dict实现的大部分)的和2020年8月版本(其他部分)的,所以可能会有细微差别。因为Redis的代码比较好读,并且质量很高。这里还推荐《Redis设计与实现》一书,它介绍了Redis中部分比较有趣的设计思路,可惜还有些没有覆盖到,本文中对这些有趣的设计也进行了论述。
Redis中主要包含了字符串STRING、列表LIST(双向链表)、集合SET、哈希表HASH、有序集合ZSET五种最常见的类型。在后续的版本中,还提供了bitmap、geohash、hyperloglog、stream这四种类型。
这些对象依赖于一些内部结构,包括字符串(SDS)、哈希表(dict)、链表(list)、跳表(zskiplist)、压缩双向表(ziplist)、快表等。注意出于性能原因,一个对象的实现往往根据具体的内容而选择不同的实现。列举如下:

  1. STRING
    使用int、sds(raw)或者embstr。
    下面的类型也是使用STRING的存储的:
    1. hyperloglog
    2. bitmap
  2. HASH
    使用dict或者ziplist方案。
  3. LIST
    3.0是使用list或者ziplist的方案。
    目前使用快表。
  4. SET
    使用dict或者intset的方案。
  5. ZSET
    视数据规模选用ziplist和skiplist+dict的方案。
    下面的类型也是使用ZSET的存储的:
    1. GEOHASH

本文中不介绍的是,它们在系列的其他文章中讲解:

  1. Redis基础设施
  2. Redis Sentinel
  3. Redis Cluster
  4. Redis AOF/RDB

最后,本文的主体部分已经完成,但后续仍然会进行修订,或者补充。

SDS

SDS(simple dynamic string)是Redis中的动态字符串实现,没错,Redis又重复了C/C++的传统,自己造了套轮子。我们考虑一下设计一个字符串的几个方面,复制/移动效率、空间效率、编码问题。例如在std::string中就会进行一些短串优化(SSO)(对每个字符串对象内部维护一段较短的buffer,当buffer不够用时再向堆请求空间)、写时拷贝(COW)的方法来进行优化,这会导致不同STL下c_str不同行为。但在字符串设计时,常将其实现成immutable的,以Java为例,这是为了防止在外部对容器(如Hashset)中对象的更改破坏容器的特性(Hashset的唯一性)、并发、便于进行常量池优化考虑。但是SDS却是可变的,并且被用在实现键和值中。例如SET hello world中,键hello和值world的底层都是SDS。此外,由于其可变性,SDS还被用作缓冲区。

查看sds的实现,发现是一个char*,难道直接就是一个char*的原生表示么?其实还真是这样,可以直接通过printf("%s", s)打印这个sds。

1
2
// sds.h
typedef char *sds;

那么问题来了,sds的中间段可以有\0,Redis总不会用O(n)来算字符串长度吧,那么元信息报错在哪里呢?我们看到Redis提供了支持不同最大长度的sdshdr类型,和sds开头的C-style的字符串函数。所以说元信息是保存在sdshdr里面的。

1
2
3
4
5
6
7
8
9
10
11
struct __attribute__ ((__packed__)) sdshdr5 {
unsigned char flags; /* 3 lsb of type, and 5 msb of string length */
char buf[];
};
...
struct __attribute__ ((__packed__)) sdshdr64 {
uint64_t len; /* used */
uint64_t alloc; /* excluding the header and null terminator */
unsigned char flags; /* 3 lsb of type, 5 unused bits */
char buf[];
};

简单解释一下这几个参数:

  1. len
    len表示了字符串的长度,所以我们省去了strlen的开销,虽然我们还是可以直接对sds用。
  2. buf
    特别地,buf实际上是一个二进制数组,\0可以出现在中间,Redis只保证buf最终以\0结尾。而这个buf实际上就是sds所指向的东西,我们将在稍后解释这一点。

现在要讲解的重点是Redis是如何组织sdshdr和sds的,事实上它们的内存布局如图所示。容易看出,给定一个sds,可以直接当做char*来处理,但也可以往前推sizeof(sdshdr)大小,去获得sdshdr结构。而到底往前推多少字节,取决于

1
2
3
4
      sds
|
v
sdshdr | sdshdr.buf

创建

1
2
3
4
sds sdsnew(const char *init) {
size_t initlen = (init == NULL) ? 0 : strlen(init);
return sdsnewlen(init, initlen);
}

可以发现,主要是会调用sdsnewlen这个函数。这个函数根据传入的init和initlen创建一个sds,例如:

1
mystring = sdsnewlen("abc",3)

如果init传入的是NULL,那么就用\0初始化。但不管怎么样,这个sds总是以\0结尾,所以可以用printf打印。但和char*不同的是,sds的中间段可以有\0

1
2
3
4
5
sds sdsnewlen(const void *init, size_t initlen) {
void *sh;
sds s;
char type = sdsReqType(initlen);
...

特别注意,这个函数会导致“复制”,而不仅仅是将指针指向init。
首先,看一下这个type

1
2
3
4
5
6
7
8
9
10
11
12
13
14
15
static inline char sdsReqType(size_t string_size) {
if (string_size < 1<<5)
return SDS_TYPE_5;
if (string_size < 1<<8)
return SDS_TYPE_8;
if (string_size < 1<<16)
return SDS_TYPE_16;
#if (LONG_MAX == LLONG_MAX)
if (string_size < 1ll<<32)
return SDS_TYPE_32;
return SDS_TYPE_64;
#else
return SDS_TYPE_32;
#endif
}

可以看出,根据要分配的字符串的长度,会给到不同的SDS_TYPE_,实际上也就对应到不同长度的sdshdr对象。比如对长度小于1<<8的字符串来说,我们只需要一个sdshdr8类型的头部去维护它的长度。

1
2
3
4
5
6
struct __attribute__ ((__packed__)) sdshdr8 {
uint8_t len; /* used */
uint8_t alloc; /* excluding the header and null terminator */
unsigned char flags; /* 3 lsb of type, 5 unused bits */
char buf[];
};

下面我们就要具体来分配一个sdshdr对象了。

1
2
3
4
5
6
7
// 续sdsnewlen
...
/* Empty strings are usually created in order to append. Use type 8
* since type 5 is not good at this. */
if (type == SDS_TYPE_5 && initlen == 0) type = SDS_TYPE_8;
int hdrlen = sdsHdrSize(type);
...

看一下sdsHdrSize,不出所料,是根据typesizeof算得需要使用的sdshdr对象的大小。

1
2
3
4
5
6
7
8
9
10
static inline int sdsHdrSize(char type) {
switch(type&SDS_TYPE_MASK) {
case SDS_TYPE_5:
return sizeof(struct sdshdr5);
// ...
case SDS_TYPE_64:
return sizeof(struct sdshdr64);
}
return 0;
}

下面是分配了sdshdr对象和sds字符串的所有的内存。sh指向的是包含头部和实际数据以及结尾的\0的一块内存。

1
2
3
4
5
6
7
8
9
...
unsigned char *fp; /* flags pointer. */
sh = s_malloc(hdrlen+initlen+1);
if (sh == NULL) return NULL;
if (init==SDS_NOINIT)
init = NULL;
else if (!init)
memset(sh, 0, hdrlen+initlen+1);
...

下面一个有趣的是s,它实际上就是最后要返回的sds了。
SDS_HDR_VAR(T,s)表示最大长度为T,指针为s(实际数据而不是header)的sds,生成其header的指针,命名为sh。fp指向header中的flags字段,直接从s计算了。

1
2
3
4
5
6
7
8
9
10
11
12
13
14
15
16
17
18
19
20
21
22
...
s = (char*)sh+hdrlen;
fp = ((unsigned char*)s)-1;
switch(type) {
case SDS_TYPE_5: {
*fp = type | (initlen << SDS_TYPE_BITS);
break;
}
// ...
case SDS_TYPE_64: {
SDS_HDR_VAR(64,s);
sh->len = initlen;
sh->alloc = initlen;
*fp = type;
break;
}
}
if (initlen && init)
memcpy(s, init, initlen);
s[initlen] = '\0';
return s;
}

list

在新版本下,Redis中的list(t_list)的实现借助于快表,但本章主要是讲解原始双向链表list的实现,它被定义在adlist文件中。

1
2
3
4
5
6
7
8
9
10
11
12
13
14
15
16
17
typedef struct listNode {
struct listNode *prev;
struct listNode *next;
void *value;
} listNode;

typedef struct list {
listNode *head;
listNode *tail;
// 复制
void *(*dup)(void *ptr);
// 释放
void (*free)(void *ptr);
// 对比
int (*match)(void *ptr, void *key);
unsigned long len;
} list;

可以看到,保存了head、tail和len的值,因此len操作是O(1)的。

dict

dict是Redis中非常重要的结构,它不仅被用来实现HASH等数据结构,而且还被广泛地使用到Redis数据库服务器等基础设施中。在本章中,将介绍dict的实现,并使用HASH数据结构跟踪到dict的上层调用。我们首先看一下dict类的包含关系。
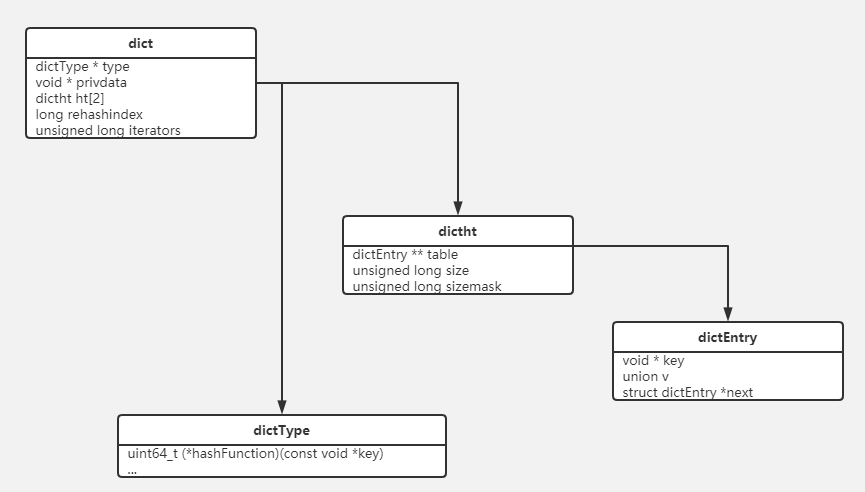
其中,union v包含下面的几个类型

1
2
3
4
5
6
union {
void *val;
uint64_t u64;
int64_t s64;
double d;
} v;

dict的基本实现与Rehash机制

在这个章节中,我们主要介绍dict的主要实现和Hash以及Rehash机制。

dictEntry、dictType、dictht

dict的实现在dict.h中,注意在deps/hiredis中也有另一个实现,注意不要搞混。

1
2
3
4
5
6
7
8
9
10
11
typedef struct dictEntry {
void *key;
union {
void *val;
uint64_t u64;
int64_t s64;
double d;
} v;
// next指针
struct dictEntry *next;
} dictEntry;

dictEntry是一个KV对,可以看到Redis以链表的形式存储KV,并且使用union来优化空间存储。我们不能从dictEntry获得任何的类型信息,实际上它是作为下面dictht对象的一个组件来使用的。
下面是dictType这个类,实际上决定了对应的行为。

1
2
3
4
5
6
7
8
typedef struct dictType {
uint64_t (*hashFunction)(const void *key);
void *(*keyDup)(void *privdata, const void *key);
void *(*valDup)(void *privdata, const void *obj);
int (*keyCompare)(void *privdata, const void *key1, const void *key2);
void (*keyDestructor)(void *privdata, void *key);
void (*valDestructor)(void *privdata, void *obj);
} dictType;

在server.c中,分门别类定义了各种dictType。这些type都是在dictCreate作为参数传入的,会产生不同的复制、析构、hash、比较等特性。
我们在先前也介绍过了db->expires是一个keyptrDictType,他在析构的时候不会删除对应的key,但是db->dict是dbDictType,这就不一样了。

1
2
3
4
5
6
7
8
9
10
11
12
13
14
15
16
17
18
19
20
21
/* Generic hash table type where keys are Redis Objects, Values
* dummy pointers. */
dictType objectKeyPointerValueDictType = {
dictEncObjHash, /* hash function */
NULL, /* key dup */
NULL, /* val dup */
dictEncObjKeyCompare, /* key compare */
dictObjectDestructor, /* key destructor */
NULL /* val destructor */
};

/* Like objectKeyPointerValueDictType(), but values can be destroyed, if
* not NULL, calling zfree(). */
dictType objectKeyHeapPointerValueDictType = {
dictEncObjHash, /* hash function */
NULL, /* key dup */
NULL, /* val dup */
dictEncObjKeyCompare, /* key compare */
dictObjectDestructor, /* key destructor */
dictVanillaFree /* val destructor */
};

dictht描述了一个哈希表,它将dictEntry组织起来,它维护了长度和节点数等信息,但并没有描述这个哈希表的行为、类型等信息,它将被进一步封装。

1
2
3
4
5
6
typedef struct dictht {
dictEntry **table;
unsigned long size;
unsigned long sizemask;
unsigned long used;
} dictht;

具体解释一下dictht的一些成员:

  1. table
    乍一看,就很奇怪,为啥是个二维数组呢?
    外面一维是哈希的,里面一维是开链表。
    这个在Rehash的时候有介绍,到时候要将这些桶拆开来,将每个dictEntry而不是每个桶进行Rehash。【Q】为什么要这样麻烦呢?这是因为到时候桶里面的元素不一定都属于新的桶里面了。
  2. size
    这里的size表示桶的数量,是2的指数。因此size的扩张只会在dictExpand中发生。而真正添加元素只是加到对应桶的开链表里面。
    需要和dictSize函数区分一下,后者表示dict中两个ht中所有的元素数量而不是的数量。
  3. sizemask
    始终是size-1,这个是2质数增长的一个很经典的一个实现了。
  4. used
    表示哈希表中装载的元素数量,也就是每个桶中所有链表的长度之和。
    因为开链表的存在,used是可能大于size的

Hash

看到这里有个疑问,似乎这里的key是一个指针,而不是我想象中的一个SDS或者char*值,难道我们仅仅是根据key的指针值来进行哈希么?事实上并非如此,根据不同的dictType,实际上会有不同的Hash函数。可以看到对于大多数key为SDS的情况,会落到dictGenHashFunction的调用上。在3.0时代,这个函数是一个对MurmurHash2函数的调用,在当前版本下,这是一个对siphash函数的调用

1
2
3
4
5
6
7
8
9
10
11
12
13
14
15
16
17
18
19
20
21
22
23
24
25
26
27
28
29
30
31
32
33
34
// server.c
/* Set dictionary type. Keys are SDS strings, values are ot used. */
dictType setDictType = {
dictSdsHash, /* hash function */
NULL, /* key dup */
NULL, /* val dup */
dictSdsKeyCompare, /* key compare */
dictSdsDestructor, /* key destructor */
NULL /* val destructor */
};

uint64_t dictSdsHash(const void *key) {
return dictGenHashFunction((unsigned char*)key, sdslen((char*)key));
}

uint64_t dictGenHashFunction(const void *key, int len) {
return siphash(key,len,dict_hash_function_seed);
}

uint64_t siphash(const uint8_t *in, const size_t inlen, const uint8_t *k) {
#ifndef UNALIGNED_LE_CPU
uint64_t hash;
uint8_t *out = (uint8_t*) &hash;
#endif
uint64_t v0 = 0x736f6d6570736575ULL;
uint64_t v1 = 0x646f72616e646f6dULL;
uint64_t v2 = 0x6c7967656e657261ULL;
uint64_t v3 = 0x7465646279746573ULL;
uint64_t k0 = U8TO64_LE(k);
uint64_t k1 = U8TO64_LE(k + 8);
uint64_t m;
const uint8_t *end = in + inlen - (inlen % sizeof(uint64_t));
const int left = inlen & 7;
...

dict和dictAdd

我们接着来看上面的dictht结构。就和我在libutp里面看到的环状缓冲区一样,这里sizesizemask已经是老套路了,我们已经可以想象size一定是按照2的级数增长的,然后sizemask一定全是1给哈希函数算出来的值&一下。下面我们来看一个dictAdd的调用过程,以验证我们的思路。
这些宏用来封装调用dictType中定义的方法,从而实现对不同类型的不同哈希。

1
2
3
4
5
#define dictHashKey(d, key) (d)->type->hashFunction(key)
#define dictCompareKeys(d, key1, key2) \
(((d)->type->keyCompare) ? \
(d)->type->keyCompare((d)->privdata, key1, key2) : \
(key1) == (key2))

检查是否已经存在

dictAdd会最终调用dictAddRaw,然后会调用一个_dictKeyIndex,这个函数给定key,返回哈希表中可以插入到的slot的index。如果key已经在哈希表中存在,返回-1,并通过existing取回。

1
2
3
// dictAddRaw <- dictAdd
if ((index = _dictKeyIndex(d, key, dictHashKey(d,key), existing)) == -1)
return NULL;

这个函数主要就是一个for循环,这个循环在dict中是非常常见的对所有dictEntry遍历的循环,我们列在“dict遍历抽象主干代码”这个章节里面。循环关键如下:

  1. 遍历所有的table,如果正在Rehash过程中,那么就会有两个table。
    【Q】根据源码中的注释,如果在Rehash过程中_dictKeyIndex返回那个idx,一定是ht[1]对应的索引值?
    这在说啥呢?参考“会不会有两个键出现在两个table里面?”这个讨论,如果在Rehash过程中,我们插入要插入到新的表ht[1]中,所以插入的位置idx,也应该是新的表中的位置idx。下面的for循环从0到1的顺序保证了这一点。

    1
    for (table = 0; table <= 1; table++)
  2. 我们根据key的哈希值,找到对应的桶d->ht[table].table[idx]

  3. 我们遍历这个桶的开链表。

1
2
3
4
5
6
7
8
9
10
11
12
13
14
15
16
17
18
19
20
21
22
23
24
25
26
27
// _dictKeyIndex <- dictAddRaw <- dictAdd
static long _dictKeyIndex(dict *d, const void *key, uint64_t hash, dictEntry **existing)
{
unsigned long idx, table;
dictEntry *he;
if (existing) *existing = NULL;

/* Expand the hash table if needed */
if (_dictExpandIfNeeded(d) == DICT_ERR)
return -1;
// 这个for循环在“dict遍历抽象主干代码”也列举了出来。
for (table = 0; table <= 1; table++) {
idx = hash & d->ht[table].sizemask;
// 注意Redis使用开链法解决哈希冲突,所以要搜完`d->ht[table].table[idx]`这条链。
he = d->ht[table].table[idx];
while(he) {
if (key==he->key || dictCompareKeys(d, key, he->key)) {
// 如果key和he->key相等(指针相等或者值相等),我们尝试赋值给*existing
if (existing) *existing = he;
return -1;
}
he = he->next;
}
// 如果不在Rehash过程中,我们不找ht[1],这个机制在后面的`dictFind`等函数中也会出现
if (!dictIsRehashing(d)) break;
}
...

函数的返回值选取idx即可,具体的dictEntry *,如果调用者有需要,我们才设置*existing用来返回。因为我们用这个函数不仅是看有没有,还要顺便获得在后面插入位置。返回并保存链表头,后面就可以直接从链表头插入,这样的好处是一方面我们只要记录一个链表头,另一方面是Redis假设最近被添加的字段会被频繁访问。
这里可以总结出链表使用的经验,如果需要快速push,保存链表头。如果需要快速pop,保存链表尾。

1
2
3
...
return idx;
}

在刚才的代码中出现了dict这个结构,它也就是我们真正提供的完备的哈希表。因此,到这里的“继承关系”是dict <- dictht <- dictEntry

1
2
3
4
5
6
7
typedef struct dict {
dictType *type;
void *privdata;
dictht ht[2];
long rehashidx;
unsigned long iterators;
} dict;

同样简单介绍一下成员:

  1. type/privdata
    用来实现类似继承的机制,这样我们可以自定义dict的行为。
  2. ht
    是两个dictht结构,每一个dictht就是上面提到的一个哈希表。这个用来实际保存数据。
    可是为什么是长度为2的数组呢?这里的ht[1]在rehash的时候用,在rehash的时候会把ht[0]慢慢搬到ht[1]上。
  3. rehashidx
    用来表示此时Rehash的过程(具体机制查看后文)。
    -1表示未在Rehash。
    >=0表示Rehash开始,将要移动ht[0].table[rehashidx]这个桶。
  4. iterators
    表示这个字典上的安全迭代器的个数。

哈希表的扩容

当哈希表容量不够时就需要进行扩容,同时需要进行Rehash。下面我们正式来研究哈希表的扩容与Rehash部分
根据_dictExpandIfNeeded,扩容需要满足几个条件:

  1. used >= size
    回忆一下,size是桶的数量,used是键的数量。used是会大于size的,因为开链表。
  2. dict_can_resize
    根据updateDictResizePolicy函数,在一些情况下dict_can_resizefalse,这时候不会扩张。
    根据《Redis设计与实现》,这种情况发生在BGSLAVE或者BGREWRITEAOF命令运行时针对COW机制的一个优化。这两个命令实际上是后台写RDB和AOF的实现。
  3. 但是当used/size大于一个比例,默认是5,会强制扩张(注意扩张还是按照2倍)。
1
2
3
4
5
6
7
8
9
10
11
12
13
14
15
16
17
#define dictIsRehashing(d) ((d)->rehashidx != -1)
static int _dictExpandIfNeeded(dict *d)
{
// 此时正在进行Rehash(有没有很奇怪为啥会有个正在进行中的状态?请看下文)
if (dictIsRehashing(d)) return DICT_OK;

// 哈希表是空的
if (d->ht[0].size == 0) return dictExpand(d, DICT_HT_INITIAL_SIZE);

// Hash表扩张条件:
if (d->ht[0].used >= d->ht[0].size &&
(dict_can_resize || d->ht[0].used/d->ht[0].size > dict_force_resize_ratio))
{
return dictExpand(d, d->ht[0].used*2);
}
return DICT_OK;
}

下面的dictExpand就是扩容函数

1
2
3
4
5
6
7
8
9
10
11
12
13
14
15
16
17
18
19
/* Expand or create the hash table */
int dictExpand(dict *d, unsigned long size)
{
// size是要扩张到的大小,在计算时是按照used成比例放大的,所以肯定比used要大。
if (dictIsRehashing(d) || d->ht[0].used > size)
return DICT_ERR;

dictht n; /* the new hash table */
unsigned long realsize = _dictNextPower(size);

/* Rehashing to the same table size is not useful. */
if (realsize == d->ht[0].size) return DICT_ERR;

/* Allocate the new hash table and initialize all pointers to NULL */
n.size = realsize;
n.sizemask = realsize-1;
n.table = zcalloc(realsize*sizeof(dictEntry*));
n.used = 0;
...

假如ht[0]是空的,那这是一次初始化,直接将ht[0]指向新的hash表n

1
2
3
4
5
6
...
if (d->ht[0].table == NULL) {
d->ht[0] = n;
return DICT_OK;
}
...

否则将ht[1]指向新的哈希表n

1
2
3
4
5
...
d->ht[1] = n;
d->rehashidx = 0;
return DICT_OK;
}

Rehash

我们看到扩容操作只是创建了一个空的哈希表,并没有真正移动ht[0]的元素到ht[1]对应的位置上(这个过程被称作桶转移),难道这里又是COW了?
答案是肯定的。通过优秀的英文能力,我们猜到了真正做Rehash的函数int dictRehash(dict *d, int n)dictRehashdictRehashMilliseconds_dictRehashStep中被调用。

dictRehashd做**n**步的Rehash,其中一步表示将ht[0]中的一个桶d->ht[0].table[d->rehashidx]移到ht[1]上。注意下面几点:

  1. 这里的d->ht[0].table[d->rehashidx]是一个开链表。

  2. 我们不能直接移动桶,因为到时候里面的元素可能Rehash到不同的桶里面。所以,我们只能遍历桶的开链表里面的所有key,然后逐个放到新的table里面。

  3. 容易看出ht[0].size > rehashidx是始终成立的。
    因为ht[0].size就是桶的最多数量,rehashidx表示现在哈希到第几个桶了。

  4. 这个**n**的计算不包括空桶,Redis每次哈希可以跳过empty_visits个空桶,这时候我们要做的仅仅是自增d->rehashidx

  5. dictRehashMilliseconds
    定时Rehash函数incrementallyRehash在后台被databasesCron定时调用,起到定时Rehash每个db的dict和expire表的作用。
    dictRehashMilliseconds是一个时间相关的函数,它会在在ms毫秒的时间里面rehash尽可能多的桶,也就是每rehash 100个桶之后检查一下有没有超时,没有就接着来。

    1
    2
    3
    4
    5
    6
    7
    8
    9
    10
    11
    12
    13
    14
    15
    16
    17
    18
    19
    20
    21
    22
    23
    24
    25
    26
    27
    28
    29
    30
    31
    32
    33
    34
    // server.c
    void databasesCron(void) {
    ...

    if (server.activerehashing) {
    for (j = 0; j < dbs_per_call; j++) {
    int work_done = incrementallyRehash(rehash_db);
    ...
    }

    int incrementallyRehash(int dbid) {
    /* Keys dictionary */
    if (dictIsRehashing(server.db[dbid].dict)) {
    dictRehashMilliseconds(server.db[dbid].dict,1);
    return 1; /* already used our millisecond for this loop... */
    }
    /* Expires */
    if (dictIsRehashing(server.db[dbid].expires)) {
    dictRehashMilliseconds(server.db[dbid].expires,1);
    return 1; /* already used our millisecond for this loop... */
    }
    return 0;
    }

    int dictRehashMilliseconds(dict *d, int ms) {
    long long start = timeInMilliseconds();
    int rehashes = 0;

    while(dictRehash(d,100)) {
    rehashes += 100;
    if (timeInMilliseconds()-start > ms) break;
    }
    return rehashes;
    }
  6. _dictRehashStep
    _dictRehashStep在诸如dictAddRawdictGenericDeletedictFinddictGetRandomKey等函数中被调用,作为dictRehashMilliseconds的补充。

    1
    2
    3
    4
    static void _dictRehashStep(dict *d) {
    // 只有当
    if (d->iterators == 0) dictRehash(d,1);
    }

下面我们来看一下Rehash的过程。最外面是一个大循环,表示移动最多n个桶。

1
2
3
4
5
6
7
int dictRehash(dict *d, int n) {
int empty_visits = n*10;
if (!dictIsRehashing(d)) return 0;

while(n-- && d->ht[0].used != 0) {
dictEntry *de, *nextde;
...

我们最多跳过empty_visits == n*10个空桶,此时只更新rehashidx,不计算n

1
2
3
4
5
6
7
8
9
...
/* Note that rehashidx can't overflow as we are sure there are more
* elements because ht[0].used != 0 */
assert(d->ht[0].size > (unsigned long)d->rehashidx);
while(d->ht[0].table[d->rehashidx] == NULL) {
d->rehashidx++;
if (--empty_visits == 0) return 1;
}
...

下面开始移动非空桶。注意我们不能直接将这个非空桶整个移植过去,因为里面的key在Rehash之后可能会去到其他的桶里面,所以我们用de来遍历这个开链表。

1
2
3
4
5
6
7
8
9
10
11
12
13
14
15
16
17
...
de = d->ht[0].table[d->rehashidx];
while(de) {
uint64_t h;
nextde = de->next;
/* Get the index in the new hash table */
h = dictHashKey(d, de->key) & d->ht[1].sizemask;
de->next = d->ht[1].table[h];
d->ht[1].table[h] = de;
d->ht[0].used--;
d->ht[1].used++;
de = nextde;
}
d->ht[0].table[d->rehashidx] = NULL;
d->rehashidx++;
}
...

在大循环移动完n个桶,或者遇到太多的空桶退出之后,检查ht[0]是不是已经结束了。

1
2
3
4
5
6
7
8
9
10
11
12
13
14
...
// 当ht[0].used为0时过程终止,将d->rehashidx设为-1。
if (d->ht[0].used == 0) {
zfree(d->ht[0].table);
// 将ht[1]按指针赋值给ht[0]。
d->ht[0] = d->ht[1];
_dictReset(&d->ht[1]);
d->rehashidx = -1;
return 0;
}

// 否则Rehash还没有结束。
return 1;
}

我们发现在Rehash的过程中,调用dictRehash都将ht[0]掏空一点给ht[1],直到最后过程结束后将ht[1]指针赋值给ht[0]

ht[0]和ht[1]的顺序

【Q】如果在Rehash过程中,增删改查需要考虑下面几点(注意我们的语境是在Rehash下!!)

  1. 对于插入操作,会不会在ht[0]中已经有了,我们又新插入到ht[1],导致一个值在两个地方,或者反过来?
    这个是不可能的。首先,我们要规定插入只能在ht[1];然后在每次插入前,我们都要在ht[0]ht[1]中都检查一遍。
  2. 对于删除操作,会不会只删除ht中的数据?

总结一下,在Rehash的过程中我们插入必须对ht[1],而查找删除优先在ht[0]操作,然后再ht[1]。Rehash在对哈希表每一次的增删改查中渐进进行,我们查看相关代码。

首先看插入,我们首先调用_dictKeyIndex,如果不存在,则:

  1. 如果不在Rehash,那么返回ht[0]中待插入的idx
  2. 如果在Rehash,则返回ht[1]。关于这部分,在_dictKeyIndex讲过了。
1
2
3
4
5
6
7
8
9
10
11
12
13
14
15
16
17
// dictAddRaw
dictEntry *dictAddRaw(dict *d, void *key, dictEntry **existing)
{
long index;
dictEntry *entry;
dictht *ht;

if (dictIsRehashing(d)) _dictRehashStep(d);

/* Get the index of the new element, or -1 if
* the element already exists. */
if ((index = _dictKeyIndex(d, key, dictHashKey(d,key), existing)) == -1)
return NULL;

ht = dictIsRehashing(d) ? &d->ht[1] : &d->ht[0];
...
}

对查找来说,也是从ht[0]查,再查ht[1]

1
2
3
4
5
6
7
8
9
10
11
12
13
14
15
16
// dictFind
if (dictIsRehashing(d)) _dictRehashStep(d);
// 调用对应的hash function获得哈希值h
h = dictHashKey(d, key);
for (table = 0; table <= 1; table++) {
idx = h & d->ht[table].sizemask;
// 找到第table(0或者1)个ht的第idx的元素
he = d->ht[table].table[idx];
while(he) {
if (key==he->key || dictCompareKeys(d, key, he->key))
return he;
he = he->next;
}
// 如果不在Rehash过程中,我们找完ht[0]就不找了,因为只可能ht[0]有内容
if (!dictIsRehashing(d)) return NULL;
}

删除同理

1
2
3
4
5
6
7
8
9
// dictGenericDelete
if (dictIsRehashing(d)) _dictRehashStep(d);
h = dictHashKey(d, key);
for (table = 0; table <= 1; table++) {
idx = h & d->ht[table].sizemask;
he = d->ht[table].table[idx];
...
// _dictKeyIndex
// 见前面

遍历机制(dictScan)

Redis中的遍历分为两块,第一个是dictScan函数,第二个是借助dictIterator这个迭代器。其中,前者用来对外提供SCAN,后者主要用来服务其他数据结构。我们首先介绍dictScan。
由于Redis中哈希表的动态扩展和缩小中有渐进Rehash的过程,所以做到恰巧一遍的遍历是非常难的,函数dictScan的实现确保了每个元素都能遍历到,但可能存在元素被重复遍历。函数dictScan接受一个cursor即参数v,并移动这个cursor,返回其新值,初始情况下我们传入v为0。
dictScanFunction表示需要对每一个dictEntry设置的函数。
dictScanBucketFunction表示需要对每个桶设置的函数。

1
2
3
4
5
6
7
8
9
10
11
12
13
14
15
16
17
18
19
20
21
22
23
24
25
26
27
28
29
30
31
#define dictSize(d) ((d)->ht[0].used+(d)->ht[1].used)
unsigned long dictScan(dict *d, unsigned long v, dictScanFunction *fn, dictScanBucketFunction* bucketfn, void *privdata){
dictht *t0, *t1;
const dictEntry *de, *next;
unsigned long m0, m1;

// 如果没有元素,直接返回0,表示遍历完毕
if (dictSize(d) == 0) return 0;
if (!dictIsRehashing(d)) {
// 假设不在Rehash过程中,此时只有ht[0]中有元素
t0 = &(d->ht[0]);
m0 = t0->sizemask;

// 下面这一串表示对桶和桶中所有元素调用bucketfn和fn回调函数
if (bucketfn) bucketfn(privdata, &t0->table[v & m0]);
de = t0->table[v & m0];
while (de) {
next = de->next;
fn(privdata, de);
de = next;
}

v |= ~m0;
v = rev(v);
v++;
v = rev(v);
} else {
...
}
return v;
}

这里对v的更新十分奇妙,按照理想情况,我们完全可以去直接v++,然后遍历完所有的桶。但是那四行代码的行为却很奇特,这种遍历方法被称为reverse binary iteration:

  1. 首先第一行将v的会和~mask or一下
  2. 第二行调用revv按比特反转,这时候高位填充的1就到了最低位上。
  3. 接着后面两行进行自增,再倒回去。

这么做的结果是二进制的进位是反向的,我们首先对最高位自增,如果高位溢出了,就对低位进位。

我们首先介绍一下rev这个函数,它的作用是将一个二进制串前后倒置。

1
2
3
4
5
6
7
8
9
10
11
12
13
14
15
16
17
18
// 进行位反转
static unsigned long rev(unsigned long v) {
unsigned long s = 8 * sizeof(v); // bit size; must be power of 2
unsigned long mask = ~0;
while ((s >>= 1) > 0) {
mask ^= (mask << s);
v = ((v >> s) & mask) | ((v << s) & ~mask);
}
return v;
}

int main(){
using namespace std;
unsigned long long x;
x = 0b1011011101111;
cout << std::bitset<64>(x) << endl;
cout << std::bitset<64>(rev(x)) << endl;
}

打印下来是这样的

1
2
0000000000000000000000000000000000000000000000000001011011101111
1111011101101000000000000000000000000000000000000000000000000000

mask = (uint8_t) 15(0x1111)、v = (uint8_t) 2为例查看一下这个过程。

1
2
3
4
5
00000010(2)初始状态
-> 11110010 `15`是0x1111,`~15`是0x11110000。这么做的目的是将“没用到”的位全部置为1
-> 01001111 rev函数逆向原串
-> 01010000 自增
-> 00001010(10) rev函数再逆向回来

我们从v=0开始迭代,发现值依次是

1
2
0 8 4 12 2 10 6 14 1 9 5 13 3 11 7 15 0
0b0000 0b1000 0b0100 0b1100 0b0010 0b1010 0b0110 0b1110 0b0001 0b1001 0b0101 0b1101 0b0011 0b1011 0b0111 0b1111

【Q】为什么要做这样的设计呢?因为Rehash是以2为倍数扩展或者收缩的,这样遍历之下,能够保证Rehash之后,既不会漏掉,也不会重复遍历。

我们考虑将数字[0,7]哈希到2和4的不同情况,可以发现哈希到4时每个slot里数字的后2位都相同,而哈希到2时每个slot里数字的后1位相同。我们可以认为从$2^i$到$2^{i+1}$,我们将每个slot中的数按照第i位的值分成两个slot。

1
2
3
4
5
6
7
0(00):0(000),4(100)
1(01):1(001),5(101)
2(10):2(010),6(110)
3(11):3(011),7(111)
===
0:0(000),2(010),4(100),6(110)
1:1(001),3(011),5(101),7(111)

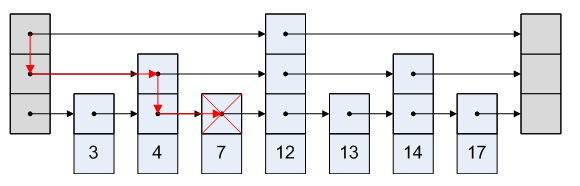
在上面讨论了更通用的情形,特别用了slot而不是之前提到的桶的概念。在这篇文章中,一个桶指的是ht中哈希值相同的所有元素组成的链表,也就是dictht的dictEntry** table的第一维。现在讨论的dictScan针对桶的扫描而不是元素的扫描。特别地,我们将哈希表中的N个桶合并成N/2个桶时,相当于做一次针对桶的哈希。考虑一个8个桶的哈希表,其桶的遍历顺序是0 4 2 6 1 5 3 7 0。假设遍历6(110)前我们将8个桶缩小到4个桶,那么桶6中的元素应当被映射到新桶2(10)中了,因此我们应当遍历2(10)这个桶,此时我们已经遍历过的桶如下示意

1
2
3
4
5
新桶      原桶
0(00):0(000),4(100)
1(01):
2(10):2(010)
3(11):

容易发现此时我们重复遍历了原来桶2(010)中的元素。这个过程结束时新的mask为3,v会更新到1(01),我们发现下面要遍历的1 5两个就桶被合并到了1(01)这个新桶里面。如果考虑遍历2(010)前发生了缩小,那么我们就不要重复遍历元素。

遍历机制(迭代器)

迭代器的声明如下,容易看出通过dindextable我们可以确定一个桶。safe表示这个迭代器是否是一个安全的迭代器。

1
2
3
4
5
6
7
8
9
10
11
12
13
14
15
16
typedef struct dictIterator {
// 被迭代的字典
dict *d;
// 迭代器当前所指向的dictEntry位置
long index;
// 正在被迭代的dictht号码,值可以是 0 或 1
int table;
// 标识这个迭代器是否安全
int safe;
// 当前迭代到的节点的指针
dictEntry *entry;
// 见下文说明
dictEntry *nextEntry;
/* unsafe iterator fingerprint for misuse detection. */
long long fingerprint;
} dictIterator;

我们将在下面逐一介绍相关的字段用法

  1. 安全迭代器
    安全的迭代器是什么意思呢?比如在Rehash机制中,存在safe迭代器的情况下是暂停Rehash的。只有当iterators数量为0时,才会进行Rehash。

    1
    2
    3
    4
    5
    6
    7
    8
    9
    /* Rehash for an amount of time between ms milliseconds and ms+1 milliseconds */
    int dictRehashMilliseconds(dict *d, int ms) {
    if (d->iterators > 0) return 0;
    ...
    }

    static void _dictRehashStep(dict *d) {
    if (d->iterators == 0) dictRehash(d,1);
    }

    需要注意的是,在Redis的6.0版本上,dictScan也会增加iterators,从而导致rehash停止。而在5.0版本还没有这个限制。【Q】为什么会有这个限制呢?

  2. fingerprint
    用来将两个ht的指针、sizeused进行哈希,在dictNext开始和结束之后比较哈希值,如果不一样的话,就assert。这主要是用来保证,当不安全迭代器被使用时,该迭代器的使用者不能对这个哈希表做出不合法的操作。

dict迭代器相关方法

搜索dict这个迭代器主要作用是在redis内部,例如持久化相关的工作。dict迭代器的相关方法主要包括dictNextdictGetIteratordictGetSafeIteratordictReleaseIterator

dictNext

dictNext的实现比较特别,它会缓存当前的iter->entry,以及下一个iter->nextEntry。主要流程如下:

  1. 初始化
    指向0这个table。指向0这个dictEntry。
    iter->index表示遍历的distEntry的位置,iter->entry表示被遍历的那个distEntry。
  2. 如果iter->entry是NULL
    通常是因为初始化,或者遍历完了一张表
    如果遍历完了所有的dictEntry,就换到table 1。当然没有Rehash的话就结束。
  3. 如果iter->entry不是NULL
    这是大部分情况。
    我们移动到iter->nextEntry,然后去更新iter->nextEntry
    这里要用nextEntry的原因是安全迭代器是能够对哈希表进行增删的,因此如果iter->entry在迭代时被删除了,那么就会导致iter->entry->next是无法访问的,因此这里要提前保存一下
1
2
3
4
5
6
7
8
9
10
11
12
13
14
15
16
17
18
19
20
21
22
23
24
25
26
27
28
29
30
31
32
33
34
35
36
37
38
39
40
41
42
dictEntry *dictNext(dictIterator *iter)
{
while (1) {
if (iter->entry == NULL) {
// 如果没有指定dictEntry
// iter->table初始值是0
dictht *ht = &iter->d->ht[iter->table];
if (iter->index == -1 && iter->table == 0) {
// 这边是初始化
if (iter->safe)
iter->d->iterators++;
else
iter->fingerprint = dictFingerprint(iter->d);
}
// 通常操作,找到下一个entry
iter->index++;
// 但如果这个dictht遍历完了
if (iter->index >= (long) ht->size) {
// 如果同时有两个表(dictIsRehashing条件),且表0遍历完了,就切换到表1
if (dictIsRehashing(iter->d) && iter->table == 0) {
iter->table++;
iter->index = 0;
ht = &iter->d->ht[1];
} else {
break;
}
}
// 再设置一下entry
iter->entry = ht->table[iter->index];
} else {
// 如果指定了dictEntry,说明是之前有遍历到某个dictht的一半,这是大部分情况,所以就直接到nextEntry
iter->entry = iter->nextEntry;
}
if (iter->entry) {
/* We need to save the 'next' here, the iterator user
* may delete the entry we are returning. */
iter->nextEntry = iter->entry->next;
return iter->entry;
}
}
return NULL;
}

dict的其他相关方法

dict遍历抽象主干代码

由于在dict中常出现遍历操作,为了方便阅读代码,我们将整个遍历操作先抽象出来,在下面相关代码的介绍中,只列出主干。关于这个循环的说明,可以参看_dictKeyIndex的讲解

1
2
3
4
5
6
7
8
9
10
11
12
13
14
15
16
17
18
19
20
// dict.h
#define dictHashKey(d, key) (d)->type->hashFunction(key)

if (dictIsRehashing(d)) _dictRehashStep(d);
h = dictHashKey(d, key);
for (table = 0; table <= 1; table++) {
idx = h & d->ht[table].sizemask;
he = d->ht[table].table[idx];
prevHe = NULL;
while(he) {
if (key==he->key || dictCompareKeys(d, key, he->key)) {
// 找到了
return;
}
he = he->next;
}
// 如果不在Rehash过程中,就不需要查找table=1的表了
if (!dictIsRehashing(d)) break;
}
return NULL; /* not found */

dictFind

这个函数用来根据给定的key找到对应的dictEntry,如果找不到,就返回NULL
其中涉及一些Rehash相关的机制,我们在先前已经讲过了,在这里就略过。

1
2
3
4
5
6
7
8
9
dictEntry *dictFind(dict *d, const void *key)
{
dictEntry *he;
uint64_t h, idx, table;

if (dictSize(d) == 0) return NULL; /* dict is empty */
// 参考“dict遍历抽象主干代码”
return NULL;
}

dictGet系列函数

这个系列的函数主要通过读取union v里面的不同类型的值。

1
2
3
4
5
#define dictGetKey(he) ((he)->key)
#define dictGetVal(he) ((he)->v.val)
#define dictGetSignedIntegerVal(he) ((he)->v.s64)
#define dictGetUnsignedIntegerVal(he) ((he)->v.u64)
#define dictGetDoubleVal(he) ((he)->v.d)

dictDelete和dictGenericDelete

dictDelete实现,就是调用dictGenericDelete,并且指定是要free的。注意,我们不要和hiredis里面的dictDelete实现搞混起来

1
2
3
4
5
/* Remove an element, returning DICT_OK on success or DICT_ERR if the
* element was not found. */
int dictDelete(dict *ht, const void *key) {
return dictGenericDelete(ht,key,0) ? DICT_OK : DICT_ERR;
}

现在我们介绍其依赖函数dictGenericDelete。这函数表示要从d中删除一个key
在前面已经看到,dictDelete系列函数相比其他操作会多一个场景,也就是会考虑是不是立即将key和value的对象free掉。

1
2
3
4
5
6
7
8
9
10
11
12
13
14
15
16
17
static dictEntry *dictGenericDelete(dict *d, const void *key, int nofree) {
uint64_t h, idx;
dictEntry *he, *prevHe;
int table;

if (d->ht[0].used == 0 && d->ht[1].used == 0) return NULL;

if (dictIsRehashing(d)) _dictRehashStep(d);
// 下面代码参考“dict遍历抽象主干代码”,省略其中大部分
...
if (!nofree) {
dictFreeKey(d, he);
dictFreeVal(d, he);
zfree(he);
}
...
}

但这里对dict遍历抽象主干代码的处理会有一些修改,首先用prevHe来记录待删除节点he的父节点,从而将链表接起来。然后是一个nofree选项,可以不去析构key和value。

1
2
3
4
5
6
7
8
9
10
11
12
13
14
15
16
17
18
19
20
21
22
// dictGenericDelete中不连续的部分代码
...
prevHe = NULL;
while(he) {
if (key==he->key || dictCompareKeys(d, key, he->key)) {
/* Unlink the element from the list */
if (prevHe)
prevHe->next = he->next;
else
d->ht[table].table[idx] = he->next;
if (!nofree) {
dictFreeKey(d, he);
dictFreeVal(d, he);
zfree(he);
}
d->ht[table].used--;
return he;
}
prevHe = he;
he = he->next;
}
...

dictUnlink就是设置了nofree=1调用了dictGenericDelete

1
2
3
dictEntry *dictUnlink(dict *ht, const void *key) {
return dictGenericDelete(ht,key,1);
}

HSET的相关数据结构

HSET是对dict的封装。

hset实现

我们还是从redisCommandTable里面查到hset的对应函数是hsetCommand
hashTypeLookupWriteOrCreate这个函数就是调用lookupKeyWrite,如果找不到,就通过createHashObject创建,这个函数是创建一个OBJ_HASH对象。

1
2
3
4
5
6
7
8
9
10
11
12
13
14
15
16
17
18
19
20
21
22
23
24
25
26
27
28
void hsetCommand(client *c) {
int i, created = 0;
robj *o;

if ((c->argc % 2) == 1) {
addReplyErrorFormat(c,"wrong number of arguments for '%s' command",c->cmd->name);
return;
}

if ((o = hashTypeLookupWriteOrCreate(c,c->argv[1])) == NULL) return;
hashTypeTryConversion(o,c->argv,2,c->argc-1);

for (i = 2; i < c->argc; i += 2)
created += !hashTypeSet(o,c->argv[i]->ptr,c->argv[i+1]->ptr,HASH_SET_COPY);

/* HMSET (deprecated) and HSET return value is different. */
char *cmdname = c->argv[0]->ptr;
if (cmdname[1] == 's' || cmdname[1] == 'S') {
/* HSET */
addReplyLongLong(c, created);
} else {
/* HMSET */
addReply(c, shared.ok);
}
signalModifiedKey(c,c->db,c->argv[1]);
notifyKeyspaceEvent(NOTIFY_HASH,"hset",c->argv[1],c->db->id);
server.dirty++;
}

ZSET

在本章中,我们将会从ZSET切入,了解它是如何包装ziplist和zskiplist的。但是具体到ziplist和zskiplist的实现,是在单独的章节里面讲的。
ZSET有两个实现,基于跳表的和基于ziplist的,具体来说:

  1. ziplist
    是一个双向压缩链表的实现,这里的压缩链表指的是不会保存prev和next信息,而是采用类似线性表的方式将整个list存放在一整块内存中。对应于元素数量少于128,且每个元素的长度小于64字节。
  2. zskiplist
    是个跳表的实现。对应于1之外的情况。

ZSET和zadd

redisCommandTable找到绑定的函数zaddCommand,它会调用一个zaddGenericCommand

1
2
3
4
// t_zset.c
void zaddCommand(client *c) {
zaddGenericCommand(c,ZADD_NONE);
}

查看zaddGenericCommand,它接受一个flags参数,我们稍后介绍。

1
2
3
4
5
6
7
8
9
10
11
12
13
14
15
void zaddGenericCommand(client *c, int flags) {
static char *nanerr = "resulting score is not a number (NaN)";
robj *key = c->argv[1];
robj *zobj;
sds ele;
double score = 0, *scores = NULL;
int j, elements;
int scoreidx = 0;
/* The following vars are used in order to track what the command actually
* did during the execution, to reply to the client and to trigger the
* notification of keyspace change. */
int added = 0; /* Number of new elements added. */
int updated = 0; /* Number of elements with updated score. */
int processed = 0; /* Number of elements processed, may remain zero with
options like XX. */

下面一部分代码是用来处理一些额外输入的flag参数,这里引入了scoreidx表示score/value对开始的位置,在3.0版本中写死了是2,但是由于后面版本允许了nxxx等参数,所以这边改为动态计算的。

1
2
3
4
5
6
7
8
9
10
11
12
13
14
15
16
17
18
19
...
scoreidx = 2;
while(scoreidx < c->argc) {
char *opt = c->argv[scoreidx]->ptr;
if (!strcasecmp(opt,"nx")) flags |= ZADD_NX;
else if (!strcasecmp(opt,"xx")) flags |= ZADD_XX;
else if (!strcasecmp(opt,"ch")) flags |= ZADD_CH;
else if (!strcasecmp(opt,"incr")) flags |= ZADD_INCR;
else break;
scoreidx++;
}


/* Turn options into simple to check vars. */
int incr = (flags & ZADD_INCR) != 0;
int nx = (flags & ZADD_NX) != 0;
int xx = (flags & ZADD_XX) != 0;
int ch = (flags & ZADD_CH) != 0;
...

下面的代码主要是校验参数的合法性

1
2
3
4
5
6
7
8
9
10
11
12
13
14
15
16
17
18
19
20
21
22
...
// 这里是一个通常的做法,类似于Spark里面的KV存储一样,把score和elements存得很整齐。
elements = c->argc-scoreidx;
if (elements % 2 || !elements) {
addReply(c,shared.syntaxerr);
return;
}
elements /= 2; /* Now this holds the number of score-element pairs. */

/* Check for incompatible options. */
if (nx && xx) {
addReplyError(c,
"XX and NX options at the same time are not compatible");
return;
}

if (incr && elements > 1) {
addReplyError(c,
"INCR option supports a single increment-element pair");
return;
}
...

下面,我们开始正式处理参数了

1
2
3
4
5
6
7
8
9
10
11
12
13
14
15
...
// 取回输入的score,或者报错,注意这里是从用户的输入取的
// 可以看出,偶数位是分数,奇数位是字段值
scores = zmalloc(sizeof(double)*elements);
for (j = 0; j < elements; j++) {
if (getDoubleFromObjectOrReply(c,c->argv[scoreidx+j*2],&scores[j],NULL)
!= C_OK) goto cleanup;
}

// 从数据库中找到这个ZSET对象
zobj = lookupKeyWrite(c->db,key);
// 检查是否是OBJ_ZSET类型
if (checkType(c,zobj,OBJ_ZSET)) goto cleanup;
// 如果这个对象还没有被创建,就创建
...

为了阅读接下来的代码,首先了解两个参数,可以看到,这两个参数就是规定了何时使用ziplist的阈值。上面两个指示了对zset而言,ziplist能用到什么时候,后面就是skiplist。下面两个指示对hash而言,ziplist能用到什么时候,后面就用dict。

1
2
3
4
5
// config.c
createSizeTConfig("zset-max-ziplist-value", NULL, MODIFIABLE_CONFIG, 0, LONG_MAX, server.zset_max_ziplist_value, 64, MEMORY_CONFIG, NULL, NULL),
createSizeTConfig("zset-max-ziplist-entries", NULL, MODIFIABLE_CONFIG, 0, LONG_MAX, server.zset_max_ziplist_entries, 128, INTEGER_CONFIG, NULL, NULL)
createSizeTConfig("hash-max-ziplist-entries", NULL, MODIFIABLE_CONFIG, 0, LONG_MAX, server.hash_max_ziplist_entries, 512, INTEGER_CONFIG, NULL, NULL)
createSizeTConfig("hash-max-ziplist-value", NULL, MODIFIABLE_CONFIG, 0, LONG_MAX, server.hash_max_ziplist_value, 64, MEMORY_CONFIG, NULL, NULL)

然后我们来看一下两个对象的创建方法

1
2
3
4
5
6
7
8
9
10
11
12
13
14
15
16
17
robj *createZsetObject(void) {
zset *zs = zmalloc(sizeof(*zs));
robj *o;

zs->dict = dictCreate(&zsetDictType,NULL);
zs->zsl = zslCreate();
o = createObject(OBJ_ZSET,zs);
o->encoding = OBJ_ENCODING_SKIPLIST;
return o;
}

robj *createZsetZiplistObject(void) {
unsigned char *zl = ziplistNew();
robj *o = createObject(OBJ_ZSET,zl);
o->encoding = OBJ_ENCODING_ZIPLIST;
return o;
}

下面来看一下创建的逻辑,可以发现,在创建时默认是创建一个ziplist的,其实在后面zsetAdd添加的时候,当超出了ziplist的阈值的时候会调用zsetConvert来转成skiplist。

1
2
3
4
5
6
7
8
9
10
11
12
13
14
15
16
17
...
if (zobj == NULL) {
if (xx) goto reply_to_client; /* No key + XX option: nothing to do. */
if (server.zset_max_ziplist_entries == 0 ||
server.zset_max_ziplist_value < sdslen(c->argv[scoreidx+1]->ptr))
{
// 如果zset_max_ziplist_entries是0,也就是说不管怎么样都不会创建ziplist了,
// 或者第一个要加入的元素就已经超长了
zobj = createZsetObject();
} else {
// 否则还是先创建一个ziplist
zobj = createZsetZiplistObject();
}
// 向db注册这个zobj
dbAdd(c->db,key,zobj);
}
...

下面,就是调用zsetAdd依次往ZSET里面添加元素了。

1
2
3
4
5
6
7
8
9
10
11
12
13
14
15
16
17
18
19
20
21
22
23
24
25
26
27
28
29
30
31
32
33
34
35
36
37
38
39
...
for (j = 0; j < elements; j++) {
double newscore;
score = scores[j];
int retflags = flags;

ele = c->argv[scoreidx+1+j*2]->ptr;
int retval = zsetAdd(zobj, score, ele, &retflags, &newscore);
if (retval == 0) {
addReplyError(c,nanerr);
goto cleanup;
}
// 这个应该是用来支持CH参数的
if (retflags & ZADD_ADDED) added++;
if (retflags & ZADD_UPDATED) updated++;
if (!(retflags & ZADD_NOP)) processed++;
score = newscore;
}
server.dirty += (added+updated);

reply_to_client:
if (incr) { /* ZINCRBY or INCR option. */
if (processed)
addReplyDouble(c,score);
else
addReplyNull(c);
} else { /* ZADD. */
// 如果指定了CH,就返回增加和修改的数量,否则只返回增加的数量
addReplyLongLong(c,ch ? added+updated : added);
}

cleanup:
zfree(scores);
if (added || updated) {
signalModifiedKey(c,c->db,key);
notifyKeyspaceEvent(NOTIFY_ZSET,
incr ? "zincr" : "zadd", key, c->db->id);
}
}

zsetAdd的实现

zsetAdd

在3.0版本里面,并没有这个函数,而是直接放到了zaddGenericCommand里面。但由于后续版本支持了各种flag(注意3.0是可以incr的),逻辑复杂了,所以单独做出了一个函数。

1
int zsetAdd(robj *zobj, double score, sds ele, int *flags, double *newscore) {

首先来讨论一下参数,flags按照指针传递,是因为它同时用来保存输入信息和输出信息。

1
2
3
4
5
6
7
8
9
10
11
/* Input flags. */
#define ZADD_NONE 0
#define ZADD_INCR (1<<0) /* Increment the score instead of setting it. */
#define ZADD_NX (1<<1) /* Don't touch elements not already existing. */
#define ZADD_XX (1<<2) /* Only touch elements already existing. */

/* Output flags. */
#define ZADD_NOP (1<<3) /* Operation not performed because of conditionals.*/
#define ZADD_NAN (1<<4) /* Only touch elements already existing. */
#define ZADD_ADDED (1<<5) /* The element was new and was added. */
#define ZADD_UPDATED (1<<6) /* The element already existed, score updated. */

newscore被用来存储返回的incr后的分数。
下面我们来看函数的具体实现过程。

1
2
3
4
5
6
7
8
9
10
11
12
13
14
...
/* Turn options into simple to check vars. */
int incr = (*flags & ZADD_INCR) != 0;
int nx = (*flags & ZADD_NX) != 0;
int xx = (*flags & ZADD_XX) != 0;
*flags = 0; /* We'll return our response flags. */
double curscore;

/* NaN as input is an error regardless of all the other parameters. */
if (isnan(score)) {
*flags = ZADD_NAN;
return 0;
}
...

ziplist存储的分支

1
2
3
4
5
6
7
8
9
10
11
12
13
14
15
16
17
18
19
20
21
22
23
24
25
26
27
28
29
30
31
32
33
34
35
36
37
38
39
40
41
42
43
44
45
46
47
48
...
/* Update the sorted set according to its encoding. */
if (zobj->encoding == OBJ_ENCODING_ZIPLIST) {
unsigned char *eptr;

if ((eptr = zzlFind(zobj->ptr,ele,&curscore)) != NULL) {
// 如果已经找到了这个元素
/* NX? Return, same element already exists. */
if (nx) {
*flags |= ZADD_NOP;
return 1;
}

/* Prepare the score for the increment if needed. */
if (incr) {
score += curscore;
if (isnan(score)) {
*flags |= ZADD_NAN;
return 0;
}
// 如果需要取回score的值,则newscore不为NULL,那么就顺便返回
if (newscore) *newscore = score;
}

// 通过先删除再添加的方法来实现修改score
if (score != curscore) {
zobj->ptr = zzlDelete(zobj->ptr,eptr);
zobj->ptr = zzlInsert(zobj->ptr,ele,score);
*flags |= ZADD_UPDATED;
}
return 1;
} else if (!xx) {
// 如果没有找到,并且没有xx选项(xx选项表示只更新不添加),那么就进行添加
/* Optimize: check if the element is too large or the list
* becomes too long *before* executing zzlInsert. */
zobj->ptr = zzlInsert(zobj->ptr,ele,score);
// 如果超过阈值,就要转换成跳表
if (zzlLength(zobj->ptr) > server.zset_max_ziplist_entries ||
sdslen(ele) > server.zset_max_ziplist_value)
zsetConvert(zobj,OBJ_ENCODING_SKIPLIST);
if (newscore) *newscore = score;
*flags |= ZADD_ADDED;
return 1;
} else {
*flags |= ZADD_NOP;
return 1;
}
...

跳表存储的分支

1
2
3
4
5
6
7
8
9
10
11
12
13
14
15
16
17
18
19
20
21
22
23
24
25
26
27
28
29
30
31
32
33
34
35
36
37
38
39
40
41
42
43
44
45
46
47
48
49
50
51
52
53
54
55
56
57
58
59
60
...
} else if (zobj->encoding == OBJ_ENCODING_SKIPLIST) {
// 需要同时更新哈希表和跳表
zset *zs = zobj->ptr;
zskiplistNode *znode;
dictEntry *de;

// 查看成员是否存在
de = dictFind(zs->dict,ele);
if (de != NULL) {
// 如果成员存在
/* NX? Return, same element already exists. */
if (nx) {
*flags |= ZADD_NOP;
return 1;
}
// 取出成员的分值
// 其中de是dictEntry
// #define dictGetKey(he) ((he)->key)
// #define dictGetVal(he) ((he)->v.val)
curscore = *(double*)dictGetVal(de);

/* Prepare the score for the increment if needed. */
if (incr) {
score += curscore;
if (isnan(score)) {
*flags |= ZADD_NAN;
return 0;
}
if (newscore) *newscore = score;
}

/* Remove and re-insert when score changes. */
if (score != curscore) {
// 对于跳表来讲,就有一个单独的函数了,对于某些情况,能够原地更新,但对于特殊情况会先删除再加上
znode = zslUpdateScore(zs->zsl,curscore,ele,score);
/* Note that we did not removed the original element from
* the hash table representing the sorted set, so we just
* update the score. */
dictGetVal(de) = &znode->score; /* Update score ptr. */
*flags |= ZADD_UPDATED;
}
return 1;
} else if (!xx) {
// 如果没有设置只更新不添加的机制
ele = sdsdup(ele);
znode = zslInsert(zs->zsl,score,ele);
serverAssert(dictAdd(zs->dict,ele,&znode->score) == DICT_OK);
*flags |= ZADD_ADDED;
if (newscore) *newscore = score;
return 1;
} else {
*flags |= ZADD_NOP;
return 1;
}
} else {
serverPanic("Unknown sorted set encoding");
}
return 0; /* Never reached. */
}

zsetConvert

参数encoding表示要转换成什么格式。

1
2
3
4
5
6
7
8
void zsetConvert(robj *zobj, int encoding) {
zset *zs;
zskiplistNode *node, *next;
sds ele;
double score;

if (zobj->encoding == encoding) return;
...
1
2
3
4
5
6
7
8
9
10
11
12
13
14
15
16
17
18
19
20
21
22
23
24
25
26
27
28
29
30
31
32
33
34
35
36
37
...
if (zobj->encoding == OBJ_ENCODING_ZIPLIST) {
unsigned char *zl = zobj->ptr;
unsigned char *eptr, *sptr;
unsigned char *vstr;
unsigned int vlen;
long long vlong;

if (encoding != OBJ_ENCODING_SKIPLIST)
serverPanic("Unknown target encoding");

zs = zmalloc(sizeof(*zs));
zs->dict = dictCreate(&zsetDictType,NULL);
zs->zsl = zslCreate();

eptr = ziplistIndex(zl,0);
serverAssertWithInfo(NULL,zobj,eptr != NULL);
sptr = ziplistNext(zl,eptr);
serverAssertWithInfo(NULL,zobj,sptr != NULL);

while (eptr != NULL) {
score = zzlGetScore(sptr);
serverAssertWithInfo(NULL,zobj,ziplistGet(eptr,&vstr,&vlen,&vlong));
if (vstr == NULL)
ele = sdsfromlonglong(vlong);
else
ele = sdsnewlen((char*)vstr,vlen);

node = zslInsert(zs->zsl,score,ele);
serverAssert(dictAdd(zs->dict,ele,&node->score) == DICT_OK);
zzlNext(zl,&eptr,&sptr);
}

zfree(zobj->ptr);
zobj->ptr = zs;
zobj->encoding = OBJ_ENCODING_SKIPLIST;
...
1
2
3
4
5
6
7
8
9
10
11
12
13
14
15
16
17
18
19
20
21
22
23
24
25
26
27
28
29
...
} else if (zobj->encoding == OBJ_ENCODING_SKIPLIST) {
unsigned char *zl = ziplistNew();

if (encoding != OBJ_ENCODING_ZIPLIST)
serverPanic("Unknown target encoding");

/* Approach similar to zslFree(), since we want to free the skiplist at
* the same time as creating the ziplist. */
zs = zobj->ptr;
dictRelease(zs->dict);
node = zs->zsl->header->level[0].forward;
zfree(zs->zsl->header);
zfree(zs->zsl);

while (node) {
zl = zzlInsertAt(zl,NULL,node->ele,node->score);
next = node->level[0].forward;
zslFreeNode(node);
node = next;
}

zfree(zs);
zobj->ptr = zl;
zobj->encoding = OBJ_ENCODING_ZIPLIST;
} else {
serverPanic("Unknown sorted set encoding");
}
}

zrangeGenericCommand

zrangeGenericCommand主要处理ZRANGE命令。

1
2
3
4
5
6
7
8
9
10
11
12
13
14
15
16
17
18
19
20
21
22
23
24
25
26
27
28
29
30
31
32
33
34
35
36
37
void zrangeGenericCommand(client *c, int reverse) {
robj *key = c->argv[1];
robj *zobj;
int withscores = 0;
long start;
long end;
long llen;
long rangelen;

if ((getLongFromObjectOrReply(c, c->argv[2], &start, NULL) != C_OK) ||
(getLongFromObjectOrReply(c, c->argv[3], &end, NULL) != C_OK)) return;

if (c->argc == 5 && !strcasecmp(c->argv[4]->ptr,"withscores")) {
withscores = 1;
} else if (c->argc >= 5) {
addReply(c,shared.syntaxerr);
return;
}

if ((zobj = lookupKeyReadOrReply(c,key,shared.emptyarray)) == NULL
|| checkType(c,zobj,OBJ_ZSET)) return;

/* Sanitize indexes. */
llen = zsetLength(zobj);
if (start < 0) start = llen+start;
if (end < 0) end = llen+end;
if (start < 0) start = 0;

/* Invariant: start >= 0, so this test will be true when end < 0.
* The range is empty when start > end or start >= length. */
if (start > end || start >= llen) {
addReply(c,shared.emptyarray);
return;
}
if (end >= llen) end = llen-1;
rangelen = (end-start)+1;
...

通过start和end计算出需要取出的长度rangelen。

1
2
3
4
5
6
7
8
9
...
/* Return the result in form of a multi-bulk reply. RESP3 clients
* will receive sub arrays with score->element, while RESP2 returned
* a flat array. */
if (withscores && c->resp == 2)
addReplyArrayLen(c, rangelen*2);
else
addReplyArrayLen(c, rangelen);
...

对于ziplist的实现

1
2
3
4
5
6
7
8
9
10
11
12
13
14
15
16
17
18
19
20
21
22
23
24
25
26
27
28
29
30
31
32
33
...
if (zobj->encoding == OBJ_ENCODING_ZIPLIST) {
unsigned char *zl = zobj->ptr;
unsigned char *eptr, *sptr;
unsigned char *vstr;
unsigned int vlen;
long long vlong;

if (reverse)
eptr = ziplistIndex(zl,-2-(2*start));
else
eptr = ziplistIndex(zl,2*start);

serverAssertWithInfo(c,zobj,eptr != NULL);
sptr = ziplistNext(zl,eptr);

while (rangelen--) {
serverAssertWithInfo(c,zobj,eptr != NULL && sptr != NULL);
serverAssertWithInfo(c,zobj,ziplistGet(eptr,&vstr,&vlen,&vlong));

if (withscores && c->resp > 2) addReplyArrayLen(c,2);
if (vstr == NULL)
addReplyBulkLongLong(c,vlong);
else
addReplyBulkCBuffer(c,vstr,vlen);
if (withscores) addReplyDouble(c,zzlGetScore(sptr));

if (reverse)
zzlPrev(zl,&eptr,&sptr);
else
zzlNext(zl,&eptr,&sptr);
}
...

对于跳表的实现,通过zslGetElementByRank获得我们要遍历的起点ln。在找到之后,直接移动backward指针,或者最底层的forward指针,取出rangelen的元素。
所以对于面试日经题目,跳表的zrange复杂度是多少?答案就是O(log(n)+rangelen)

1
2
3
4
5
6
7
8
9
10
11
12
13
14
15
16
17
18
19
20
21
22
23
24
25
26
27
28
29
30
...
} else if (zobj->encoding == OBJ_ENCODING_SKIPLIST) {
zset *zs = zobj->ptr;
zskiplist *zsl = zs->zsl;
zskiplistNode *ln;
sds ele;

/* Check if starting point is trivial, before doing log(N) lookup. */
if (reverse) {
ln = zsl->tail;
if (start > 0)
ln = zslGetElementByRank(zsl,llen-start);
} else {
ln = zsl->header->level[0].forward;
if (start > 0)
ln = zslGetElementByRank(zsl,start+1);
}

while(rangelen--) {
serverAssertWithInfo(c,zobj,ln != NULL);
ele = ln->ele;
if (withscores && c->resp > 2) addReplyArrayLen(c,2);
addReplyBulkCBuffer(c,ele,sdslen(ele));
if (withscores) addReplyDouble(c,ln->score);
ln = reverse ? ln->backward : ln->level[0].forward;
}
} else {
serverPanic("Unknown sorted set encoding");
}
}

zskiplist

zskiplist是跳表,Redis用它来作为有序集合ZSET的一个实现。
跳表的查找复杂度是平均$O(log n)$最坏$O(n)$,而插入/删除复杂度是$O(log n)$。

基本数据结构

跳表的结构如下所示

结构定义如下所示。

1
2
3
4
5
6
7
8
9
typedef struct zskiplistNode {
sds ele;
double score;
struct zskiplistNode *backward;
struct zskiplistLevel {
struct zskiplistNode *forward;
unsigned long span;
} level[];
} zskiplistNode;

容易看到,这里的level是一个Flex Array,这是C99里面的特性,实际上是一个长度为0的数组。

跳表里面的一个元素,对应一个zskiplistNode。每个zskiplistNode可能有若干个zskiplistLevel,从而组成跳表的层次结构。

  1. backward
    这个指针是一个zskiplistNode一个的,指向最下面一层的前一个节点。

  2. zskiplistLevel::forward
    每一层都有一个,指向当前层的下一个节点。层数越往上,zskiplistLevel::span越大。

  3. span
    span表示当前节点当前层的后向(forward)指针跨越了多少节点。对于最下面一层,它的span就是1。如果在某一层上,forward相对对下面一层跳过了一个节点,那么span就是2。
    这个值对跳表实现不是必要的,增加它是为了方便计算rank[i]
    rank是为了实现zsetRank设置的。【Q】一个问题是为什么需要用rank[i]数组。这个我加日志打印了一下,发现这反映了插入新Node时,我们插入到的是update[i]的后面,而rank[i]就表示这个update[i]到链表头的距离。
    考虑zslInsert,我们要插入下面两行

    1
    2
    3
    zadd y 1.0 a 2.0 b 3.0 c 4.0 d 5.0 e 6.0 f
    zadd y 4.5 de
    zadd y 3.5 cd

    检查插入cd前的行为。对于4/5层来说,d前面都没有该层节点了,所以rank都是0。同时可以注意到,因为最底层(第0层)永远表示待插入的节点前面有多少个。

    1
    2
    3
    4
    5
    6
    7
    8
    9
    10
    11
    12
    13
    14
    rank[0]=3
    rank[1]=3
    rank[2]=3
    rank[3]=3
    rank[4]=0
    rank[5]=0
    SUMMARY: tot level 6
    ( )[S: 1] ( a)[S: 1] ( b)[S: 1] ( c)[S: 1] ( d)[S: 1] ( de)[S: 1] ( e)[S: 1] ( f)[S: 0]
    ( )[S: 2] .............( b)[S: 1] ( c)[S: 1] ( d)[S: 3] ..........................( f)[S: 0]
    ( )[S: 3] ..........................( c)[S: 1] ( d)[S: 3]
    ( )[S: 3] ..........................( c)[S: 1] ( d)[S: 3]
    ( )[S: 4] .......................................( d)[S: 3]
    ( )[S: 4] .......................................( d)[S: 3]
    node_len 13

zslCreateNode

我们进一步查看zslCreateNode是如何被初始化的,容易看出,它的空间占用等于zskiplistNode的大小,加上level的长度乘以zskiplistLevel的大小。

1
2
3
4
5
6
7
8
// t_zset.c
zskiplistNode *zslCreateNode(int level, double score, sds ele) {
zskiplistNode *zn =
zmalloc(sizeof(*zn)+level*sizeof(struct zskiplistLevel));
zn->score = score;
zn->ele = ele;
return zn;
}

跳表数据结构的展现

下面的代码可以轻松地打印出zskiplist的结构。

1
2
3
4
5
6
7
8
9
10
11
12
13
14
15
16
17
18
19
20
21
22
23
24
25
26
27
28
29
30
31
32
33
34
35
36
37
38
39
40
41
42
void printZsl(zskiplist *zsl){
int tot_level = zsl->level;
int node_len = 0;
int join_size = 2;
char buf[1000];
printf("SUMMARY: tot level %d\n", tot_level);

for(int level = 0; level < tot_level; level++){
zskiplistNode * prev = 0;
zskiplistNode * x = zsl->header;
while(1) {
int gap = 0;
if(level && prev){
zskiplistNode * y = prev;
while (1) {
if(y->ele != x->ele) {
gap ++;
}else{
break;
}
if(y->level[0].forward)
y = y->level[0].forward;
else
break;
}
int length = (gap - 1) * node_len;
int modified_length = length <= 0 ? 0 : length;
for(int kk = 0; kk < modified_length; kk++) printf(".");
}
sprintf(buf, "(%3.3s)[S:%2ld]%*s", x->ele, x->level[level].span, join_size, " ");
if(node_len == 0) node_len = strlen(buf);
printf(buf);
prev = x;
if(x->level[level].forward)
x = x->level[level].forward;
else
break;
}
printf("\n");
}
printf("node_len %d\n", node_len);
}

我们修改zslInsert代码,并输入下面的语句,为了便于得到更高的跳表,我们设置ZSKIPLIST_P到0.5(参考下文)。

1
zadd zs2 1 a 2 b 10 c 5 d 5 e 6 f1 6 f2 6 f3 6 f4 6 f5 6 f6 6 f7 6 f8 6 f9 6 f10 6 f11

得到打印的结果如下(这里输出是反的,第0层实际上是“最下面一层”,也就是最密集的那一层)

1
2
3
4
5
6
7
8
9
SUMMARY: tot level 7
( )[S: 1] ( a)[S: 1] ( b)[S: 1] ( d)[S: 1] ( e)[S: 1] ( f1)[S: 1] (f10)[S: 1] ( f2)[S: 1] ( f3)[S: 1] ( f4)[S: 1] ( f5)[S: 1] ( f6)[S: 1] ( f7)[S: 1] ( f8)[S: 1] ( f9)[S: 1] ( c)[S: 0]
( )[S: 1] ( a)[S: 1] ( b)[S: 1] ( d)[S: 1] ( e)[S: 2] .............(f10)[S: 1] ( f2)[S: 5] ....................................................( f7)[S: 1] ( f8)[S: 2]
( )[S: 1] ( a)[S: 1] ( b)[S: 1] ( d)[S: 4] .......................................( f2)[S: 5] ....................................................( f7)[S: 1] ( f8)[S: 2]
( )[S: 2] .............( b)[S: 1] ( d)[S: 4] .......................................( f2)[S: 6] .................................................................( f8)[S: 2]
( )[S: 2] .............( b)[S: 1] ( d)[S: 4] .......................................( f2)[S: 8]
( )[S: 2] .............( b)[S: 1] ( d)[S:12]
( )[S: 2] .............( b)[S:13]
node_len 13

可以比较容易得看出:

  1. header节点是空的
  2. span表示当前层上相邻两个节点的实际距离。对于level 0来说,相邻两个节点的实际距离一定为1

zslInsert的实现

跳表遍历抽象主干代码

我们首先看到的是跳表遍历抽象的主干代码,它会在很多地方重复出现。这段代码的含义是计算update[i]rank[i]

1
2
3
4
5
6
7
8
9
10
11
12
13
14
15
16
17
18
19
20
21
22
23
24
25
26
27
28
29
30
31
32
33
zskiplistNode *zslInsert(zskiplist *zsl, double score, sds ele) {
// 表示我们在第i层的第update[i]节点后面,插入新节点
zskiplistNode *update[ZSKIPLIST_MAXLEVEL];
// 这是一个临时变量,前期做迭代用,后期表示新节点
zskiplistNode *x;
unsigned int rank[ZSKIPLIST_MAXLEVEL];
int i, level;

serverAssert(!isnan(score));
// x是表头节点
x = zsl->header;
// 从最高层节点(跨度最大)逐层向下遍历,这样方便复用,稍后将看到我们新增节点的时候是从下往上构建的
for (i = zsl->level-1; i >= 0; i--) {
/* store rank that is crossed to reach the insert position */
// 最终rank[0]的值加一就是新节点的前置节点(update)的排位
rank[i] = i == (zsl->level-1) ? 0 : rank[i+1];
while (x->level[i].forward &&
// 如果要插入的score,比前面节点的score还要大,就前进
(x->level[i].forward->score < score ||
// 如果score相等,那么就比较ele
(x->level[i].forward->score == score &&
sdscmp(x->level[i].forward->ele,ele) < 0)))
{
// x->level[i].span表示第i层上,当前节点到forward节点的中间有多少个节点,比如这是第t个节点,那么经过了a_{t+1} – a{t}个节点。
// rank[i]表示这个节点排第几
rank[i] += x->level[i].span;
// 前进节点
x = x->level[i].forward;
}
// 对于第i层,我们要修改这个节点,它是score最大的小于要插入的x的节点
update[i] = x;
}
...

在以上的代码执行完之后,我们得到了计算好的updaterank数组。我们要在update[i]后面插入节点,并且用rank[i]来更新span。
在这里,我们假设元素没有在跳表中,这是因为:

  1. 跳表是通过score排序的,而score是允许重复的,所以无法通过score来判断。
  2. 而在跳表中插入相同的元素是不可能的情况,因为zslInsert的调用者通过dict来维护是否有相同元素。

在插入新节点前,首先需要为这个节点生成一个随机层高,同时处理这个随机层高大于现有层高的情况。

1
2
3
4
5
6
7
8
9
10
11
12
13
14
15
16
17
// 续zslInsert
...
level = zslRandomLevel();
if (level > zsl->level) {
// 如果新节点的level比这个跳表的最大层数zsl->level都大,即出现一个珠穆朗玛峰了,
// 初始化一下zsl->level以上的所有的层
for (i = zsl->level; i < level; i++) {
// 这里是初始化一下rank,方便后面往上加span
rank[i] = 0;
update[i] = zsl->header;
update[i]->level[i].span = zsl->length;
}
// 更新跳表的最大层数
zsl->level = level;
}
...
// 函数待续

zslRandomLevel生成待插入节点的随机高度。
注意,这里层数越往上的概率是越低的,最终能够形成一个powerlaw的分布。

1
2
3
4
5
6
7
8
9
10
// t_zset.c
int zslRandomLevel(void) {
int level = 1;
while ((random()&0xFFFF) < (ZSKIPLIST_P * 0xFFFF))
level += 1;
return (level<ZSKIPLIST_MAXLEVEL) ? level : ZSKIPLIST_MAXLEVEL;
}

// server.h
#define ZSKIPLIST_P 0.25 /* Skiplist P = 1/4 */

下面就是将新增的节点插入跳表中。新链表的前后顺序是update -> x -> update.forward

1
2
3
4
5
6
7
8
9
10
// 续zslInsert
...
// 主要就是分配一个zskiplistNode,并且设置score和ele。
x = zslCreateNode(level,score,ele);
for (i = 0; i < level; i++) {
// 更新x前向指针
x->level[i].forward = update[i]->level[i].forward;
// 更新update前向指针
update[i]->level[i].forward = x;
...

下面我们的目标是计算x->level[i].span。从前面介绍过了,span表示当前节点当前层的后向指针跨越了多少节点。由于x被插到了中间,所以需要更新xupdate的span。
对于x而言,它继承了update的span的后半部分,即+号覆盖的部分,这个后半部分的长度等于总span的长度减去从updatex的span。

1
2
插入前  update-------------update.forward
插入后 update x++++++update.forward

下面这个公式,有点愣神了。为了方便理解,不如先看i=0的情况。

1
x->level[i].span = update[i]->level[i].span - (rank[0] - rank[i]);
  1. 计算x最下层的span,即x->level[0].span
    结果是update[i]->level[i].span。这是因为x是紧插到update后面的,这样会导致x实际上继承了update的span。
  2. 计算update最下层的span,即update[0]->level[0].span
    结果是rank[0]-rank[0]+1=1。这是因为update紧后面就是x了,所以这里的1就表示跨越到x节点的距离。

那么,往回看到i取任意值的情况:

  1. 计算x->level[i].span
  2. 计算update[i]->level[i].span
    从前面的讨论中,我们可以知道rank[0]表示第0层中,待插入节点x前面有多少个节点。
    同理rank[i]表示在第i层中,待插入节点x前面有多少个节点。
    那么(rank[0] - rank[i]) + 1就是第i层上,update[i]x中间有多少个节点。
1
2
3
4
5
6
7
8
9
10
11
12
13
14
15
16
17
18
19
20
...
// 计算对于新增节点而言,它第i层的span
x->level[i].span = update[i]->level[i].span - (rank[0] - rank[i]);
update[i]->level[i].span = (rank[0] - rank[i]) + 1;
}

// 在level层及之上,新节点x是没有对应的节点的,所以span要自增。
for (i = level; i < zsl->level; i++) {
update[i]->level[i].span++;
}

// 新节点的前向节点始终是update[0],也就是最底层的前驱
x->backward = (update[0] == zsl->header) ? NULL : update[0];
if (x->level[0].forward)
x->level[0].forward->backward = x;
else
zsl->tail = x;
zsl->length++;
return x;
}

zslGetRank实现

注意Rank是从1开始算的。
这里实现还是一个经典的二层循环。

1
2
3
4
5
6
7
8
9
10
11
12
13
14
15
16
17
18
19
20
21
22
23
24
25
26
/* Find the rank for an element by both score and key.
* Returns 0 when the element cannot be found, rank otherwise.
* Note that the rank is 1-based due to the span of zsl->header to the
* first element. */
unsigned long zslGetRank(zskiplist *zsl, double score, sds ele) {
zskiplistNode *x;
unsigned long rank = 0;
int i;

x = zsl->header;
for (i = zsl->level-1; i >= 0; i--) {
while (x->level[i].forward &&
(x->level[i].forward->score < score ||
(x->level[i].forward->score == score &&
sdscmp(x->level[i].forward->ele,ele) <= 0))) {
rank += x->level[i].span;
x = x->level[i].forward;
}

/* x might be equal to zsl->header, so test if obj is non-NULL */
if (x->ele && sdscmp(x->ele,ele) == 0) {
return rank;
}
}
return 0;
}

zslUpdateScore的实现

1
2
3
4
5
6
7
8
9
10
11
12
13
14
15
16
17
18
19
20
21
22
23
24
zskiplistNode *zslUpdateScore(zskiplist *zsl, double curscore, sds ele, double newscore) {
zskiplistNode *update[ZSKIPLIST_MAXLEVEL], *x;
int i;

/* We need to seek to element to update to start: this is useful anyway,
* we'll have to update or remove it. */
x = zsl->header;
// 参考zslInsert,主要是为了取得update和x
for (i = zsl->level-1; i >= 0; i--) {
while (x->level[i].forward &&
(x->level[i].forward->score < curscore ||
(x->level[i].forward->score == curscore &&
sdscmp(x->level[i].forward->ele,ele) < 0)))
{
x = x->level[i].forward;
}
update[i] = x;
}

/* Jump to our element: note that this function assumes that the
* element with the matching score exists. */
x = x->level[0].forward;
serverAssert(x && curscore == x->score && sdscmp(x->ele,ele) == 0);
...

在下面几种情况下,可以不进行先删除再添加的操作,而只是更新score:

  1. 如果是第一个节点,或者前面的节点的分数比新分数要小。
  2. 或者是最后一个节点(必须最下层),或者后面的节点的分数比新分数要大。
1
2
3
4
5
6
7
8
...
if ((x->backward == NULL || x->backward->score < newscore) &&
(x->level[0].forward == NULL || x->level[0].forward->score > newscore))
{
x->score = newscore;
return x;
}
...

在更通用的情况下,我们只能删除原节点x,并且重新插入新节点。

1
2
3
4
5
6
7
8
9
10
...
/* No way to reuse the old node: we need to remove and insert a new
* one at a different place. */
zslDeleteNode(zsl, x, update);
zskiplistNode *newnode = zslInsert(zsl,newscore,x->ele);
// 这里复用原节点的ele字段,所以置为NULL,防止被delete
x->ele = NULL;
zslFreeNode(x);
return newnode;
}

zslGetElementByRank的实现

这个函数作用是获得的元素,被用来处理跳表对zrange的实现。这里的rank是从1开始的。
此外还有个zsetRank,用来获得元素从0开始的RANK。

这里的遍历,其实和经典的遍历类似。我们从最高层尝试往右移动指针,一旦我们发现移动过头了,我们就转而下沉一层。

1
2
3
4
5
6
7
8
9
10
11
12
13
14
15
16
17
18
19
/* Finds an element by its rank. The rank argument needs to be 1-based. */
zskiplistNode* zslGetElementByRank(zskiplist *zsl, unsigned long rank) {
zskiplistNode *x;
unsigned long traversed = 0;
int i;

x = zsl->header;
for (i = zsl->level-1; i >= 0; i--) {
while (x->level[i].forward && (traversed + x->level[i].span) <= rank)
{
traversed += x->level[i].span;
x = x->level[i].forward;
}
if (traversed == rank) {
return x;
}
}
return NULL;
}

ziplist

ziplist是一个比较神奇的结构,通常被用在ZSET和HASH等结构上面。首先我们解释一下它的名字

  1. zip
    说明ziplist是压缩的,空间优化的。那么既然优化了空间,时间可能就会受损。
  2. list
    说明ziplist是一个双向链表,可以存储SDS和整数。

那么,ziplist优化在哪里呢?

  1. ziplist整体是连续分配的
    虽然作为一个链表存在,但它的内存是一次性连续分配的。
  2. 因为连续分配,所以ziplist省去了前向指针
    可以根据这个entry的encoding,直接算出来下一个元素的offset。
  3. ziplist节约了后向指针的大小
    因为只是指定了后向指针的偏移。

格式与创建

首先,分配了头部和尾部的空间

1
2
3
4
5
// ziplist.c
/* Create a new empty ziplist. */
unsigned char *ziplistNew(void) {
unsigned int bytes = ZIPLIST_HEADER_SIZE+ZIPLIST_END_SIZE;
unsigned char *zl = zmalloc(bytes);

那么头部和尾部究竟是什么呢?
头部包含了32位的int,表示总长度;32位的int表示最后一个元素的offset。16位表示item的数量。在头部保存尾部指针的实现逻辑在链表中是非常常见的,这使得查找尾部的操作是$O(1)$的。

1
#define ZIPLIST_HEADER_SIZE     (sizeof(uint32_t)*2+sizeof(uint16_t))

尾部有一个”end of ziplist” entry,它是一个值为255的byte,表示结束。不过为什么需要这个ZIP_END来表示结束呢?也许是为了遍历的方便,那么在这里我们就能猜测到ziplist里面的元素肯定是经过特殊编码的,255这个编码表示结束,没有第二个编码长这样。

1
2
/* Size of the "end of ziplist" entry. Just one byte. */
#define ZIPLIST_END_SIZE (sizeof(uint8_t))

这两个宏可以取头和尾

1
2
3
4
5
/* Return total bytes a ziplist is composed of. */
#define ZIPLIST_BYTES(zl) (*((uint32_t*)(zl)))

/* Return the offset of the last item inside the ziplist. */
#define ZIPLIST_TAIL_OFFSET(zl) (*((uint32_t*)((zl)+sizeof(uint32_t))))

下面继续看实现,我们可以看到,ziplist的大小是包括了头和尾的大小的

1
2
3
4
5
6
7
...
ZIPLIST_BYTES(zl) = intrev32ifbe(bytes);
ZIPLIST_TAIL_OFFSET(zl) = intrev32ifbe(ZIPLIST_HEADER_SIZE);
ZIPLIST_LENGTH(zl) = 0;
zl[bytes-1] = ZIP_END;
return zl;
}

格式

下面我们来看看ziplist的编码格式

  1. 00xxxxxx
    xxxxxx表示字符串的位数,最大长度63。
  2. 01xxxxxx xxxxxxxx
    xxxxxx xxxxxxxx(14个x)表示字符串的长度。
  3. 10000000 aaaaaaaa bbbbbbbb cccccccc dddddddd
    从a到d表示字符串的长度。
  4. 11000000
    int16
  5. 11010000
    int32
  6. 11100000
    int64
  7. 11110000
    int24
  8. 11111110
    int8
  9. 11111111
    ZIP_END是255表示结束。
  10. 1111xxxx
    xxxx的范围只能是(00011101), 也就是113。
    因为int8和EOF占了14和15的情况。

HyperLogLog

HyperLogLog算法主要用在基数统计中,也就是能用很小的内存占用统计出集合的大小。在Redis中,只需要大概12KB的内存就能够统计接近2**64个不同元素的基数。
HyperLogLog算法是对LogLog算法的改进。包括LogLog Counting采用的算数/几何平均数对离群值(比如0)更敏感,而HyperLogLog采用了调和平均。这里的LogLog指的是算法复杂度是$O(log(log(N_{max})))$

HLL原理

HLL通过一个哈希函数把输入x映射到一个bitset上,然后对这个bitset进行考察。考虑bitset长度为4,那么出现0001这样的结果的概率是1/16,也就是说平均要抛16次才能得到。在对数字的二进制表示进行采样的过程中,我们认为有一半的数字是以1开头的,另一半是以0开头的。同理,有1/4的数字是以01开头的,1/8以001开头的。那么在一个随机流中,我们恰恰发现一个001开头的,那么至少这个集合有8个元素。

进行推广,如下所示。考虑长度为L的bitset,那么前k-1项都为0,而第k项为1的概率,根据二项分布是$1/2^k$。因此可以通过统计bitset中第一个1出现的位置来估算数量。具体来说,我们把一批元素通过哈希函数映射成一系列bitset并放入一个桶里面,然后统计整个过程中,每个哈希值中第一个1出现的最大值(越往左越大)。我们假设最左端是第1位,那么假如第一个1出现的位置的最大值是在第$m$位,那么集合中就有$2^m$个元素。

1
2
3
4
5
6
7
8
         m
|
v
v1 xxxxxxxxx10
v2 xxxxx100000
...
vn xxxxxxx1000
|---- L ----|

为了提高精度,实际上可以使用多个桶而不是一个桶来进行统计。Redis使用了一个分桶的技巧,也就是说给定一个序号$b$,将bitset中小于$b$的所有位数bitset[0..(b-1)]决定桶的序号,剩下的部分用来就是做那个伯努利过程。那么最终就能够得到这$2^b$个桶中第$i$个桶的预估元素个数$2^{m_i}$。

如何从这多个桶的输出结果中总结到最终结果呢?HLL使用调和平均数来计算。令$B = 2^b$,表示总的桶数。那么计算$A$就是平均每个桶里面的元素个数。

$$
A = \frac{B}{\sum_{i=1}^{B}{2^{-m_i}}} = \frac{B}{\sum_{i=1}^{B}{ \frac{1}{2^{m_i}} }}
$$

那总元素的个数就是$AB$。

在实际操作的时候,发现有一个问题,例如有的桶直接就是0,也就是说没有出现一个1,对这种情况我们如何处理呢?或者说,我们认为这表示这个集合的值是比001这样的小还是大呢?我觉得,其实应该认为这个集合是**远远大于001**的,事实上集合的大小至少应该等于10...0(共有len(bitset)个0)。形象一点,这里都是0的原因是因为真正的1其实还在更前面!所以在计算的时候,0...000...01表示的值之间就会存在一个很大的落差,不知道我理解是否正确。

最后,我们得到的$AB$其实不准确,还需要进行修正。

Redis的HLL的基本结构

1
2
3
4
5
6
7
struct hllhdr {
char magic[4]; /* "HYLL" */
uint8_t encoding; /* HLL_DENSE or HLL_SPARSE. */
uint8_t notused[3]; /* Reserved for future use, must be zero. */
uint8_t card[8]; /* Cached cardinality, little endian. */
uint8_t registers[]; /* Data bytes. */
};
  1. encoding
    它的取值是HLL_DENSEHLL_SPARSE,分别对应Dense存储模式和Sparse存储模式,这两个存储模式是Redis的HLL实现的一个精妙的部分,用来节省存储空间。此外,在内部还会有一个HLL_RAW的模式,这个只在pfcount上用到,并且不对外暴露。后面详细介绍这两个结构。
  2. registers
    一个Flex数组,即上面提到的bitset。因为Sparse存储模式一开始用的空间很少,所以我们的数据也是弹性分配的。

Dense和Sparse结构

Dense模式就是经典的HLL算法,其中registers大概占据了12KB的大小。容易看到,这个空间占用还是比较大的,考虑到这里面大多数都是0,所以Redis又使用了Sparse模式。
Sparse模式是创建时默认的,实际上不会占用12KB的大小,主要用来表达连续多个桶的值为0的情况,也就是用CPU换存储。它使用下面三种编码方式,称为opcode

  1. XZERO:格式为01xxxxxx yyyyyyyy
    这个能表示最多的0形态。初始化之后,因为一个数都没有加入HLL中,就使用XZERO,占用两个字节。
    前面的6个x叫Most Signigicent Bits(MSB),后面8个y叫Least Significant Bits(LSB)。这14位组合起来可以表示16384个0,这也对应了后面提到的HLL_SPARSE_XZERO_MAX_LEN这个宏的取值,刚好等于HLL_REGISTERS的值。
  2. ZERO:格式为00xxxxxx
    ZERO能表示的0比XZERO要少,但只占用一个字节,所以能表示较少的0。
    表示xxxxxx+1个0,所以实际上能够表示最多64个0。
  3. VAL:格式为1vvvvvxx
    当HLL开始进一步稠密时,就可能出现VAL这种情况。
    5个v表示重复的计数值。注意,如果vvvvv为0,说明计数值是1。如果我们需要表示0的情况,就直接用XZERO和ZERO了。
    2个x表示重复的桶的数量,也就是说有连续xx+1(<4)个桶的值都是vvvvv+1(<32)。
  4. 变换为Dense
    注意,当VAL也无法描述时,例如:
    • 某一段重复的桶的数量超过4了,那么就要变换为Dense。
    • 出现超过32的值之后,就会切换为Dense模式。

HLL的空间占用

1
2
3
4
5
6
7
8
9
10
// hyperloglog.c

#define HLL_P 14 /* The greater is P, the smaller the error. */
#define HLL_Q (64-HLL_P)
#define HLL_HDR_SIZE sizeof(struct hllhdr)
#define HLL_SPARSE_XZERO_MAX_LEN 16384
#define HLL_REGISTERS (1<<HLL_P) /* With P=14, 16384 registers. */
#define HLL_P_MASK (HLL_REGISTERS-1) /* Mask to index register. */
#define HLL_BITS 6 /* Enough to count up to 63 leading zeroes. */
#define HLL_REGISTER_MAX ((1<<HLL_BITS)-1)

先说一下这几个常数:

  1. HLL_P
    桶的数量,默认值14。P越大,计算得越精确。

  2. HLL_Q
    用来做伯努利过程的尾数。

  3. HLL_REGISTERS表示有多少个桶
    如果默认值14,则可以构成16384个桶(对应到hllhdr中的registers)。

  4. HLL_P_MASK
    可以通过&来取出实际桶的序号。
    所以Dense的实际排布是

    1
    | Q bits of hash | P bits of register index |
  5. HLL_BITS
    每个桶的大小,这里是6bit。为什么不是8bit,正好一个bytes呢?因为2**6是64,可以用来表示63个0了。
    不过我觉得最多只有50个0。首先,我们得到的是64位的哈希,然后其中有14位被用来分桶了,那剩下最多还能表示64-P+1=51位的count(参考“pfadd的Dense实现”的实验),而这个是最少需要6个bit来表示的,所以这里用了6bit而不是8bit。不过这样会不会因为内存不对齐从而产生开销呢?
    当然,这里用6bit,实际上会给定位某个桶带来麻烦。可以查看hllDenseGetHLL_DENSE_GET_REGISTER
    另外,我们还可以计算得到,Dense情况下HLL的大小为6bit*16384=12KB。

createHLLObject实现

由于创建的HLL结构中每个桶的值都是0,所以默认肯定是Sparse存储省空间。所以要手动构造一下Sparse结构。首先分配sparselen的空间,包括:

  1. HLL_HDR_SIZE也就是HLL头部的大小
  2. register的空间

它的值是

$$
\frac{(HLL\_REGISTERS+(HLL\_SPARSE\_XZERO\_MAX\_LEN-1))}{HLL\_SPARSE\_XZERO\_MAX\_LEN} * 2
$$
这个公式看起来很奇怪,但是$\frac{X + (Y-1)}{Y}$实际上是向上取整的常规操作,所以说实际上要做的就是算出
$$
\lceil \frac{HLL\_REGISTERS}{HLL\_SPARSE\_XZERO\_MAX\_LEN} \rceil * 2
$$

所以这就好理解了,总共有多少个桶,然后除以每个XZERO opcode能放存多少个桶,最后乘以2,因为每个XZERO占用两个bytes,这就是要给这个Sparse结构分配多少内存。而一个HLL_SPARSE_XZERO_MAX_LEN能表示16384个桶,这在上文已经讲解过了,刚好等于HLL_REGISTERS的值,因此实际上一开始所有register用两个bytes就完全可以cover了。
做个实验,打印下来发现sparselen为18,HLL_HDR_SIZE是16,所以确实一开始register只用了两个字节。

1
2
3
4
5
6
7
8
9
10
11
robj *createHLLObject(void) {
robj *o;
struct hllhdr *hdr;
sds s;
uint8_t *p;
int sparselen = HLL_HDR_SIZE +
(((HLL_REGISTERS+(HLL_SPARSE_XZERO_MAX_LEN-1)) /
HLL_SPARSE_XZERO_MAX_LEN)*2);
printf("sparselen %d HLL_HDR_SIZE %d\n", sparselen, HLL_HDR_SIZE);
int aux;
...

分配完空间,下面就是要初始化,具体做法就是调用HLL_SPARSE_XZERO_SET每两个字节set一下。

1
2
3
4
5
6
7
8
9
10
11
12
13
14
15
...
/* Populate the sparse representation with as many XZERO opcodes as
* needed to represent all the registers. */
aux = HLL_REGISTERS;
s = sdsnewlen(NULL,sparselen);
p = (uint8_t*)s + HLL_HDR_SIZE;
while(aux) {
int xzero = HLL_SPARSE_XZERO_MAX_LEN;
if (xzero > aux) xzero = aux;
HLL_SPARSE_XZERO_SET(p,xzero);
p += 2;
aux -= xzero;
}
serverAssert((p-(uint8_t*)s) == sparselen);
...

可以看到,实际上HLL是一个String对象。Redis中的String是可以存储二进制序列的,而不局限于是字符串。

1
2
3
4
5
6
7
8
...
/* Create the actual object. */
o = createObject(OBJ_STRING,s);
hdr = o->ptr;
memcpy(hdr->magic,"HYLL",4);
hdr->encoding = HLL_SPARSE;
return o;
}

pfadd实现

如果没有,就新创建一个HLL对象

1
2
3
4
5
6
7
8
9
10
11
12
13
14
15
16
// server.c

/* PFADD var ele ele ele ... ele => :0 or :1 */
void pfaddCommand(client *c) {
robj *o = lookupKeyWrite(c->db,c->argv[1]);
struct hllhdr *hdr;
int updated = 0, j;

if (o == NULL) {
/* Create the key with a string value of the exact length to
* hold our HLL data structure. sdsnewlen() when NULL is passed
* is guaranteed to return bytes initialized to zero. */
o = createHLLObject();
dbAdd(c->db,c->argv[1],o);
updated++;
...

否则,调用dbUnshareStringValue确保对象o能够被原地进行修改。

1
2
3
4
5
6
...
} else {
if (isHLLObjectOrReply(c,o) != C_OK) return;
o = dbUnshareStringValue(c->db,c->argv[1],o);
}
...

根据dbUnshareStringValue的注释,一个对象是可以被修改的,除非:

  1. 它是被shared的,即refcount > 1
  2. 它的encoding不是RAW

如果有对象是满足上面两个条件的,那么会存入这个string对象的一个unshared/not-encoded的副本,否则直接返回这个对象o。我们可以查看下面的实现。

1
2
3
4
5
6
7
8
9
10
robj *dbUnshareStringValue(redisDb *db, robj *key, robj *o) {
redisAssert(o->type == REDIS_STRING);
if (o->refcount != 1 || o->encoding != REDIS_ENCODING_RAW) {
robj *decoded = getDecodedObject(o);
o = createRawStringObject(decoded->ptr, sdslen(decoded->ptr));
decrRefCount(decoded);
dbOverwrite(db,key,o);
}
return o;
}

下面就是对于所有要添加的项目调用hllAdd,这和前面的zaddGenericCommand等命令很相似。

1
2
3
4
5
6
7
8
9
10
11
12
13
14
15
16
...
/* Perform the low level ADD operation for every element. */
for (j = 2; j < c->argc; j++) {
int retval = hllAdd(o, (unsigned char*)c->argv[j]->ptr,
sdslen(c->argv[j]->ptr));
switch(retval) {
case 1:
updated++;
break;
case -1:
addReplySds(c,sdsnew(invalid_hll_err));
return;
}
}
hdr = o->ptr;
...

下面的话同样会调用signalModifiedKeynotifyKeyspaceEvent进行通知,参考之前的讲解。有趣的是这个HLL_INVALIDATE_CACHE,它涉及了cache的机制,我们将在稍后讲解。

1
2
3
4
5
6
7
8
9
...
if (updated) {
signalModifiedKey(c,c->db,c->argv[1]);
notifyKeyspaceEvent(NOTIFY_STRING,"pfadd",c->argv[1],c->db->id);
server.dirty++;
HLL_INVALIDATE_CACHE(hdr);
}
addReply(c, updated ? shared.cone : shared.czero);
}

下面的是主要的hddAdd实现,主要分为Dense和Sparse两种

1
2
3
4
5
6
7
8
int hllAdd(robj *o, unsigned char *ele, size_t elesize) {
struct hllhdr *hdr = o->ptr;
switch(hdr->encoding) {
case HLL_DENSE: return hllDenseAdd(hdr->registers,ele,elesize);
case HLL_SPARSE: return hllSparseAdd(o,ele,elesize);
default: return -1; /* Invalid representation. */
}
}

pfadd的Dense实现

hllDenseAdd

hllDenseAdd函数主要在HLL结构中“插入”一个元素,事实上并没有什么元素被加上,只是说在需要的时候自增一下这个哈希值所属的max 0 pattern counter。
首先,通过hllPatLen计算ele的哈希,并从哈希值获得桶的序号index,并且把这个哈希值里面第一个1出现的位置count返回(具体含义见下面说明,这里难以理解的是到底从左边数还是从右边数。。。)。需要注意的是,我们并不需要实际的哈希值。

1
2
3
4
5
6
int hllDenseAdd(uint8_t *registers, unsigned char *ele, size_t elesize) {
long index;
uint8_t count = hllPatLen(ele,elesize,&index);
/* Update the register if this element produced a longer run of zeroes. */
return hllDenseSet(registers,index,count);
}

为了更方便进行调试,我们将createHLLObject中新对象的创建默认改为HLL_DENSE,并加上一系列调试语句,来观察行为。

1
2
3
4
5
6
7
8
9
10
11
12
13
14
15
16
17
void format_binary(uint64_t x, char *buf)
{
int i = 0;
while(x){
char b = x % 2;
buf[i] = b + '0';
x /= 2;
i++;
}
int m = i / 2;
for(int j = 0; j < m; j++){
char tmp = buf[j];
buf[j] = buf[i - 1 - j];
buf[i - 1 - j] = tmp;
}
buf[i] = '\0';
}

但是单纯这样改会有问题,当第二次调用pfadd时会报错WRONGTYPE Key is not a valid HyperLogLog string value,原因是下面的语句检查不通过。

1
2
3
4
5
int isHLLObjectOrReply(client *c, robj *o) {
...
if (hdr->encoding == HLL_DENSE &&
stringObjectLen(o) != HLL_DENSE_SIZE) goto invalid;
...

所以比较好的做法是在createHLLObject最后直接调用hllSparseToDense(o),让它从Sparse转成Dense进行研究。

hllPatLen

查看hllPatLen的实现。首先,它基于MurmurHash64A算得哈希值hash,并且得到所在的桶(register)的编号index。容易知道,这个index的取值是在[0, 2**HLL_P=16384)之间的,这也对应了桶的数量。

1
2
3
4
5
6
7
8
9
10
11
12
13
/* Given a string element to add to the HyperLogLog, returns the length
* of the pattern 000..1 of the element hash. As a side effect 'regp' is
* set to the register index this element hashes to. */

int hllPatLen(unsigned char *ele, size_t elesize, long *regp) {
uint64_t hash, bit, index;
int count;

hash = MurmurHash64A(ele,elesize,0xadc83b19ULL);
index = hash & HLL_P_MASK; /* Register index. */
char s[100];
format_binary(hash, s);
printf("Raw hash %s\n", s);

接着,将表示桶的P位mask出为index,并开始对剩下的64-HLL_P=50位进行原始的HLL算法。
首先,将hash右移HLL_P位,去掉register index。然后将最高位设为1,这样的话返回值count最大为Q+1,也就是51。这样做的目的:

  1. 顺应了前面提到的全是0的情况。
  2. 防止后面死循环。
1
2
3
4
5
6
7
8
...
hash >>= HLL_P; /* Remove bits used to address the register. */
format_binary(hash, s);
printf( %llx %s\n", hash, s);
hash |= ((uint64_t)1<<HLL_Q);
format_binary(hash, s);
printf("Q-set hash %llx %s\n", hash, s);
...

从第HLL_REGISTERS位开始计算0的数量,也就是从低位往高位找,最多找到64-P+1=Q+1位。我们令bit为1,然后从右往左扫,直到看到第一个1为止。根据注释,是结尾的1也要被算在计数里面,例如”001”的count是3;count的最小值是1,此时没有前导0。
可以看出这里和HLL的原算法还是有点不同的,原算法是找leftmost 1,而现在的实现是找rightmost 1。这个循环看上去很没有效率,但在平均情况下在很少的迭代之后就能找到一个1。

1
2
3
4
5
6
7
8
9
10
11
12
13
14
...
bit = 1;
count = 1; /* Initialized to 1 since we count the "00000...1" pattern. */
while((hash & bit) == 0) {
format_binary(bit, s);
printf("while bit %s count %d\n", s, count);
count++;
bit <<= 1;
}
format_binary(bit, s);
printf("while end bit %s count %d\n", s, count);
*regp = (int) index;
return count;
}

Demo

pfadd p1 a中添加了一个元素,返回count为2。实际输出1。

1
2
3
4
5
Raw hash                     101001111010010010001110000101010011011010000111011000110100111
P-shift hash 14f491c2a6d0e 1010011110100100100011100001010100110110100001110
Q-set hash 54f491c2a6d0e 101010011110100100100011100001010100110110100001110
while bit 1 count 1
while end bit 10 count 2

接着运行pfadd p1 b c d e f h i0 i1 i2,现在有10个元素,返回count为5。实际输出10。

1
2
3
4
5
6
7
8
Raw hash 110100001100001000111001011000101111000000001000000001111010000
P-shift hash 1a18472c5e010 1101000011000010001110010110001011110000000010000
Q-set hash 5a18472c5e010 101101000011000010001110010110001011110000000010000
while bit 1 count 1
while bit 10 count 2
while bit 100 count 3
while bit 1000 count 4
while end bit 10000 count 5

hllDenseSet

下面再来看hllDenseSet的实现,它应该就是根据hllPatLen计算的结果更新对应桶的值了。
hllDenseSet是一个一个底层的函数,用来设置Dense HLL register。将index处的值设为count,如果count比当前值大。
registers应该能够容纳HLL_REGISTERS+1的长度,这个是由sds的实现来保证的,因为sds字符串始终会在最后自动加上一个’\0’。
这个函数始终会成功,返回1表示发生了修改,否则返回0。

1
2
3
4
5
6
7
8
9
10
11
int hllDenseSet(uint8_t *registers, long index, uint8_t count) {
uint8_t oldcount;

HLL_DENSE_GET_REGISTER(oldcount,registers,index);
if (count > oldcount) {
HLL_DENSE_SET_REGISTER(registers,index,count);
return 1;
} else {
return 0;
}
}

逻辑很简单,就是先把老的oldcount读出来,如果count比较大,那么就更新,比较麻烦的就是这两个宏。

首先是HLL_BITS,它的取值是6,为什么这么奇怪呢?先前说到这是出于压缩空间的考虑。所以HLL_DENSE_GET_REGISTER做的就是从数组p中找到第regnum个register(桶)。方案也很简单,可以算得这个桶在第几个byte。然后从这个byte开始读6个bit,其中可能还会读到后一个byte上。

1
2
3
4
5
6
7
8
9
10
11
12
13
14
15
16
/* Store the value of the register at position 'regnum' into variable 'target'.
* 'p' is an array of unsigned bytes. */
// do...while(0)是Linux中常见的保护宏的机制
#define HLL_DENSE_GET_REGISTER(target,p,regnum) do { \
uint8_t *_p = (uint8_t*) p; \
// 获得当前桶所在的起始byte
unsigned long _byte = regnum*HLL_BITS/8; \
// 获得当前桶所在的起始byte的偏移
unsigned long _fb = regnum*HLL_BITS&7; \
// 还有_fb8个bit在下一个byte上
unsigned long _fb8 = 8 - _fb; \
unsigned long b0 = _p[_byte]; \
unsigned long b1 = _p[_byte+1]; \
// 拼起来
target = ((b0 >> _fb) | (b1 << _fb8)) & HLL_REGISTER_MAX; \
} while(0)

pfadd的Sparse实现

几个宏

1
2
3
4
// xzero类型前缀 01xxxxxx
#define HLL_SPARSE_XZERO_BIT 0x40
// val类型前缀 1vvvvvxx
#define HLL_SPARSE_VAL_BIT 0x80

下面的三个宏用来判断类型

1
2
3
4
5
6
// 0xc0=0x11000000 判断是否是zero类型
#define HLL_SPARSE_IS_ZERO(p) (((*(p)) & 0xc0) == 0)
// 判断是否是xzero类型
#define HLL_SPARSE_IS_XZERO(p) (((*(p)) & 0xc0) == HLL_SPARSE_XZERO_BIT)
// 判断是否是val类型
#define HLL_SPARSE_IS_VAL(p) ((*(p)) & HLL_SPARSE_VAL_BIT)

下面的几个宏,对于XZERO和ZERO,是取出它表示有多少个0;对于VAL,还需要获得VAL的值,以及对应VAL的个数。

1
2
3
4
5
6
7
8
// 00xxxxxx & 0x00111111 获得后6位的值,即zero的长度
#define HLL_SPARSE_ZERO_LEN(p) (((*(p)) & 0x3f)+1)
// 01xxxxxx yyyyyyy 计算xzero长度
#define HLL_SPARSE_XZERO_LEN(p) (((((*(p)) & 0x3f) << 8) | (*((p)+1)))+1)
// 001vvvvv & 值0x00011111 获得中间5位的值,即val的值
#define HLL_SPARSE_VAL_VALUE(p) ((((*(p)) >> 2) & 0x1f)+1)
// 获得后两位的值, 即长度
#define HLL_SPARSE_VAL_LEN(p) (((*(p)) & 0x3)+1)

下面的几个宏给出每个op对应的数值范围,为什么取这些值之前已经介绍过了。

1
2
3
4
5
6
7
8
// spase值5bit最大32
#define HLL_SPARSE_VAL_MAX_VALUE 32
// 长度2bit 最大4
#define HLL_SPARSE_VAL_MAX_LEN 4
// zero类型6位表示长度, 64
#define HLL_SPARSE_ZERO_MAX_LEN 64
// xzero类型14bit, 最大16384
#define HLL_SPARSE_XZERO_MAX_LEN 16384

下面几个宏是用来写入VAL、ZERO和XZERO的

  1. HLL_SPARSE_VAL_SET
    这是通过移位进行拼装。
    为什么是(val)-1而不是val呢,回想之前说过VAL为0的时候表示VAL为1而不是0,有0个的情况直接用ZERO和XZERO表示。
    1
    2
    3
    #define HLL_SPARSE_VAL_SET(p,val,len) do { \
    *(p) = (((val)-1)<<2|((len)-1))|HLL_SPARSE_VAL_BIT; \
    } while(0)

hllSparseAdd

hllSparseAdd的实现还是需要先通过hllPatLen来获得countindex

1
2
3
4
5
6
int hllSparseAdd(robj *o, unsigned char *ele, size_t elesize) {
long index;
uint8_t count = hllPatLen(ele,elesize,&index);
/* Update the register if this element produced a longer run of zeroes. */
return hllSparseSet(o,index,count);
}

hllSparseSet

hllSparseSet是一个贼复杂的函数,作用是将第index个register的值设置为不小于count。参数o是用来存储HLL的String对象,这个函数需要一个可变引用(指针),从而在需要的时候扩容。

返回值:

  1. 当集合的cardinality发生变化后,函数返回1。
  2. 返回0,表示没有实际更新。
  3. 返回-1表示错误。

另外一个副作用是使得HLL从Sparse表示变为Dense表示,这个通常发生在某个值不能通过Sparse格式表示了(参考之前对VAL表示方法的论述),或者结果集的大小超过了server.hll_sparse_max_bytes
不过,在createHLLObject创建HLL时,却不会判断server.hll_sparse_max_bytes为0的时候就直接Dense,此外,还有个HLL_SPARSE_VAL_MAX_VALUE阈值。

1
2
3
4
5
6
7
8
9
int hllSparseSet(robj *o, long index, uint8_t count) {
struct hllhdr *hdr;
uint8_t oldcount, *sparse, *end, *p, *prev, *next;
long first, span;
long is_zero = 0, is_xzero = 0, is_val = 0, runlen = 0;

// 如果count大于32,直接走promote流程到Dense
if (count > HLL_SPARSE_VAL_MAX_VALUE) goto promote;
...

后面讲到,我们先得在这里为最差情况(XZERO变为XZERO-VAL-XZERO)额外分配3个字节。这个必须要现在做,因为sdsMakeRoomFor可能realloc,也可能malloc,但这两种都不保证返回的ptr不会变化。而我们希望以后的o->ptr能够是不变的。

1
2
3
...
o->ptr = sdsMakeRoomFor(o->ptr,3);
...

下面是第一步,先定位到sparse的头sparse,也就是registers数组,和尾end。目的是定位到需要修改的opcode,从而检查是否真的要修改。
下面这个大循环,主要就是从头遍历,先通过HLL_SPARSE_IS_宏判断是具体哪种op类型,然后前进对应的oplenspan
在上面的while循环结束后,我们维护了下面几个性质:

  1. first储存了当前的opcode所覆盖的第一个register注意这里的register对应了Dense里面桶的概念,而不是表示一个uint8_t
  2. nextprev分别存储了后一个和前一个opcode,如果不存在前驱后继,对应值是NULL
  3. span表示当前opcode覆盖了多少个register,也就是跨过了多少个相同的数字
  4. oplen表示这个op实际长度是多少个byte,根据前面对ZERO、XZERO和VAL的定义,其实取值只会在1和2
  5. p指向了当前的opcode
  6. index表示要哈希到哪个桶里面
1
2
3
4
5
6
7
8
9
10
11
12
13
14
15
16
17
18
19
20
21
22
23
24
25
26
27
28
29
30
31
...
sparse = p = ((uint8_t*)o->ptr) + HLL_HDR_SIZE;
end = p + sdslen(o->ptr) - HLL_HDR_SIZE;

first = 0;
prev = NULL; /* Points to previous opcode at the end of the loop. */
next = NULL; /* Points to the next opcode at the end of the loop. */
span = 0;
while(p < end) {
long oplen;

/* Set span to the number of registers covered by this opcode. */
// 这个循环是最performance critical的。所以需要从最可能被处理的情况开始(ZERO)处理。
// 最少见的情况(XZERO)放到最后。
oplen = 1;
if (HLL_SPARSE_IS_ZERO(p)) {
span = HLL_SPARSE_ZERO_LEN(p);
} else if (HLL_SPARSE_IS_VAL(p)) {
span = HLL_SPARSE_VAL_LEN(p);
} else { /* XZERO. */
span = HLL_SPARSE_XZERO_LEN(p);
oplen = 2;
}
// 如果这个opcode覆盖了要访问的register,退出循环
if (index <= first+span-1) break;
prev = p;
p += oplen;
first += span;
}
if (span == 0 || p >= end) return -1; /* Invalid format. */
...

现在,我们找到了包含index的那个op了,判断这个op的类型,并且计算runlen。也就是这个opcode表示有多少个0或者VAL,对应的诸如HLL_SPARSE_ZERO_LEN宏之前也讲过了。

1
2
3
4
5
6
7
8
9
10
11
12
13
14
15
16
17
18
...
next = HLL_SPARSE_IS_XZERO(p) ? p+2 : p+1;
if (next >= end) next = NULL;

/* Cache current opcode type to avoid using the macro again and
* again for something that will not change.
* Also cache the run-length of the opcode. */
if (HLL_SPARSE_IS_ZERO(p)) {
is_zero = 1;
runlen = HLL_SPARSE_ZERO_LEN(p);
} else if (HLL_SPARSE_IS_XZERO(p)) {
is_xzero = 1;
runlen = HLL_SPARSE_XZERO_LEN(p);
} else {
is_val = 1;
runlen = HLL_SPARSE_VAL_LEN(p);
}
...

在得到类型后,我们需要进行分类讨论。

首先是VAL的两种平凡情况,尝试进行原地修改。

  1. 如果这个VAL opcode所表示的count大于现在这个哈希产生的count,那么实际上并不需要进行更新
    在这种情况下PFADD会返回0,因为没有发生任何更新。
  2. 特例。如果这个VAL opcode仅仅就覆盖了一个register,那么就仅直接进行更新
    我们稍后会去具体查看updated的具体实现。
    相对的不平凡的情况就是这个VAL opcode覆盖了多个register,也就是有相邻的多个桶都是这个count,可想而知,需要把这个register切出来单独做一个VAL opcode,实现稍后分析。
1
2
3
4
5
6
7
8
9
10
11
12
13
...
if (is_val) {
oldcount = HLL_SPARSE_VAL_VALUE(p);
/* Case A. */
if (oldcount >= count) return 0;

/* Case B. */
if (runlen == 1) {
HLL_SPARSE_VAL_SET(p,count,1);
goto updated;
}
}
...

然后是数量为1的ZERO平凡情况。如果是0,并且只覆盖了一个register,同样直接进行更新。注意这里对这个函数的调用是HLL_SPARSE_VAL_SET(p,count,1)count被传给了形参val,而不是语义上更接近的len。这表示在p处有连续1个桶,它的值为count

1
2
3
4
5
6
7
8
...
/* C) Another trivial to handle case is a ZERO opcode with a len of 1.
* We can just replace it with a VAL opcode with our value and len of 1. */
if (is_zero && runlen == 1) {
HLL_SPARSE_VAL_SET(p,count,1);
goto updated;
}
...

下面是较为复杂的普通情况。opcode要不是VAL,要不是len大于1的ZERO,要不就是XZERO。
这些情况特殊在需要将原来的opcode拆分为多个opcode。其中最坏情况要把XZERO拆分成XZERO-VAL-XZERO的结构,也就是在原来的XZERO范围中有一个register被hit了。这个变化会占用5个字节,比原来多3个,也就是我们前面提前分配3个字节的原因。【Q】如果最后发现这3个字节不需要的话,会回收么?如果不会回收的话,每次访问这个opcode,会不会导致每次都会尝试多分配3个?其实sdsMakeRoomFor是对当前实际使用的长度len而言的,而不是每次都增加capacity。

下面就是先将新序列写到n里面,然后将n原地插入到旧数组中。创建一个长度为5的buf即seq,保证不会溢出。
首先处理ZERO和XZERO这块,这个处理主要就是将它分为Z-VAL-Z的序列,其中Z可能是ZERO可能是XZERO。具体查看代码中的注释。

1
2
3
4
5
6
7
8
9
10
11
12
13
14
15
16
17
18
19
20
21
22
23
24
25
26
27
28
29
30
31
32
33
34
35
36
...
uint8_t seq[5], *n = seq;
int last = first+span-1; /* Last register covered by the sequence. */
int len;

if (is_zero || is_xzero) {
/* Handle splitting of ZERO / XZERO. */
if (index != first) {
// 在index前面有len个桶
len = index-first;
// 如果这么多个桶不能用ZERO放下,
// 就用XZERO放
if (len > HLL_SPARSE_ZERO_MAX_LEN) {
HLL_SPARSE_XZERO_SET(n,len);
n += 2;
} else {
HLL_SPARSE_ZERO_SET(n,len);
n++;
}
}
// 设置count
HLL_SPARSE_VAL_SET(n,count,1);
n++;
// 同样的办法处理尾部
if (index != last) {
len = last-index;
if (len > HLL_SPARSE_ZERO_MAX_LEN) {
HLL_SPARSE_XZERO_SET(n,len);
n += 2;
} else {
HLL_SPARSE_ZERO_SET(n,len);
n++;
}
}
} else {
...

下面是分割VAL的情况。我们也是在n上面进行修改。把除自己之外的设为curval,自己设置为count

1
2
3
4
5
6
7
8
9
10
11
12
13
14
15
16
17
18
...
/* Handle splitting of VAL. */
int curval = HLL_SPARSE_VAL_VALUE(p);

if (index != first) {
len = index-first;
HLL_SPARSE_VAL_SET(n,curval,len);
n++;
}
HLL_SPARSE_VAL_SET(n,count,1);
n++;
if (index != last) {
len = last-index;
HLL_SPARSE_VAL_SET(n,curval,len);
n++;
}
}
...

下面将n插入到老序列里面,其实就是一个memmove

1
2
3
4
5
6
7
8
9
10
11
12
13
14
15
16
...
/* Step 3: substitute the new sequence with the old one.
*
* Note that we already allocated space on the sds string
* calling sdsMakeRoomFor(). */
int seqlen = n-seq;
int oldlen = is_xzero ? 2 : 1;
int deltalen = seqlen-oldlen;

if (deltalen > 0 &&
sdslen(o->ptr)+deltalen > server.hll_sparse_max_bytes) goto promote;
if (deltalen && next) memmove(next+deltalen,next,end-next);
sdsIncrLen(o->ptr,deltalen);
memcpy(p,seq,seqlen);
end += deltalen;
...

下面,来看updated的实现,这一块代码,主要是从处理VAL和ZERO的两个goto过来,以及通常情况的顺序执行过来。

1
2
3
4
5
6
7
8
9
10
11
12
13
14
15
16
17
18
19
20
21
22
23
24
25
26
27
28
29
30
31
32
33
34
35
36
37
38
39
40
41
42
43
44
45
...
updated:
/* Step 4: Merge adjacent values if possible.
*
* The representation was updated, however the resulting representation
* may not be optimal: adjacent VAL opcodes can sometimes be merged into
* a single one. */
p = prev ? prev : sparse;
int scanlen = 5; /* Scan up to 5 upcodes starting from prev. */
while (p < end && scanlen--) {
if (HLL_SPARSE_IS_XZERO(p)) {
p += 2;
continue;
} else if (HLL_SPARSE_IS_ZERO(p)) {
p++;
continue;
}
/* We need two adjacent VAL opcodes to try a merge, having
* the same value, and a len that fits the VAL opcode max len. */
if (p+1 < end && HLL_SPARSE_IS_VAL(p+1)) {
int v1 = HLL_SPARSE_VAL_VALUE(p);
int v2 = HLL_SPARSE_VAL_VALUE(p+1);
if (v1 == v2) {
int len = HLL_SPARSE_VAL_LEN(p)+HLL_SPARSE_VAL_LEN(p+1);
if (len <= HLL_SPARSE_VAL_MAX_LEN) {
HLL_SPARSE_VAL_SET(p+1,v1,len);
memmove(p,p+1,end-p);
sdsIncrLen(o->ptr,-1);
end--;
/* After a merge we reiterate without incrementing 'p'
* in order to try to merge the just merged value with
* a value on its right. */
continue;
}
}
}
p++;
}

/* Invalidate the cached cardinality. */
hdr = o->ptr;
HLL_INVALIDATE_CACHE(hdr);
return 1;

...

下面是promote流程,是比较直截了当的,也就是先hllSparseToDense转换到Dense,然后调用hllDenseSet。注意这也反过来意味着PFADD命令需要保证被广播到slaves和AOF中,从而保证slaves中也进行这个转换。

1
2
3
4
5
6
7
8
9
10
11
12
13
...
promote: /* Promote to dense representation. */
if (hllSparseToDense(o) == C_ERR) return -1; /* Corrupted HLL. */
hdr = o->ptr;

/* We need to call hllDenseAdd() to perform the operation after the
* conversion. However the result must be 1, since if we need to
* convert from sparse to dense a register requires to be updated.
*/
int dense_retval = hllDenseSet(hdr->registers,index,count);
serverAssert(dense_retval == 1);
return dense_retval;
}

pfcount实现

pfcountCommand函数

照例是pfcountCommand作为入口。
首先是处理PFCOUNT给出多个key的情况,此时会返回将这些HLL做union之后的近似cardinality。

1
2
3
4
5
6
7
8
9
10
11
12
13
14
15
16
17
18
19
20
21
22
23
24
25
26
27
28
29
30
31
32
33
34
35
36
37
38
/* PFCOUNT var -> approximated cardinality of set. */
void pfcountCommand(client *c) {
robj *o;
struct hllhdr *hdr;
uint64_t card;

/* Case 1: multi-key keys, cardinality of the union.
*
* When multiple keys are specified, PFCOUNT actually computes
* the cardinality of the merge of the N HLLs specified. */
if (c->argc > 2) {
uint8_t max[HLL_HDR_SIZE+HLL_REGISTERS], *registers;
int j;

/* Compute an HLL with M[i] = MAX(M[i]_j). */
memset(max,0,sizeof(max));
hdr = (struct hllhdr*) max;
hdr->encoding = HLL_RAW; /* Special internal-only encoding. */
registers = max + HLL_HDR_SIZE;
for (j = 1; j < c->argc; j++) {
/* Check type and size. */
robj *o = lookupKeyRead(c->db,c->argv[j]);
if (o == NULL) continue; /* Assume empty HLL for non existing var.*/
if (isHLLObjectOrReply(c,o) != C_OK) return;

/* Merge with this HLL with our 'max' HLL by setting max[i]
* to MAX(max[i],hll[i]). */
if (hllMerge(registers,o) == C_ERR) {
addReplySds(c,sdsnew(invalid_hll_err));
return;
}
}

/* Compute cardinality of the resulting set. */
addReplyLongLong(c,hllCount(hdr,NULL));
return;
}
...

下面的情况是处理一个HLL的cardinality。

1
2
3
4
5
6
7
8
9
10
11
12
13
14
15
16
17
...
/* Case 2: cardinality of the single HLL.
*
* The user specified a single key. Either return the cached value
* or compute one and update the cache. */
o = lookupKeyWrite(c->db,c->argv[1]);
if (o == NULL) {
/* No key? Cardinality is zero since no element was added, otherwise
* we would have a key as HLLADD creates it as a side effect. */
addReply(c,shared.czero);
} else {
if (isHLLObjectOrReply(c,o) != C_OK) return;
o = dbUnshareStringValue(c->db,c->argv[1],o);

/* Check if the cached cardinality is valid. */
hdr = o->ptr;
...

假如可以使用cache,那么就直接使用cache去组装card。可以看出低字节在数组的低index中,所以是按照小端存储的。【Q】为啥不直接放一个uint64_t,而是要自己用uint8_t去维护一下?难道仅仅是为了在高位留一个字节表示是否是valid的?那其实可以用位域来实现啊?

1
2
3
4
5
6
7
8
9
10
11
12
13
...
if (HLL_VALID_CACHE(hdr)) {
/* Just return the cached value. */
card = (uint64_t)hdr->card[0];
card |= (uint64_t)hdr->card[1] << 8;
card |= (uint64_t)hdr->card[2] << 16;
card |= (uint64_t)hdr->card[3] << 24;
card |= (uint64_t)hdr->card[4] << 32;
card |= (uint64_t)hdr->card[5] << 40;
card |= (uint64_t)hdr->card[6] << 48;
card |= (uint64_t)hdr->card[7] << 56;
} else {
...

假如cache是无效的,那么会实际调用hllCounthllCount有个invalid参数,表示这个HLL的结构是有问题的。

1
2
3
4
5
6
7
8
9
10
11
12
13
14
15
16
17
...
int invalid = 0;
/* Recompute it and update the cached value. */
card = hllCount(hdr,&invalid);
if (invalid) {
addReplySds(c,sdsnew(invalid_hll_err));
return;
}
hdr->card[0] = card & 0xff;
hdr->card[1] = (card >> 8) & 0xff;
hdr->card[2] = (card >> 16) & 0xff;
hdr->card[3] = (card >> 24) & 0xff;
hdr->card[4] = (card >> 32) & 0xff;
hdr->card[5] = (card >> 40) & 0xff;
hdr->card[6] = (card >> 48) & 0xff;
hdr->card[7] = (card >> 56) & 0xff;
...

在下面,同样需要调用signalModifiedKey。这是因为虽然PFCOUNT不会修改实际的存储,但是它可能会修改cache值。考虑到HLL实际上是作为String来存储的,所以我们需要广播这个变化。

1
2
3
4
5
6
7
...
signalModifiedKey(c,c->db,c->argv[1]);
server.dirty++;
}
addReplyLongLong(c,card);
}
}

cache实现

在先前可以看到,HLL结构有个card[8]字段用来缓存cardinality。这个card会在PFCOUNT被访问到。此外,在PFADDPFMERGE操作中,会调用HLL_INVALIDATE_CACHE使得缓存失效。

1
2
#define HLL_INVALIDATE_CACHE(hdr) (hdr)->card[7] |= (1<<7)
#define HLL_VALID_CACHE(hdr) (((hdr)->card[7] & (1<<7)) == 0)

hllCount函数

返回估计的cardinality,基于register数组的调和平均数。hdr指向持有这个HLL的SDS的开始位置。如果HLL的Sparse疏表示形式是不合法的,则设置invalid为0,否则不设置这个值。
hllCount支持一种特殊的内部编码HLL_RAW,也就是hdr->registers会指向一个长度HLL_REGISTERSuint8_t数组。这个有助于加速对多个键调用PFCOUNT,因为我们不需要处理6bit的整数了,所以实际上这是一个空间换时间的方案。

1
2
3
4
5
uint64_t hllCount(struct hllhdr *hdr, int *invalid) {
double m = HLL_REGISTERS;
double E;
int j;
...

下面计算每个register的直方图。注意到直方图数组reghisto的长度最多是HLL_Q+2,因为HLL_Q+1是哈希函数对"000...1"这样序列所能返回的最大的frequency。当然,很难检查输入的合法性,所以不如分配reghisto就直接大一点。

1
2
3
4
5
6
7
...
int reghisto[64] = {0};

/* Compute register histogram */
if (hdr->encoding == HLL_DENSE) {
hllDenseRegHisto(hdr->registers,reghisto);
...

下面是HLL_RAW这个特殊的encoding。

1
2
3
4
5
6
7
8
9
10
...
} else if (hdr->encoding == HLL_RAW) {
hllRawRegHisto(hdr->registers,reghisto);
} else {
serverPanic("Unknown HyperLogLog encoding in hllCount()");
}

naiveHllCount(reghisto);
// 后续是统计reghisto
...

在这个操作之后,我们得到了直方图reghisto[reg],表示在所有HLL_REGISTERS个桶中,count为reg的桶的数量,而这个count表示第一个1出现的位置。即之前的while end bit 10000 count 5这样的内容。
下面就是根据直方图来计算估计的数量。我们设计了一个很naive的naiveHllCount,即基于调和平均数的多桶的实现方案,而这里用了一篇很屌的论文里面的一个很屌的做法。

一个naive的count函数

下面我们根据自己的理解实现一个count函数。

1
2
3
4
5
6
7
8
9
10
11
12
13
14
15
16
17
18
19
20
21
22
23
24
25
26
27
28
29
30
31
double naiveHllCount(int * reghisto) {
double s = 0.0; // sum
double c = 0; // count
double res = 0;
// 是否用调和平均
bool useHarm = true;
for(int v = 1; v < 64; v++){
double bucketCount = 1.0 / pow(2.0, -(v-1));
// How many buckets has count of v?
int countOfV = reghisto[v];
if(useHarm){
double delta = countOfV * 1.0 / bucketCount;
printf("v %d countofV %d bucketCount %f delta %f \n", v, countOfV, bucketCount, delta);
s += delta;
c += countOfV;
}else{
double delta = countOfV * bucketCount;
printf("v %d countofV %d bucketCount %f delta %f \n", v, countOfV, bucketCount, delta);
s += delta;
c += countOfV;
}
}
if(useHarm){
res = c / s * c;
// res = c / s * c * 0.709;
}else{
res = s;
}
printf("sum %f, c %f, res %f\n", s, c, res);
return res;
}

实际运行下来,对于pfadd p1 a的结果是

1
2
3
4
5
6
7
8
9
10
11
12
13
14
15
16
17
18
19
20
21
22
23
24
25
26
27
28
29
v 37 countofV 0 bucketCount 68719476736.000000 delta 0.000000
v 38 countofV 0 bucketCount 137438953472.000000 delta 0.000000
v 39 countofV 0 bucketCount 274877906944.000000 delta 0.000000
v 40 countofV 0 bucketCount 549755813888.000000 delta 0.000000
v 41 countofV 0 bucketCount 1099511627776.000000 delta 0.000000
v 42 countofV 0 bucketCount 2199023255552.000000 delta 0.000000
v 43 countofV 0 bucketCount 4398046511104.000000 delta 0.000000
v 44 countofV 0 bucketCount 8796093022208.000000 delta 0.000000
v 45 countofV 0 bucketCount 17592186044416.000000 delta 0.000000
v 46 countofV 0 bucketCount 35184372088832.000000 delta 0.000000
v 47 countofV 0 bucketCount 70368744177664.000000 delta 0.000000
v 48 countofV 0 bucketCount 140737488355328.000000 delta 0.000000
v 49 countofV 0 bucketCount 281474976710656.000000 delta 0.000000
v 50 countofV 0 bucketCount 562949953421312.000000 delta 0.000000
v 51 countofV 0 bucketCount 1125899906842624.000000 delta 0.000000
v 52 countofV 0 bucketCount 2251799813685248.000000 delta 0.000000
v 53 countofV 0 bucketCount 4503599627370496.000000 delta 0.000000
v 54 countofV 0 bucketCount 9007199254740992.000000 delta 0.000000
v 55 countofV 0 bucketCount 18014398509481984.000000 delta 0.000000
v 56 countofV 0 bucketCount 36028797018963968.000000 delta 0.000000
v 57 countofV 0 bucketCount 72057594037927936.000000 delta 0.000000
v 58 countofV 0 bucketCount 144115188075855872.000000 delta 0.000000
v 59 countofV 0 bucketCount 288230376151711744.000000 delta 0.000000
v 60 countofV 0 bucketCount 576460752303423488.000000 delta 0.000000
v 61 countofV 0 bucketCount 1152921504606846976.000000 delta 0.000000
v 62 countofV 0 bucketCount 2305843009213693952.000000 delta 0.000000
v 63 countofV 0 bucketCount 4611686018427387904.000000 delta 0.000000
sum 0.500000, c 1.000000, res 2.000000
Actual 1073741824
修正

有个修正来自于论文中,知乎给出了解释。参考

1
2
3
4
5
6
7
8
9
10
switch (p) {
case 4:
constant = 0.673 * m * m;
case 5:
constant = 0.697 * m * m;
case 6:
constant = 0.709 * m * m;
default:
constant = (0.7213 / (1 + 1.079 / m)) * m * m;
}

牛逼做法

1
2
3
4
5
6
7
8
9
10
11
12
13
14
15
16
17
// 续hllCount
...
/* Estimate cardinality form register histogram. See:
* "New cardinality estimation algorithms for HyperLogLog sketches"
* Otmar Ertl, arXiv:1702.01284 */
double z = m * hllTau((m-reghisto[HLL_Q+1])/(double)m);
for (j = HLL_Q; j >= 1; --j) {
z += reghisto[j];
z *= 0.5;
}
z += m * hllSigma(reghisto[0]/(double)m);
// #define HLL_ALPHA_INF 0.721347520444481703680 /* constant for 0.5/ln(2) */
E = llroundl(HLL_ALPHA_INF*m*m/z);
// 注意这里要转换一下,不然结果不对
printf("Actual %llu\n", (uint64_t) E);
return (uint64_t) E;
}
1
2
3
4
5
6
7
8
9
10
11
12
13
14
15
16
17
18
19
20
21
22
23
24
25
26
27
28
29
// New cardinality estimation algorithms for HyperLogLog sketches

double hllTau(double x) {
if (x == 0. || x == 1.) return 0.;
double zPrime;
double y = 1.0;
double z = 1 - x;
do {
x = sqrt(x);
zPrime = z;
y *= 0.5;
z -= pow(1 - x, 2)*y;
} while(zPrime != z);
return z / 3;
}

double hllSigma(double x) {
if (x == 1.) return INFINITY;
double zPrime;
double y = 1;
double z = x;
do {
x *= x;
zPrime = z;
z += x * y;
y += y;
} while(zPrime != z);
return z;
}

hllDenseRegHisto

hllDenseRegHisto会根据HLL_REGISTERS == 16384 && HLL_BITS == 6的通用情况进行优化,我们对这个优化暂时按下不表,只关注实际在做什么。可以看到,它实际上去遍历了所有的register,然后通过HLL_DENSE_GET_REGISTER把这个HLL_BITS=6位的register取出来,并增加这个register的数量。

1
2
3
4
5
6
7
8
9
10
11
12
13
void hllDenseRegHisto(uint8_t *registers, int* reghisto) {
int j;

if (HLL_REGISTERS == 16384 && HLL_BITS == 6) {
...
} else {
for(j = 0; j < HLL_REGISTERS; j++) {
unsigned long reg;
HLL_DENSE_GET_REGISTER(reg,registers,j);
reghisto[reg]++;
}
}
}

hllSparseRegHisto

hllSparseRegHisto对Sparse情况进行统计。这个实现其实也很简单,遍历每个opcode,对于ZERO和XZERO就增加reghisto[0],对于VAL就增加reghisto[val]

1
2
3
4
5
...
} else if (hdr->encoding == HLL_SPARSE) {
hllSparseRegHisto(hdr->registers,
sdslen((sds)hdr)-HLL_HDR_SIZE,invalid,reghisto);
...

intset

intset是存储int的集合。在底层存储上体现为一个有序的数组,这是它和ziplist的一个不同点。intset数组中的每个元素具有相同的长度,这个长度由encoding指定。length表示Intset里面元素的个数,所以柔性数组(Flex Array)contents的长度实际上就是encoding * length的值。

1
2
3
4
5
6
// intset.h
typedef struct intset {
uint32_t encoding;
uint32_t length;
int8_t contents[];
} intset;

encoding

类似于HLL的实现,intset也要考虑节省空间。
出于节省空间考虑,支持三种encoding,当出现该encoding装不下的数时,会新创建一个更大的encoding,当然这样会伴随空间浪费。

1
2
3
#define INTSET_ENC_INT16 (sizeof(int16_t))
#define INTSET_ENC_INT32 (sizeof(int32_t))
#define INTSET_ENC_INT64 (sizeof(int64_t))

给定v的值,得到能够承载它的最小encoding。需要注意的是,这里都是有符号整数。

1
2
3
4
5
6
7
8
static uint8_t _intsetValueEncoding(int64_t v) {
if (v < INT32_MIN || v > INT32_MAX)
return INTSET_ENC_INT64;
else if (v < INT16_MIN || v > INT16_MAX)
return INTSET_ENC_INT32;
else
return INTSET_ENC_INT16;
}

编码

因为支持不同的编码,所以intset索性用一个int8_t contents[]来存这些int。如果我们要把一个64位数字按照8位8位地存到char数组里面,那么就会涉及到选择大端或者小端两种存储方式。其实在Redis的很多数据结构的实现中,我们可以明显地看到Redis开发者,或者很多C开发者的一个特点,也就是喜欢把所有的数据结构都自己编码到char*上面。intrev32ifbe这个函数用来从小/大端序转为小端序。

1
2
3
4
5
6
7
8
9
10
11
12
13
14
15
#if (BYTE_ORDER == LITTLE_ENDIAN)
#define memrev16ifbe(p) ((void)(0))
#define memrev32ifbe(p) ((void)(0))
#define memrev64ifbe(p) ((void)(0))
#define intrev16ifbe(v) (v)
#define intrev32ifbe(v) (v)
#define intrev64ifbe(v) (v)
#else
#define memrev16ifbe(p) memrev16(p)
#define memrev32ifbe(p) memrev32(p)
#define memrev64ifbe(p) memrev64(p)
#define intrev16ifbe(v) intrev16(v)
#define intrev32ifbe(v) intrev32(v)
#define intrev64ifbe(v) intrev64(v)
#endif

查找

intsetFind语句首先排除掉encoding过大的,比如在一串最大32767的数组里面肯定找不到99999。

1
2
3
4
5
/* Determine whether a value belongs to this set */
uint8_t intsetFind(intset *is, int64_t value) {
uint8_t valenc = _intsetValueEncoding(value);
return valenc <= intrev32ifbe(is->encoding) && intsetSearch(is,value,NULL);
}

下面就是intsetSearch,因为intset是有序的嘛,所以我想这个肯定是个二分的实现吧,果不其然。这个函数返回1表示找到,并用pos标记找到的位置/插入位置;否则返回0
在二分前,需要先特判一下value过大或者过小的情况,从而能够快速失败,而不是进入下面的二分。

1
2
3
4
5
6
7
8
9
10
11
12
13
14
15
16
17
18
19
20
21
static uint8_t intsetSearch(intset *is, int64_t value, uint32_t *pos) {
// min和max表示intset的最左和最右的index
int min = 0, max = intrev32ifbe(is->length)-1, mid = -1;
int64_t cur = -1;

/* The value can never be found when the set is empty */
if (intrev32ifbe(is->length) == 0) {
if (pos) *pos = 0;
return 0;
} else {
/* Check for the case where we know we cannot find the value,
* but do know the insert position. */
if (value > _intsetGet(is,max)) {
if (pos) *pos = intrev32ifbe(is->length);
return 0;
} else if (value < _intsetGet(is,0)) {
if (pos) *pos = 0;
return 0;
}
}
...

这里的二分每次都会对mid进行+1或者-1,和我们通常的二分还不太一样。通常的二分因为要在一个F/T…TTT或者TTT…F/T型的序列中找到边界的T,所以在移动mid时,如果我们发现当前的mid是T,并且我们想移动l/r的话,我们不能移动到mid-1/mid+1,这是因为mid可能就是我们要找的值。但这个二分我们要找的是exact value,所以我们可以激进一点,直接-1或者+1

1
2
3
4
5
6
7
8
9
10
11
12
13
14
15
16
17
18
19
20
21
...
while(max >= min) {
mid = ((unsigned int)min + (unsigned int)max) >> 1;
cur = _intsetGet(is,mid);
if (value > cur) {
min = mid+1;
} else if (value < cur) {
max = mid-1;
} else {
break;
}
}

if (value == cur) {
if (pos) *pos = mid;
return 1;
} else {
if (pos) *pos = min;
return 0;
}
}

添加

对于intsetAdd的情况,想想肯定是有一个$O(logn)$的查找和一个$O(n)$的移动的。

1
2
3
4
5
6
7
8
9
10
11
12
13
14
15
16
17
18
19
20
21
22
23
24
25
26
27
28
29
30
31
32
intset *intsetAdd(intset *is, int64_t value, uint8_t *success) {
uint8_t valenc = _intsetValueEncoding(value);
uint32_t pos;
if (success) *success = 1;

/* Upgrade encoding if necessary. If we need to upgrade, we know that
* this value should be either appended (if > 0) or prepended (if < 0),
* because it lies outside the range of existing values. */

if (valenc > intrev32ifbe(is->encoding)) {
// 如果encoding明显大了,那么需要直接升级intset
/* This always succeeds, so we don't need to curry *success. */
return intsetUpgradeAndAdd(is,value);
} else {
/* Abort if the value is already present in the set.
* This call will populate "pos" with the right position to insert
* the value when it cannot be found. */
if (intsetSearch(is,value,&pos)) {
// 如果已经存在,就直接返回
if (success) *success = 0;
return is;
}
// 为新插入的value分配长度为1的空间
is = intsetResize(is,intrev32ifbe(is->length)+1);
// 把[pos, )移到[pos+1, ),即往后挪一位
if (pos < intrev32ifbe(is->length)) intsetMoveTail(is,pos,pos+1);
}

_intsetSet(is,pos,value);
is->length = intrev32ifbe(intrev32ifbe(is->length)+1);
return is;
}

Resize走的zrealloc,这个函数之前讲到过,并不保证不会重新分配内存,这也是为什么intsetResize会重新返回intset *指针的原因。

1
2
3
4
5
static intset *intsetResize(intset *is, uint32_t len) {
uint32_t size = len*intrev32ifbe(is->encoding);
is = zrealloc(is,sizeof(intset)+size);
return is;
}

intsetMoveTail实际调用了memmove,直截了当的函数。

1
2
3
4
5
6
7
8
9
10
11
12
13
14
15
16
17
static void intsetMoveTail(intset *is, uint32_t from, uint32_t to) {
void *src, *dst;
// bytes表示移动多少字节,目前的赋值是多少元素,后面还要乘上元素的长度
uint32_t bytes = intrev32ifbe(is->length)-from;
uint32_t encoding = intrev32ifbe(is->encoding);

if (encoding == INTSET_ENC_INT64) {
src = (int64_t*)is->contents+from;
dst = (int64_t*)is->contents+to;
bytes *= sizeof(int64_t);
} else if (encoding == INTSET_ENC_INT32) {
...
} else {
...
}
memmove(dst,src,bytes);
}

这里就是先把64位的value放上去,如果机器上是大端(be)存储,那么再调用下面的宏倒成小端。

1
2
3
4
5
6
7
8
9
10
11
12
13
14
static void _intsetSet(intset *is, int pos, int64_t value) {
uint32_t encoding = intrev32ifbe(is->encoding);

if (encoding == INTSET_ENC_INT64) {
((int64_t*)is->contents)[pos] = value;
memrev64ifbe(((int64_t*)is->contents)+pos);
} else if (encoding == INTSET_ENC_INT32) {
((int32_t*)is->contents)[pos] = value;
memrev32ifbe(((int32_t*)is->contents)+pos);
} else {
((int16_t*)is->contents)[pos] = value;
memrev16ifbe(((int16_t*)is->contents)+pos);
}
}

大端小端宏

简单介绍一下memrev系列大小端转换的代码
16的简单,3次交换

1
2
3
4
5
6
void memrev16(void *p) {
unsigned char *x = p, t;
t = x[0];
x[0] = x[1];
x[1] = t;
}

32位的,6次交换,实际上是轴对称交换

1
2
3
0 1 2 3
3 1 2 0
3 2 1 0

代码如下

1
2
3
4
5
6
7
8
9
10
void memrev32(void *p) {
unsigned char *x = p, t;

t = x[0];
x[0] = x[3];
x[3] = t;
t = x[1];
x[1] = x[2];
x[2] = t;
}

64位的,12次交换,同样也是轴对称交换,代码就不列了。

bitmap

bitmap底层是一个SDS

count实现

这个命令可以统计得到从[start, end]区间内的1的数量,但是这个startend是以byte为单位的,从0开始。我们可以参考下面的这个demo

1
2
3
setbit test1 10 1
setbit test1 20 1
setbit test1 30 1

下面两个命令返回值都是3

1
2
bitcount test1 
bitcount test1 1 9

其实bitmap底层是从左到右开始编号的。乍一看有点本末倒置,为啥最高位是0,但仔细想想,这种方式方便扩展啊。

1
2
3
4
byte offset      : 0        1        2        3
setbit test1 10 1: 00000000 00100000
setbit test1 20 1: 00000000 00000000 00001000
setbit test1 30 1: 00000000 00000000 00000000 00000010

再举一个例子

1
setbit test2 15 1

计算15/8=1.875,所以是位于第1个byte的最后一位

1
00000000 00000001(15)

因此
getbit test2 0 0 返回0
getbit test2 0 1 返回1,因为第一个byte被包含了
getbit test2 2 3 返回0

下面看bitcountCommand

1
2
3
4
5
6
7
8
9
10
11
12
13
14
15
16
17
18
19
20
21
22
23
24
25
26
27
28
29
30
31
32
33
34
// bitops.c
void bitcountCommand(client *c) {
robj *o;
long start, end, strlen;
unsigned char *p;
char llbuf[LONG_STR_SIZE];

/* Lookup, check for type, and return 0 for non existing keys. */
if ((o = lookupKeyReadOrReply(c,c->argv[1],shared.czero)) == NULL ||
checkType(c,o,OBJ_STRING)) return;
p = getObjectReadOnlyString(o,&strlen,llbuf);

/* Parse start/end range if any. */
if (c->argc == 4) {
...
} else if (c->argc == 2) {
/* The whole string. */
start = 0;
end = strlen-1;
} else {
/* Syntax error. */
addReply(c,shared.syntaxerr);
return;
}

/* Precondition: end >= 0 && end < strlen, so the only condition where
* zero can be returned is: start > end. */
if (start > end) {
addReply(c,shared.czero);
} else {
long bytes = end-start+1;
addReplyLongLong(c,redisPopcount(p+start,bytes));
}
}

上面一堆废话结束,最关键的是redisPopcount这个函数,统计从s开始的bytes长度的slice里面的1的个数。
一开始发现一个表bitsinbyte,这里面bitsinbyte[i]表示i这个数字的二进制表示里面有几个1。可以从中看出,bitcount统计bytes而不是统计bits的原因可能很大程度上就是对bytes可以查表处理,起到加速作用。

1
2
3
4
5
6
7
8
9
10
/* Count number of bits set in the binary array pointed by 's' and long
* 'count' bytes. The implementation of this function is required to
* work with a input string length up to 512 MB. */
size_t redisPopcount(void *s, long count) {
size_t bits = 0;
unsigned char *p = s;
uint32_t *p4;
static const unsigned char bitsinbyte[256] = {0,1,1,2,1,2,2,3,1,2,2,3,2,3,3,4,1,2,2,3,2,3,3,4,2,3,3,4,3,4,4,5,1,2,2,3,2,3,3,4,2,3,3,4,3,4,4,5,2,3,3,4,3,4,4,5,3,4,4,5,4,5,5,6,1,2,2,3,2,3,3,4,2,3,3,4,3,4,4,5,2,3,3,4,3,4,4,5,3,4,4,5,4,5,5,6,2,3,3,4,3,4,4,5,3,4,4,5,4,5,5,6,3,4,4,5,4,5,5,6,4,5,5,6,5,6,6,7,1,2,2,3,2,3,3,4,2,3,3,4,3,4,4,5,2,3,3,4,3,4,4,5,3,4,4,5,4,5,5,6,2,3,3,4,3,4,4,5,3,4,4,5,4,5,5,6,3,4,4,5,4,5,5,6,4,5,5,6,5,6,6,7,2,3,3,4,3,4,4,5,3,4,4,5,4,5,5,6,3,4,4,5,4,5,5,6,4,5,5,6,5,6,6,7,3,4,4,5,4,5,5,6,4,5,5,6,5,6,6,7,4,5,5,6,5,6,6,7,5,6,6,7,6,7,7,8};

...

下面的代码中(unsigned long)p & 3的目的是用一个while循环统计下前面没有对齐到32位的数量。其实如果我们愿意慢一点,直接这个while循环就能全部统计完了。

1
2
3
4
5
6
7
...
/* Count initial bytes not aligned to 32 bit. */
while((unsigned long)p & 3 && count) {
bits += bitsinbyte[*p++];
count--;
}
...

一次性计算28个bytes,这个算法经历过疯狂的升级,3.0的时候是同时计算16个,但总体来说还是一个SWAR算法,为了便于理解,先看3.0版本的16 bytes的算法,它其实有点类似于我们在GeoHash中看到的interleave64的算法。快速计算64位和32位整数二进制表示中1数量的算法是种群算法,我在csapp data lab这篇文章中有介绍。这篇文章 中的介绍也很详细。

1
2
3
4
5
6
7
8
9
10
11
12
13
14
15
16
17
18
19
//for 64 bit numbers
int NumberOfSetBits64(long long i)
{
i = i - ((i >> 1) & 0x5555555555555555);
i = (i & 0x3333333333333333) +
((i >> 2) & 0x3333333333333333);
i = ((i + (i >> 4)) & 0x0F0F0F0F0F0F0F0F);
return (i*(0x0101010101010101))>>56;
}
//for 32 bit integers
int NumberOfSetBits32(int i)
{
// A
i = i - ((i >> 1) & 0x55555555);
i = (i & 0x33333333) + ((i >> 2) & 0x33333333);
// B
i = ((i + (i >> 4)) & 0x0F0F0F0F);
return (i*(0x01010101))>>24;
}

我们以32位为例,复习一下该算法的原理。首先回顾一下这几个常量的表示,F实际上是01的重复,T0011的重复,O00001111的重复

1
2
3
F = 0x55555555 = 01010101010101010101010101010101
T = 0x33333333 = 00110011001100110011001100110011
O = 0x0f0f0f0f = 00001111000011110000111100001111

这个算法的思路是首先把32位长度的数组按照奇偶组合成16组,然后在每组中统计1的个数,容易看到,这个结果只能是0b0/0b1/0b10,不会溢出。

1
2
‭数字 01 11 01 01 10 11 11 00 11 01 00 01 01 01‬(123456789)‬‬
和 01 10 01 01 01 10 10 00 10 01 00 01 01 01

这个过程是可以用位运算解决的,即

1
i = (i & 0x55555555) + ((i >> 1) & 0x55555555);

然后我们发现,为啥函数里面不是这样写的?其实下面两种是等价算法

1
2
i = (i & 0x55555555) + ((i >> 1) & 0x55555555);
i = i - ((i >> 1) & 0x55555555);

一般来说,&+是不满足分配率的,但在对按4移位的情况下是可以的,即不会产生溢出。所以后面我们还可以提出0x0F0F0F0F公因式。注意对2移位是不能提公因式的,考虑1010b这种情况,移位相加会出现10b + 10b从而导致溢出。

下面我们来对照看看3.0版本的16 bytes的实现,在前面执行NumberOfSetBits32的A步骤,依次计算4个byte的数量到aux1/2/3/4里面。在最后执行B步骤,将最后结果加到bits里面。

1
2
3
4
5
6
7
8
9
10
11
12
13
14
15
16
17
18
19
20
21
22
23
24
25
    p4 = (uint32_t*)p;
while(count>=16) {
uint32_t aux1, aux2, aux3, aux4;

aux1 = *p4++;
aux2 = *p4++;
aux3 = *p4++;
aux4 = *p4++;
count -= 16;

aux1 = aux1 - ((aux1 >> 1) & 0x55555555);
aux1 = (aux1 & 0x33333333) + ((aux1 >> 2) & 0x33333333);
aux2 = aux2 - ((aux2 >> 1) & 0x55555555);
aux2 = (aux2 & 0x33333333) + ((aux2 >> 2) & 0x33333333);
aux3 = aux3 - ((aux3 >> 1) & 0x55555555);
aux3 = (aux3 & 0x33333333) + ((aux3 >> 2) & 0x33333333);
aux4 = aux4 - ((aux4 >> 1) & 0x55555555);
aux4 = (aux4 & 0x33333333) + ((aux4 >> 2) & 0x33333333);

bits += ((((aux1 + (aux1 >> 4)) & 0x0F0F0F0F) * 0x01010101) >> 24) +
((((aux2 + (aux2 >> 4)) & 0x0F0F0F0F) * 0x01010101) >> 24) +
((((aux3 + (aux3 >> 4)) & 0x0F0F0F0F) * 0x01010101) >> 24) +
((((aux4 + (aux4 >> 4)) & 0x0F0F0F0F) * 0x01010101) >> 24);
}
...

下面看28 bytes算法也是类似,不过为啥要选择28这个数呢,我不是很明白

1
2
3
4
5
6
7
8
9
10
11
12
13
14
15
16
17
18
19
20
21
...
p4 = (uint32_t*)p;
while(count>=28) {
uint32_t aux1, aux2, aux3, aux4, aux5, aux6, aux7;

// *p++等于*(p++)
aux1 = *p4++;
...
aux7 = *p4++;
count -= 28;

aux1 = aux1 - ((aux1 >> 1) & 0x55555555);
aux1 = (aux1 & 0x33333333) + ((aux1 >> 2) & 0x33333333);
...
aux7 = aux7 - ((aux7 >> 1) & 0x55555555);
aux7 = (aux7 & 0x33333333) + ((aux7 >> 2) & 0x33333333);

bits += ((((aux1 + (aux1 >> 4)) & 0x0F0F0F0F) +
...
((aux7 + (aux7 >> 4)) & 0x0F0F0F0F))* 0x01010101) >> 24;
}

这个循环和之前的(unsigned long)p & 3循环是对应的,用来处理余下来和28个bytes不对齐的。

1
2
3
4
5
    /* Count the remaining bytes. */
p = (unsigned char*)p4;
while(count--) bits += bitsinbyte[*p++];
return bits;
}

set/get实现

1
2
3
4
5
6
7
8
9
10
11
12
13
14
15
16
17
18
19
20
21
22
23
/* SETBIT key offset bitvalue */
void setbitCommand(client *c) {
robj *o;
char *err = "bit is not an integer or out of range";
size_t bitoffset;
ssize_t byte, bit;
int byteval, bitval;
long on;

// 把bitoffset位置设置为on
if (getBitOffsetFromArgument(c,c->argv[2],&bitoffset,0,0) != C_OK)
return;

if (getLongFromObjectOrReply(c,c->argv[3],&on,err) != C_OK)
return;

/* Bits can only be set or cleared... */
// 如果on不是0或者1,那么就返回错误
if (on & ~1) {
addReplyError(c,err);
return;
}
...

下面这个命令,进行检查,该创建的创建,该扩容的扩容

1
2
3
4
5
6
7
8
9
10
11
12
13
14
15
16
17
18
19
20
21
22
...
if ((o = lookupStringForBitCommand(c,bitoffset)) == NULL) return;

/* Get current values */
// bitoffset除以8,得到所在的byte
byte = bitoffset >> 3;
byteval = ((uint8_t*)o->ptr)[byte];
// 由于bitmap是从左往右数的,所以这边要用7减一下,得到这个byte中从右往左的偏移量
bit = 7 - (bitoffset & 0x7);
// 取出实际的bit值
bitval = byteval & (1 << bit);

/* Update byte with new bit value and return original value */
// 更新并返回原先的值
byteval &= ~(1 << bit);
byteval |= ((on & 0x1) << bit);
((uint8_t*)o->ptr)[byte] = byteval;
signalModifiedKey(c,c->db,c->argv[1]);
notifyKeyspaceEvent(NOTIFY_STRING,"setbit",c->argv[1],c->db->id);
server.dirty++;
addReply(c, bitval ? shared.cone : shared.czero);
}

bitop

bitop指令的格式如下面所示,结果存到dest里面。

1
bitop opname dest src1 src2 ...
1
2
3
4
5
6
7
8
9
10
11
12
/* BITOP op_name target_key src_key1 src_key2 src_key3 ... src_keyN */
void bitopCommand(client *c) {
char *opname = c->argv[1]->ptr;
robj *o, *targetkey = c->argv[2];
unsigned long op, j, numkeys;
robj **objects; /* Array of source objects. */
unsigned char **src; /* Array of source strings pointers. */
unsigned long *len, maxlen = 0; /* Array of length of src strings,
and max len. */
unsigned long minlen = 0; /* Min len among the input keys. */
unsigned char *res = NULL; /* Resulting string. */
...

在字符串判定的时候有个优化,因为strcasecmp的开销比较大,所以会先判断第一个字母合不合法,合法再调用这个函数。

1
2
3
4
5
6
7
8
9
10
11
12
13
14
15
16
...
/* Parse the operation name. */
if ((opname[0] == 'a' || opname[0] == 'A') && !strcasecmp(opname,"and"))
op = BITOP_AND;
...
else {
addReply(c,shared.syntaxerr);
return;
}

/* Sanity check: NOT accepts only a single key argument. */
if (op == BITOP_NOT && c->argc != 4) {
addReplyError(c,"BITOP NOT must be called with a single source key.");
return;
}
...

遍历所有要查找的key,统计一些信息:

  1. objects
    调用getDecodedObject。因为这个是raw encoding,所以相当于就是自增了一下引用。
  2. src
    每一个src的指针
  3. len
    每一个src的对应长度,这个长度是按照字节算的
  4. maxlen/minlen
    所有src的最大长度和最小长度
1
2
3
4
5
6
7
8
9
10
11
12
13
14
15
16
17
18
19
20
21
22
23
24
25
26
27
28
29
30
31
32
33
34
35
36
...
/* Lookup keys, and store pointers to the string objects into an array. */
numkeys = c->argc - 3;
src = zmalloc(sizeof(unsigned char*) * numkeys);
len = zmalloc(sizeof(long) * numkeys);
objects = zmalloc(sizeof(robj*) * numkeys);
for (j = 0; j < numkeys; j++) {
o = lookupKeyRead(c->db,c->argv[j+3]);
/* Handle non-existing keys as empty strings. */
if (o == NULL) {
objects[j] = NULL;
src[j] = NULL;
len[j] = 0;
minlen = 0;
continue;
}
/* Return an error if one of the keys is not a string. */
// 如果有不是OBJ_STRING对象,就返回错误,并且释放
if (checkType(c,o,OBJ_STRING)) {
unsigned long i;
for (i = 0; i < j; i++) {
if (objects[i])
decrRefCount(objects[i]);
}
zfree(src);
zfree(len);
zfree(objects);
return;
}
objects[j] = getDecodedObject(o);
src[j] = objects[j]->ptr;
len[j] = sdslen(objects[j]->ptr);
if (len[j] > maxlen) maxlen = len[j];
if (j == 0 || len[j] < minlen) minlen = len[j];
}
...

比较有趣的是这里同样针对对齐数据有个优化。我们需要在ARM架构上跳过这个优化点,这是因为ARM不支持multiple-words load/store,即使在V6架构下。
首先,解释一下几个临时变量:

  1. j
    表示SDS里面的每一个字节
  2. i
    表示op作用的每一个key

出于从普通到特殊,可以先阅读后面的普通实现,再看这个优化实现。
优化实现能够处理最短的bitmap至少有4个long(32位)的情况,但是要求key的总数小于等于16。也就是说我们能够一批4个地对所有的key做bitop。【Q】不过不需要什么特殊的指令,直接这样写CPU就可以优化了吗?

1
2
3
4
5
6
7
8
9
10
11
12
13
14
15
16
17
18
19
20
21
22
23
24
25
26
27
28
29
30
31
32
33
34
35
36
37
38
39
40
41
...
/* Compute the bit operation, if at least one string is not empty. */
if (maxlen) {
res = (unsigned char*) sdsnewlen(NULL,maxlen);
unsigned char output, byte;
unsigned long i;
j = 0;

#ifndef USE_ALIGNED_ACCESS
if (minlen >= sizeof(unsigned long)*4 && numkeys <= 16) {
unsigned long *lp[16];
unsigned long *lres = (unsigned long*) res;

/* Note: sds pointer is always aligned to 8 byte boundary. */
memcpy(lp,src,sizeof(unsigned long*)*numkeys);
memcpy(res,src[0],minlen);

/* Different branches per different operations for speed (sorry). */
if (op == BITOP_AND) {
while(minlen >= sizeof(unsigned long)*4) {
for (i = 1; i < numkeys; i++) {
lres[0] &= lp[i][0];
lres[1] &= lp[i][1];
lres[2] &= lp[i][2];
lres[3] &= lp[i][3];
lp[i]+=4;
}
lres+=4;
j += sizeof(unsigned long)*4;
minlen -= sizeof(unsigned long)*4;
}
} else if (op == BITOP_OR) {
...
} else if (op == BITOP_XOR) {
...
} else if (op == BITOP_NOT) {
...
}
}
#endif
...

专门提取第一个出来作为左操作数,下面i从1开始循环

1
2
3
4
5
6
...
/* j is set to the next byte to process by the previous loop. */
for (; j < maxlen; j++) {
output = (len[0] <= j) ? 0 : src[0][j];
if (op == BITOP_NOT) output = ~output;
...

这里我有个疑惑了,既然里面都不处理BITOP_NOT了,为啥不直接跳过这个for循环呢?

1
2
3
4
5
6
7
8
9
10
11
12
13
...
for (i = 1; i < numkeys; i++) {
byte = (len[i] <= j) ? 0 : src[i][j];
switch(op) {
case BITOP_AND: output &= byte; break;
case BITOP_OR: output |= byte; break;
case BITOP_XOR: output ^= byte; break;
}
}
res[j] = output;
}
}
...

下面是清理工作了

1
2
3
4
5
6
7
8
9
10
11
12
13
14
15
16
17
18
19
20
21
22
23
...
for (j = 0; j < numkeys; j++) {
if (objects[j])
decrRefCount(objects[j]);
}
zfree(src);
zfree(len);
zfree(objects);

/* Store the computed value into the target key */
if (maxlen) {
o = createObject(OBJ_STRING,res);
setKey(c,c->db,targetkey,o);
notifyKeyspaceEvent(NOTIFY_STRING,"set",targetkey,c->db->id);
decrRefCount(o);
server.dirty++;
} else if (dbDelete(c->db,targetkey)) {
signalModifiedKey(c,c->db,targetkey);
notifyKeyspaceEvent(NOTIFY_GENERIC,"del",targetkey,c->db->id);
server.dirty++;
}
addReplyLongLong(c,maxlen); /* Return the output string length in bytes. */
}

quicklist

Geo和GeoHash

Redis在3.2版本之后提供GeoHash的实现,主要包含下面的命令:

  1. GEOADD key longitude latitude member [longitude latitude member ...]
    将某个经纬度以及对应的名字(member)加入到指定的key里面
  2. GEOPOS key member [member ...]
    以member为输入,返回经纬度为输出
  3. GEODIST key member1 member2 [unit]
    返回两个位置之间的间隔,以unit为单位,默认为米
  4. GEORADIUS key longitude latitude radius unit
    返回给定经纬度为中心radius范围内的位置,默认返回未排序的元素
  5. GEORADIUSBYMEMBER
    同上,但是不是给出经纬度,而是直接给一个member名字
  6. GEOHASH ley member [member ...]
    返回member的GeoHash值
  7. ZREM
    用来删除一个GEOHASH对象

GEOADD

对应GEOADD指令。
可以看到,Geo的底层存储是一个ZSET。这也是可以理解的,因为通过GeoHash确实可以实现有序的地理坐标,所以我们是按照顺序存储的。

1
2
3
4
5
6
7
8
9
10
/* GEOADD key long lat name [long2 lat2 name2 ... longN latN nameN] */
void geoaddCommand(client *c) {
/* Check arguments number for sanity. */
if ((c->argc - 2) % 3 != 0) {
/* Need an odd number of arguments if we got this far... */
addReplyError(c, "syntax error. Try GEOADD key [x1] [y1] [name1] "
"[x2] [y2] [name2] ... ");
return;
}
...

在这里构建将来**提供给zadd命令的argcargv**。elements表示坐标的数量,一个坐标需要有(long, lat, name)三元组来表示,所以这里要除以3。

1
2
3
4
5
6
7
8
9
...
int elements = (c->argc - 2) / 3;
int argc = 2+elements*2; /* ZADD key score ele ... */
robj **argv = zcalloc(argc*sizeof(robj*));
// 表示创建一个值是"zadd"的`OBJ_STRING`对象
argv[0] = createRawStringObject("zadd",4);
argv[1] = c->argv[1]; /* key */
printf("Step 1: argv[1]->refcount %d, c->argv[1]->refcount %d\n", argv[1]->refcount, c->argv[1]->refcount);
...

这里自增argv[1]的引用计数是因为直接把argv[1]指向c->argv[1]了,所以实际上也是自增c->argv[1]的引用计数。实际上这么做同时也保证了replaceClientCommandVector在释放掉c->argv后,c->argv[1]所指向的对象仍有一个引用。

1
2
3
...
incrRefCount(argv[1]);
...

在这个语句之后,我们得到Step 1: argv[1]->refcount 2, c->argv[1]->refcount 2
下面的循环依次解析每个坐标,并构建scoremember字段。
首先通过extractLongLatOrReply把经纬度读到xy里面,如果出现经纬度超出范围的问题函数会返回C_ERR,从而导致直接return。

1
2
3
4
5
6
7
8
9
10
11
12
13
14
15
...
/* Create the argument vector to call ZADD in order to add all
* the score,value pairs to the requested zset, where score is actually
* an encoded version of lat,long. */
int i;
for (i = 0; i < elements; i++) {
double xy[2];

if (extractLongLatOrReply(c, (c->argv+2)+(i*3),xy) == C_ERR) {
for (i = 0; i < argc; i++)
if (argv[i]) decrRefCount(argv[i]);
zfree(argv);
return;
}
...

下面的geohashEncodeWGS84函数根据我们取出来的xy算GeoHash,最后会调用到geohashEncodeType -> geohashEncode,关于GeoHash部分会在后面讨论。

1
2
3
4
5
6
7
8
...
/* Turn the coordinates into the score of the element. */
GeoHashBits hash;
// geohashEncodeWGS84最终调用geohashEncode
geohashEncodeWGS84(xy[0], xy[1], GEO_STEP_MAX, &hash);
GeoHashFix52Bits bits = geohashAlign52Bits(hash);
// geoaddCommand未完结
...

geohashAlign52Bits函数能够将得到的哈希值GeoHashBits,其中hash.bits是哈希值,hash.step是精度。我们需要将它做成一个52位的整数。

1
2
3
4
5
6
7
8
9
// geohash_helper.h
typedef uint64_t GeoHashFix52Bits;

// geo.c
GeoHashFix52Bits geohashAlign52Bits(const GeoHashBits hash) {
uint64_t bits = hash.bits;
bits <<= (52 - hash.step * 2);
return bits;
}

接着来看函数geoaddCommand,我们将得到的bits组装成SDS,并且安装到argv里面,接着**调用replaceClientCommandVector得到一个以argcargv为参数的新的redisCommand**,放到c->cmd里面。

1
2
3
4
5
6
7
8
9
10
11
12
13
14
15
// 续geoaddCommand
...
robj *score = createObject(OBJ_STRING, sdsfromlonglong(bits));
robj *val = c->argv[2 + i * 3 + 2];
argv[2+i*2] = score;
argv[3+i*2] = val;
incrRefCount(val);
}

/* Finally call ZADD that will do the work for us. */
printf("Step 2: argv[1]->refcount %d, c->argv[1]->refcount %d\n", argv[1]->refcount, c->argv[1]->refcount);
replaceClientCommandVector(c,argc,argv);
printf("Step 3: argv[1]->refcount %d, c->argv[1]->refcount %d\n", argv[1]->refcount, c->argv[1]->refcount);
zaddCommand(c);
}

在这之后,输出是

1
2
Step 2: argv[1]->refcount 2, c->argv[1]->refcount 2
Step 3: argv[1]->refcount 1, c->argv[1]->refcount 1

replaceClientCommandVector

replaceClientCommandVector函数会释放c->argvc->argc,并且使用传入的argcargv替换。

1
2
3
4
5
6
7
8
9
10
11
// networking.c

/* Completely replace the client command vector with the provided one. */
void replaceClientCommandVector(client *c, int argc, robj **argv) {
freeClientArgv(c);
zfree(c->argv);
c->argv = argv;
c->argc = argc;
c->cmd = lookupCommandOrOriginal(c->argv[0]->ptr);
serverAssertWithInfo(c,NULL,c->cmd != NULL);
}

freeClientArgv

查看freeClientArgv

1
2
3
4
5
6
7
static void freeClientArgv(client *c) {
int j;
for (j = 0; j < c->argc; j++)
decrRefCount(c->argv[j]);
c->argc = 0;
c->cmd = NULL;
}

lookupCommandOrOriginal

lookupCommandOrOriginal用来根据指令名name找到对应的redisCommand项目。首先会在server.commands里面找,如果没找到会在server.orig_commands里面找。orig_commands表示没有被redis.conf里面的rename命令修改过的原始的命令名字。看起来很奇怪,不过人家注释也说了lookupCommandOrOriginal一般只和lookupCommandOrOriginal配合使用。

1
2
3
4
5
6
7
8
9
/* This is used by functions rewriting the argument vector such as
* rewriteClientCommandVector() in order to set client->cmd pointer
* correctly even if the command was renamed. */
struct redisCommand *lookupCommandOrOriginal(sds name) {
struct redisCommand *cmd = dictFetchValue(server.commands, name);

if (!cmd) cmd = dictFetchValue(server.orig_commands,name);
return cmd;
}

GEOHASH算法介绍

GEOHASH是将二进制的经纬度转换为字符串,每个字符串表示一块矩形的区域。这些字符串越长,那么表示的范围就越精确。

下面阐述如何计算GEOHASH:

  1. 如何编码精度或者纬度
    例如纬度的范围是[-90,90],那么我们不断二分就可以得到一个二进制的表示。例如00表示[-90,-45)11表示[45,90]
  2. 如何组合精度和纬度
    通过interleave来组合。也就是偶数位放经度,奇数位放纬度。
  3. 如何生成字符串
    我们组成的GeoHash有52位,通过Base32编码(一个char能表示5位)可以得到长度为11的字符串。

这种interleave的组合方式成为Peano空间填充曲线。如下所示,这个曲线可能存在编码相邻但是实际距离很远的情况,例如0111和1000。因此,在通过GEOHASH召回部分空间点后,还需要去判断一下实际距离。
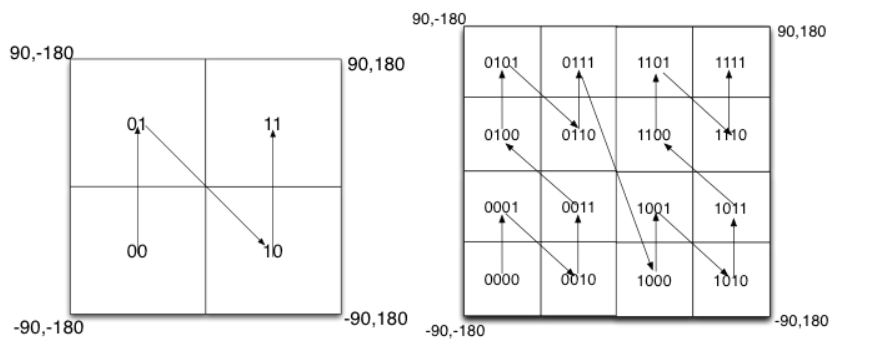
GEOHASH实现

GeoHashBits/geohashGetCoordRange

GeoHashBits是GEOHASH结构。bits表示hash值,是interleave64之后的结果。step表示进行二分的次数,Redis中默认是26,所以最终得到的hash是52位的。

1
2
3
4
typedef struct {
uint64_t bits; // 表示哈希值
uint8_t step; // 表示精度
} GeoHashBits;

下面四个宏规定了经纬度的取值范围。在这里需要说明的是Redis的GeoHash的内部存储和标准有差异。标准规定纬度的取值范围是[-90, 90],而Redis的实现是[-85, 85]。因此Redis实际上是不能索引位于南北极的一小块范围的。
【Q】为什么这么做呢?我觉得可能有两个原因:

  1. 南北极的位置本来也不常用
  2. 南北极的经度变化比较敏感,所以其实有点浪费
1
2
3
4
5
/* Limits from EPSG:900913 / EPSG:3785 / OSGEO:41001 */
#define GEO_LAT_MIN -85.05112878
#define GEO_LAT_MAX 85.05112878
#define GEO_LONG_MIN -180
#define GEO_LONG_MAX 180

我们回顾之前看到的geohashEncodeWGS84的函数的调用链,它会通过geohashGetCoordRange来获得这次经纬度的范围,并作为参数传给geohashEncode

1
2
3
4
5
6
7
8
9
10
11
12
13
14
15
16
17
18
19
20
21
// geohash.c

int geohashEncodeType(double longitude, double latitude, uint8_t step, GeoHashBits *hash) {
GeoHashRange r[2] = {{0}};
geohashGetCoordRange(&r[0], &r[1]);
return geohashEncode(&r[0], &r[1], longitude, latitude, step, hash);
}

int geohashEncodeWGS84(double longitude, double latitude, uint8_t step,
GeoHashBits *hash) {
return geohashEncodeType(longitude, latitude, step, hash);
}

void geohashGetCoordRange(GeoHashRange *long_range, GeoHashRange *lat_range) {
/* These are constraints from EPSG:900913 / EPSG:3785 / OSGEO:41001 */
/* We can't geocode at the north/south pole. */
long_range->max = GEO_LONG_MAX;
long_range->min = GEO_LONG_MIN;
lat_range->max = GEO_LAT_MAX;
lat_range->min = GEO_LAT_MIN;
}

geohashCommand

查看geohashCommand的实现,它主要是通过geohashEncode去得到一个GeoHashBits对象。

1
2
3
4
5
6
7
8
9
10
11
12
13
14
void geohashCommand(client *c) {
char *geoalphabet= "0123456789bcdefghjkmnpqrstuvwxyz";
int j;

/* Look up the requested zset */
robj *zobj = lookupKeyRead(c->db, c->argv[1]);
if (checkType(c, zobj, OBJ_ZSET)) return;

/* Geohash elements one after the other, using a null bulk reply for
* missing elements. */
addReplyArrayLen(c,c->argc-2);
for (j = 2; j < c->argc; j++) {
double score;
...

首先通过zsetScore获得指定memberc->argv[j]->ptrscore

1
2
3
4
5
...
if (!zobj || zsetScore(zobj, c->argv[j]->ptr, &score) == C_ERR) {
addReplyNull(c);
} else {
...

在前面提到过,Redis的GeoHash的内部存储和标准的GEOHASH坐标有差异。Redis的是[-85,85]这个区间,但是普通的GEOHASH是[-90,90]区间。因为这个命令会返回标准的GEOHASH值,所以我们需要将它转换到标准GeoHash。
因此需要用decodeGeohashscore解码到xy,并且再通过GeoHashRange编码,得到纬度取值范围为[-90, 90]的hash

1
2
3
4
5
6
7
8
9
10
11
12
13
14
15
16
17
18
19
20
21
22
23
...
/* The internal format we use for geocoding is a bit different
* than the standard, since we use as initial latitude range
* -85,85, while the normal geohashing algorithm uses -90,90.
* So we have to decode our position and re-encode using the
* standard ranges in order to output a valid geohash string. */

/* Decode... */
double xy[2];
if (!decodeGeohash(score,xy)) {
addReplyNull(c);
continue;
}

/* Re-encode */
GeoHashRange r[2];
GeoHashBits hash;
r[0].min = -180;
r[0].max = 180;
r[1].min = -90;
r[1].max = 90;
geohashEncode(&r[0],&r[1],xy[0],xy[1],26,&hash);
...

下面我们得到了符合标准的hash,接下来我们将这个hash值根据geoalphabet编码到字符串buf上。

1
2
3
4
5
6
7
8
9
10
11
12
13
14
15
16
17
18
19
20
...
char buf[12];
int i;
for (i = 0; i < 11; i++) {
int idx;
if (i == 10) {
/* We have just 52 bits, but the API used to output
* an 11 bytes geohash. For compatibility we assume
* zero. */
idx = 0;
} else {
idx = (hash.bits >> (52-((i+1)*5))) & 0x1f;
}
buf[i] = geoalphabet[idx];
}
buf[11] = '\0';
addReplyBulkCBuffer(c,buf,11);
}
}
}

geohashEncode

下面我们来看最关键的geohashEncode的实现。
首先是进行校验,包含两部分。首先检验经纬度Range是否合法,然后校验经纬度是否在GEO_宏规定的区间内,然后校验经纬度是否在经纬度Range给出的区间内。
【Q】在这里有一个问题,从上面的代码实现可以看到,其实lat_range是可能比GEO_LAT_MAX/GEO_LAT_MIN范围大的,那么这是否影响GeoHash的结果呢?

1
2
3
4
5
6
7
8
9
10
11
12
// geohash.c

#define RANGEISZERO(r) (!(r).max && !(r).min)
#define RANGEPISZERO(r) (r == NULL || RANGEISZERO(*r))

int geohashEncode(const GeoHashRange *long_range, const GeoHashRange *lat_range,
double longitude, double latitude, uint8_t step,
GeoHashBits *hash) {
/* Check basic arguments sanity. */
if (hash == NULL || step > 32 || step == 0 ||
RANGEPISZERO(lat_range) || RANGEPISZERO(long_range)) return 0;
...

longitude和latitude既要满足GEO_宏定义的区间限制,也要满足传入的long_rangelat_range区间限制。

1
2
3
4
5
6
7
8
9
10
11
12
13
14
...
/* Return an error when trying to index outside the supported
* constraints. */
if (longitude > GEO_LONG_MAX || longitude < GEO_LONG_MIN ||
latitude > GEO_LAT_MAX || latitude < GEO_LAT_MIN) return 0;

hash->bits = 0;
hash->step = step;

if (latitude < lat_range->min || latitude > lat_range->max ||
longitude < long_range->min || longitude > long_range->max) {
return 0;
}
...

下面计算的两个offset,实际上就是根据传入的long_rangelat_range做min-max归一化。

1
2
3
4
5
6
...
double lat_offset =
(latitude - lat_range->min) / (lat_range->max - lat_range->min);
double long_offset =
(longitude - long_range->min) / (long_range->max - long_range->min);
...

接着对归一化的结果,乘以$2^{step}$
【Q】这是为什么呢?这里的两个offset是无量纲的比例。我们乘以(1ULL << step)相当于就是先把地图分step次,然后找到对应的offset在的位置。所以在读取GeoHash的时候,实际上是需要知道对应的step的。我们参考geoaddCommand里面的调用是geohashEncodeWGS84(xy[0], xy[1], GEO_STEP_MAX, &hash)

1
2
3
4
5
...
/* convert to fixed point based on the step size */
lat_offset *= (1ULL << step);
long_offset *= (1ULL << step);
...

接下来就是GeoHash算法的一个核心,也就是将得到的两个offset,按照奇数为纬度,偶数为经度的方式组成一个二进制序列。

1
2
3
4
...
hash->bits = interleave64(lat_offset, long_offset);
return 1;
}

下面我们来看这个interleave64的实现,他看起来就像一个拉链一样,交错。

1
2
3
4
5
6
7
8
9
10
11
12
13
14
15
16
17
18
19
20
21
22
23
24
25
26
27
28
29
30
31
/* Interleave lower bits of x and y, so the bits of x
* are in the even positions and bits from y in the odd;
* x and y must initially be less than 2**32 (65536).
* From: https://graphics.stanford.edu/~seander/bithacks.html#InterleaveBMN
*/
static inline uint64_t interleave64(uint32_t xlo, uint32_t ylo) {
static const uint64_t B[] = {0x5555555555555555ULL, 0x3333333333333333ULL,
0x0F0F0F0F0F0F0F0FULL, 0x00FF00FF00FF00FFULL,
0x0000FFFF0000FFFFULL};
static const unsigned int S[] = {1, 2, 4, 8, 16};

uint64_t x = xlo;
uint64_t y = ylo;

x = (x | (x << S[4])) & B[4];
y = (y | (y << S[4])) & B[4];

x = (x | (x << S[3])) & B[3];
y = (y | (y << S[3])) & B[3];

x = (x | (x << S[2])) & B[2];
y = (y | (y << S[2])) & B[2];

x = (x | (x << S[1])) & B[1];
y = (y | (y << S[1])) & B[1];

x = (x | (x << S[0])) & B[0];
y = (y | (y << S[0])) & B[0];

return x | (y << 1);
}

我们不妨以一个32位的0xffff进行调试

1
2
3
4
5
6
7
8
9
10
11
12
x (ffffffff)11111111111111111111111111111111 
y (0)
S 4: x (ffff0000ffff) 111111111111111100000000000000001111111111111111
S 4: y (0)
S 3: x (ff00ff00ff00ff) 11111111000000001111111100000000111111110000000011111111
S 3: y (0)
S 2: x (f0f0f0f0f0f0f0f) 111100001111000011110000111100001111000011110000111100001111
S 2: y (0)
S 1: x (3333333333333333) 11001100110011001100110011001100110011001100110011001100110011
S 1: y (0)
S 0: x (5555555555555555)101010101010101010101010101010101010101010101010101010101010101
S 0: y (0)

GEORADIUS/GEORADIUSBYMEMBER

GeoHashRadius类

这个类是一个非常大的上下文,包含了一个GEOHASH位置本身,以及他解码后实际的经纬度,以及它的八个邻居的GeoHashBits。

1
2
3
4
5
typedef struct {
GeoHashBits hash;
GeoHashArea area;
GeoHashNeighbors neighbors;
} GeoHashRadius;

GeoHashBits之前介绍过,包含哈希位bits和精度step,也就是一个GEOHASH地址,表示一块区域。
GeoHashArea的定义如下所示,它实际上就是对hash值的一个经纬度的表示,可以由geohashDecode算得。

1
2
3
4
5
typedef struct {
GeoHashBits hash;
GeoHashRange longitude;
GeoHashRange latitude;
} GeoHashArea;

GeoHashNeighbors表示周围八个区域。

1
2
3
4
5
6
7
8
9
10
typedef struct {
GeoHashBits north;
GeoHashBits east;
GeoHashBits west;
GeoHashBits south;
GeoHashBits north_east;
GeoHashBits south_east;
GeoHashBits north_west;
GeoHashBits south_west;
} GeoHashNeighbors;

georadiusGeneric函数

在很多应用中有查找附近的人这样的功能,这就可以通过GEORADIUSBYMEMBER命令来实现。
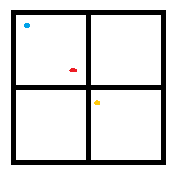
【Q】在启用了GEOHASH之后,两个hash值越接近,说明两个点距离越近。所以说,这个函数是不是可以直接匹配前缀呢?答案是不行的,因为这样会漏掉跨边界的情况。如下图所示,如果我们采用前缀匹配的方式,则红点和蓝点的前缀更为接近,但实际上它和黄点的实际距离更近。所以在搜索时,我们要搜索周围的8个方块。

这个函数包含两部分:

  1. geohashGetAreasByRadius获得上下文GeoHashRadius
  2. membersOfAllNeighbors得到所有满足条件的点
1
2
3
4
5
6
7
8
9
10
11
12
13
14
15
16
17
18
19
20
21
22
23
24
25
26
27
28
29
30
31
32
33
34
35
36
37
38
39
40
41
42
43
44
45
46
47
48
49
50
51
52
53
54
55
56
57
58
59
60
61
62
63

/* GEORADIUS key x y radius unit [WITHDIST] [WITHHASH] [WITHCOORD] [ASC|DESC]
* [COUNT count] [STORE key] [STOREDIST key]
* GEORADIUSBYMEMBER key member radius unit ... options ... */
void georadiusGeneric(client *c, int flags) {
robj *key = c->argv[1];
robj *storekey = NULL;
int storedist = 0; /* 0 for STORE, 1 for STOREDIST. */

/* Look up the requested zset */
robj *zobj = NULL;
if ((zobj = lookupKeyReadOrReply(c, key, shared.emptyarray)) == NULL ||
checkType(c, zobj, OBJ_ZSET)) {
return;
}

/* Find long/lat to use for radius search based on inquiry type */
int base_args;
double xy[2] = { 0 };
if (flags & RADIUS_COORDS) {
base_args = 6;
if (extractLongLatOrReply(c, c->argv + 2, xy) == C_ERR)
return;
} else if (flags & RADIUS_MEMBER) {
base_args = 5;
robj *member = c->argv[2];
if (longLatFromMember(zobj, member, xy) == C_ERR) {
addReplyError(c, "could not decode requested zset member");
return;
}
} else {
addReplyError(c, "Unknown georadius search type");
return;
}

/* Extract radius and units from arguments */
double radius_meters = 0, conversion = 1;
if ((radius_meters = extractDistanceOrReply(c, c->argv + base_args - 2,
&conversion)) < 0) {
return;
}

/* Discover and populate all optional parameters. */
int withdist = 0, withhash = 0, withcoords = 0;
int sort = SORT_NONE;
long long count = 0;
if (c->argc > base_args) {
// 这里面一堆对命令参数的判断,就省略了
...
}

/* Trap options not compatible with STORE and STOREDIST. */
if (storekey && (withdist || withhash || withcoords)) {
addReplyError(c,
"STORE option in GEORADIUS is not compatible with "
"WITHDIST, WITHHASH and WITHCOORDS options");
return;
}

/* COUNT without ordering does not make much sense, force ASC
* ordering if COUNT was specified but no sorting was requested. */
if (count != 0 && sort == SORT_NONE) sort = SORT_ASC;
...

函数geohashGetAreasByRadiusWGS84(实际上是geohashGetAreasByRadius)根据中心点位置xy和搜索范围距离radius_meters计算georadius,这个GeoHashRadius georadius可以理解为是一个上下文对象。

1
2
3
4
5
...
/* Get all neighbor geohash boxes for our radius search */
GeoHashRadius georadius =
geohashGetAreasByRadiusWGS84(xy[0], xy[1], radius_meters);
...

函数membersOfAllNeighbors对中心点以及它周边八个方向进行查找,找出所有范围内的元素,返回满足搜索距离范围的点。该函数中依次对中心点及周边8个区块调用membersOfGeoHashBox函数。这个函数比较厉害,我们后面单独讲。

1
2
3
4
5
...
/* Search the zset for all matching points */
geoArray *ga = geoArrayCreate();
membersOfAllNeighbors(zobj, georadius, xy[0], xy[1], radius_meters, ga);
...

如果我们找不到对应的点,那么就返回一个空的Array。

1
2
3
4
5
6
7
8
...
/* If no matching results, the user gets an empty reply. */
if (ga->used == 0 && storekey == NULL) {
addReply(c,shared.emptyarray);
geoArrayFree(ga);
return;
}
...

否则我们就进行排序。

1
2
3
4
5
6
7
8
9
10
11
12
13
14
15
16
17
18
19
20
21
22
23
24
25
26
27
28
29
30
31
32
33
34
35
36
37
38
39
40
41
42
43
44
45
46
47
48
49
50
51
52
53
54
55
56
57
58
59
60
61
62
63
64
65
66
67
68
69
70
71
72
73
74
75
76
77
78
79
80
81
82
83
84
85
86
87
88
89
90
91
92
93
94
95
96
97
98
99
100
101
...
long result_length = ga->used;
long returned_items = (count == 0 || result_length < count) ?
result_length : count;
long option_length = 0;

/* Process [optional] requested sorting */
if (sort == SORT_ASC) {
qsort(ga->array, result_length, sizeof(geoPoint), sort_gp_asc);
} else if (sort == SORT_DESC) {
qsort(ga->array, result_length, sizeof(geoPoint), sort_gp_desc);
}

if (storekey == NULL) {
/* No target key, return results to user. */

/* Our options are self-contained nested multibulk replies, so we
* only need to track how many of those nested replies we return. */
if (withdist)
option_length++;

if (withcoords)
option_length++;

if (withhash)
option_length++;

/* The array len we send is exactly result_length. The result is
* either all strings of just zset members *or* a nested multi-bulk
* reply containing the zset member string _and_ all the additional
* options the user enabled for this request. */
addReplyArrayLen(c, returned_items);

/* Finally send results back to the caller */
int i;
for (i = 0; i < returned_items; i++) {
geoPoint *gp = ga->array+i;
gp->dist /= conversion; /* Fix according to unit. */

/* If we have options in option_length, return each sub-result
* as a nested multi-bulk. Add 1 to account for result value
* itself. */
if (option_length)
addReplyArrayLen(c, option_length + 1);

addReplyBulkSds(c,gp->member);
gp->member = NULL;

if (withdist)
addReplyDoubleDistance(c, gp->dist);

if (withhash)
addReplyLongLong(c, gp->score);

if (withcoords) {
addReplyArrayLen(c, 2);
addReplyHumanLongDouble(c, gp->longitude);
addReplyHumanLongDouble(c, gp->latitude);
}
}
} else {
/* Target key, create a sorted set with the results. */
robj *zobj;
zset *zs;
int i;
size_t maxelelen = 0;

if (returned_items) {
zobj = createZsetObject();
zs = zobj->ptr;
}

for (i = 0; i < returned_items; i++) {
zskiplistNode *znode;
geoPoint *gp = ga->array+i;
gp->dist /= conversion; /* Fix according to unit. */
double score = storedist ? gp->dist : gp->score;
size_t elelen = sdslen(gp->member);

if (maxelelen < elelen) maxelelen = elelen;
znode = zslInsert(zs->zsl,score,gp->member);
serverAssert(dictAdd(zs->dict,gp->member,&znode->score) == DICT_OK);
gp->member = NULL;
}

if (returned_items) {
zsetConvertToZiplistIfNeeded(zobj,maxelelen);
setKey(c,c->db,storekey,zobj);
decrRefCount(zobj);
notifyKeyspaceEvent(NOTIFY_ZSET,"georadiusstore",storekey,
c->db->id);
server.dirty += returned_items;
} else if (dbDelete(c->db,storekey)) {
signalModifiedKey(c,c->db,storekey);
notifyKeyspaceEvent(NOTIFY_GENERIC,"del",storekey,c->db->id);
server.dirty++;
}
addReplyLongLong(c, returned_items);
}
geoArrayFree(ga);
}

geohashGetAreasByRadius

1
2
3
4
5
6
7
8
9
10
GeoHashRadius geohashGetAreasByRadius(double longitude, double latitude, double radius_meters) {
GeoHashRange long_range, lat_range;
GeoHashRadius radius;
GeoHashBits hash;
GeoHashNeighbors neighbors;
GeoHashArea area;
double min_lon, max_lon, min_lat, max_lat;
double bounds[4];
int steps;
...

我们首先以(longitude, latitude, radius_meters)构造一个圆,我们通过geohashBoundingBox计算这个圆的外接矩形的经纬度范围。

1
2
3
4
5
6
7
...
geohashBoundingBox(longitude, latitude, radius_meters, bounds);
min_lon = bounds[0];
min_lat = bounds[1];
max_lon = bounds[2];
max_lat = bounds[3];
...

接下来,我们要计算精度steps。

1
2
3
...
steps = geohashEstimateStepsByRadius(radius_meters,latitude);
...

geohashGetCoordRange函数没鸟用,就是单纯用GEO_LONG_MAX/GEO_LONG_MIN设置一下range,得到的range被用来做Encode。

1
2
3
4
...
geohashGetCoordRange(&long_range,&lat_range);
geohashEncode(&long_range,&lat_range,longitude,latitude,steps,&hash);
...

计算所有的邻居。这里的neighborsGeoHashNeighbors结构的指针,这个结构里面保存了周围8个块的GeoHashBits。

1
2
3
...
geohashNeighbors(&hash,&neighbors);
...

把一个GEOHASH值,解码成经纬度的表示area

1
2
3
...
geohashDecode(long_range,lat_range,hash,&area);
...

我们需要检查自己算出来的step是否足够。下面的注释说有的时候,search area太靠近area的边缘了,step就还不够小,因为东南西北侧的正方形太靠近search area,以至于无法覆盖所有的东西。
【Q】反正我是没懂search area和area的区别是啥?
反正对于这种情况,我们需要再减小一下step。

1
2
3
4
5
6
7
8
9
10
11
12
13
14
15
16
17
18
19
20
21
22
23
24
25
26
27
28
29
30
31
32
...
/* Check if the step is enough at the limits of the covered area.
* Sometimes when the search area is near an edge of the
* area, the estimated step is not small enough, since one of the
* north / south / west / east square is too near to the search area
* to cover everything. */
int decrease_step = 0;
{
GeoHashArea north, south, east, west;

geohashDecode(long_range, lat_range, neighbors.north, &north);
geohashDecode(long_range, lat_range, neighbors.south, &south);
geohashDecode(long_range, lat_range, neighbors.east, &east);
geohashDecode(long_range, lat_range, neighbors.west, &west);

if (geohashGetDistance(longitude,latitude,longitude,north.latitude.max)
< radius_meters) decrease_step = 1;
if (geohashGetDistance(longitude,latitude,longitude,south.latitude.min)
< radius_meters) decrease_step = 1;
if (geohashGetDistance(longitude,latitude,east.longitude.max,latitude)
< radius_meters) decrease_step = 1;
if (geohashGetDistance(longitude,latitude,west.longitude.min,latitude)
< radius_meters) decrease_step = 1;
}

if (steps > 1 && decrease_step) {
steps--;
geohashEncode(&long_range,&lat_range,longitude,latitude,steps,&hash);
geohashNeighbors(&hash,&neighbors);
geohashDecode(long_range,lat_range,hash,&area);
}
...
1
2
3
4
5
6
7
8
9
10
11
12
13
14
15
16
17
18
19
20
21
22
23
24
25
26
27
28
29
...
/* Exclude the search areas that are useless. */
if (steps >= 2) {
if (area.latitude.min < min_lat) {
GZERO(neighbors.south);
GZERO(neighbors.south_west);
GZERO(neighbors.south_east);
}
if (area.latitude.max > max_lat) {
GZERO(neighbors.north);
GZERO(neighbors.north_east);
GZERO(neighbors.north_west);
}
if (area.longitude.min < min_lon) {
GZERO(neighbors.west);
GZERO(neighbors.south_west);
GZERO(neighbors.north_west);
}
if (area.longitude.max > max_lon) {
GZERO(neighbors.east);
GZERO(neighbors.south_east);
GZERO(neighbors.north_east);
}
}
radius.hash = hash;
radius.neighbors = neighbors;
radius.area = area;
return radius;
}

membersOfAllNeighbors

这里讲解一下返回值geoArray,这是一个简单的数组,bucketsused让我们联想到了之前的dict等结构。实际上,它也就是保存了一些列的点。buckets表示数组的容量,used表示实际数组用了多少。

1
2
3
4
5
6
7
8
9
10
11
12
13
typedef struct geoPoint {
double longitude;
double latitude;
double dist;
double score;
char *member;
} geoPoint;

typedef struct geoArray {
struct geoPoint *array;
size_t buckets;
size_t used;
} geoArray;

下面看主体函数

1
2
3
4
5
6
7
8
9
10
11
12
13
14
15
16
/* Search all eight neighbors + self geohash box */
int membersOfAllNeighbors(robj *zobj, GeoHashRadius n, double lon, double lat, double radius, geoArray *ga) {
GeoHashBits neighbors[9];
unsigned int i, count = 0, last_processed = 0;
int debugmsg = 0;

neighbors[0] = n.hash;
neighbors[1] = n.neighbors.north;
neighbors[2] = n.neighbors.south;
neighbors[3] = n.neighbors.east;
neighbors[4] = n.neighbors.west;
neighbors[5] = n.neighbors.north_east;
neighbors[6] = n.neighbors.north_west;
neighbors[7] = n.neighbors.south_east;
neighbors[8] = n.neighbors.south_west;
...

主要逻辑就是遍历所有的neighbors,并调用membersOfGeoHashBox。这里唯一值得一提的逻辑是,如果说我们的半径范围很大,例如超过5000km了,那么neighbour可能会重复,所以我们判断一下重复的neighbour。

1
2
3
4
5
6
7
8
9
10
11
12
13
14
15
16
17
18
19
20
21
22
23
24
25
26
27
28
29
30
31
...
/* For each neighbor (*and* our own hashbox), get all the matching
* members and add them to the potential result list. */
for (i = 0; i < sizeof(neighbors) / sizeof(*neighbors); i++) {
if (HASHISZERO(neighbors[i])) {
if (debugmsg) D("neighbors[%d] is zero",i);
continue;
}

/* Debugging info. */
if (debugmsg) {
...
}

/* When a huge Radius (in the 5000 km range or more) is used,
* adjacent neighbors can be the same, leading to duplicated
* elements. Skip every range which is the same as the one
* processed previously. */
if (last_processed &&
neighbors[i].bits == neighbors[last_processed].bits &&
neighbors[i].step == neighbors[last_processed].step)
{
if (debugmsg)
D("Skipping processing of %d, same as previous\n",i);
continue;
}
count += membersOfGeoHashBox(zobj, neighbors[i], ga, lon, lat, radius);
last_processed = i;
}
return count;
}

membersOfGeoHashBox

首先,我们根据hash,通过scoresOfGeoHashBox算出这个里面的位置点对应在ZSET中的score的范围。这个函数的实现,我们稍后讲。

1
2
3
4
5
6
7
8
9
/* Obtain all members between the min/max of this geohash bounding box.
* Populate a geoArray of GeoPoints by calling geoGetPointsInRange().
* Return the number of points added to the array. */
int membersOfGeoHashBox(robj *zobj, GeoHashBits hash, geoArray *ga, double lon, double lat, double radius) {
GeoHashFix52Bits min, max;

scoresOfGeoHashBox(hash,&min,&max);
return geoGetPointsInRange(zobj, min, max, lon, lat, radius, ga);
}

scoresOfGeoHashBox

如果step是3,那么我们的hash就有step * 2 = 6个有效位。例如,二进制的hash值,即bits是101010。
但是因为我们的分数是52位的,我们需要获取101010?????????????????????????????????????????????的范围,所以我们要在101010后面填充,让它对齐成52bit。
因为我们补齐部分的?可以取0,也可以取1,所以我们可以直接自增二进制的hash值即bits。

1
2
3
4
5
6
7
8
9
10
11
12
13
14
15
16
17
18
19
20
21
22
23
/* Compute the sorted set scores min (inclusive), max (exclusive) we should
* query in order to retrieve all the elements inside the specified area
* 'hash'. The two scores are returned by reference in *min and *max. */
void scoresOfGeoHashBox(GeoHashBits hash, GeoHashFix52Bits *min, GeoHashFix52Bits *max) {
/* We want to compute the sorted set scores that will include all the
* elements inside the specified Geohash 'hash', which has as many
* bits as specified by hash.step * 2.
*
* To get the min score we just use the initial hash value left
* shifted enough to get the 52 bit value. Later we increment the
* 6 bit prefis (see the hash.bits++ statement), and get the new
* prefix: 101011, which we align again to 52 bits to get the maximum
* value (which is excluded from the search). So we get everything
* between the two following scores (represented in binary):
*
* 1010100000000000000000000000000000000000000000000000 (included)
* and
* 1010110000000000000000000000000000000000000000000000 (excluded).
*/
*min = geohashAlign52Bits(hash);
hash.bits++;
*max = geohashAlign52Bits(hash);
}

geoGetPointsInRange

membersOfAllNeighbors中,ga最后是通过geoGetPointsInRange设置的。
geoGetPointsInRange在ZSET中查找score位于min和max之间的所有元素,然后再通过geoAppendIfWithinRadius(log,lat,radius)条件过滤一遍,将符合要求的点通过geoArrayAppend加入到ga中。

1
2
3
4
5
6
7
8
9
10
11
12
13
14
15
16
17
18
19
20
21
22
23
24
25
26
27
28
29
30
31
32
33
34
35
36
37
38
39
40
41
42
43
44
45
46
47
48
49
50
51
52
53
54
55
56
57
58
59
60
61
62
63
64
65
66
/* 
* The ability of this function to append to an existing set of points is
* important for good performances because querying by radius is performed
* using multiple queries to the sorted set, that we later need to sort
* via qsort. Similarly we need to be able to reject points outside the search
* radius area ASAP in order to allocate and process more points than needed. */
int geoGetPointsInRange(robj *zobj, double min, double max, double lon, double lat, double radius, geoArray *ga) {
/* minex 0 = include min in range; maxex 1 = exclude max in range */
/* That's: min <= val < max */
zrangespec range = { .min = min, .max = max, .minex = 0, .maxex = 1 };
size_t origincount = ga->used;
sds member;

if (zobj->encoding == OBJ_ENCODING_ZIPLIST) {
unsigned char *zl = zobj->ptr;
unsigned char *eptr, *sptr;
unsigned char *vstr = NULL;
unsigned int vlen = 0;
long long vlong = 0;
double score = 0;

if ((eptr = zzlFirstInRange(zl, &range)) == NULL) {
/* Nothing exists starting at our min. No results. */
return 0;
}

sptr = ziplistNext(zl, eptr);
while (eptr) {
score = zzlGetScore(sptr);

/* If we fell out of range, break. */
if (!zslValueLteMax(score, &range))
break;

/* We know the element exists. ziplistGet should always succeed */
ziplistGet(eptr, &vstr, &vlen, &vlong);
member = (vstr == NULL) ? sdsfromlonglong(vlong) :
sdsnewlen(vstr,vlen);
if (geoAppendIfWithinRadius(ga,lon,lat,radius,score,member)
== C_ERR) sdsfree(member);
zzlNext(zl, &eptr, &sptr);
}
} else if (zobj->encoding == OBJ_ENCODING_SKIPLIST) {
zset *zs = zobj->ptr;
zskiplist *zsl = zs->zsl;
zskiplistNode *ln;

if ((ln = zslFirstInRange(zsl, &range)) == NULL) {
/* Nothing exists starting at our min. No results. */
return 0;
}

while (ln) {
sds ele = ln->ele;
/* Abort when the node is no longer in range. */
if (!zslValueLteMax(ln->score, &range))
break;

ele = sdsdup(ele);
if (geoAppendIfWithinRadius(ga,lon,lat,radius,ln->score,ele)
== C_ERR) sdsfree(ele);
ln = ln->level[0].forward;
}
}
return ga->used - origincount;
}

geoAppendIfWithinRadius

1
2
3
4
5
6
7
8
9
10
11
12
13
14
15
16
17
18
19
20
21
22
23
24
25
26
27
/* Helper function for geoGetPointsInRange(): given a sorted set score
* representing a point, and another point (the center of our search) and
* a radius, appends this entry as a geoPoint into the specified geoArray
* only if the point is within the search area.
*
* returns C_OK if the point is included, or REIDS_ERR if it is outside. */
int geoAppendIfWithinRadius(geoArray *ga, double lon, double lat, double radius, double score, sds member) {
double distance, xy[2];

if (!decodeGeohash(score,xy)) return C_ERR; /* Can't decode. */
/* Note that geohashGetDistanceIfInRadiusWGS84() takes arguments in
* reverse order: longitude first, latitude later. */
if (!geohashGetDistanceIfInRadiusWGS84(lon,lat, xy[0], xy[1],
radius, &distance))
{
return C_ERR;
}

/* Append the new element. */
geoPoint *gp = geoArrayAppend(ga);
gp->longitude = xy[0];
gp->latitude = xy[1];
gp->dist = distance;
gp->member = member;
gp->score = score;
return C_OK;
}

Rax

Redis还提供了一个基数树的实现。这个实现被用作Redis Cluster模式下面存储slot对应的所有key的信息。此外,在Stream、RDB、客户端缓存等模块中也用到了这个数据结构。

Stream

zipmap

总结

总结一下本章节中比较有意思的实现:

  1. sds可以通过一个指针同时访问header和data。
  2. sds的多种大小的header以节省空间。
  3. hash表的reverse binary iteration。
  4. 跳表实现中的span,用来方便计算rank。
  5. hyperloglog算法。
  6. redis实现hyperloglog算法中技巧:
    1. 分桶。
    2. 使用Sparse模式解决连续桶为0的情况,从而大大节省空间。这个方案可以被用来参考实现压缩稀疏的一维线性数据。
    3. 在8bit数组中维护6bit元素。
  7. geohash中interleave组合经度和纬度。

Reference

  1. https://xiking.win/2018/11/07/reverse-binary-iteration/
  2. https://zhuanlan.zhihu.com/p/90125709