在了解了 LevelDB 的相关模块的实现后:
- Memtable
- SSTable
- Compaction 机制
本文时序地展示 LevelDB 的读、写、Recover流程。
目录:
- LevelDB 之 Memtable 实现
- LevelDB 之 SSTable 实现
- LevelDB 之 Version
- LevelDB 之 Compaction
- LevelDB 之 WAL
- LevelDB 之流程概览
先跑一个 Demo。
1 | leveldb::DB* db; |
创建
创建的逻辑实际上是在打开逻辑 DB::Open 里面分出来的。但由于这部分逻辑简单独立,并且有益于理解整个数据库的 layout 所以提出来单独讲。
首先设置几个数:
SetLogNumber将日志号设置为0DescriptorFileName生成 Manifest 文件,序号为1SetNextFile设置为2
1 | Status DBImpl::NewDB() { |
下面创建 Manifest 文件。Manifest 文件在前文已经介绍过了,和元信息相关,对应了 Descriptor File。
1 | ... |
下面一连串操作,就是把 new_db 去 Encode 到 log 里面,并且刷盘
1 | ... |
设置CURRENT指向最新的Manifest
1 | ... |
打开
调用链如下所示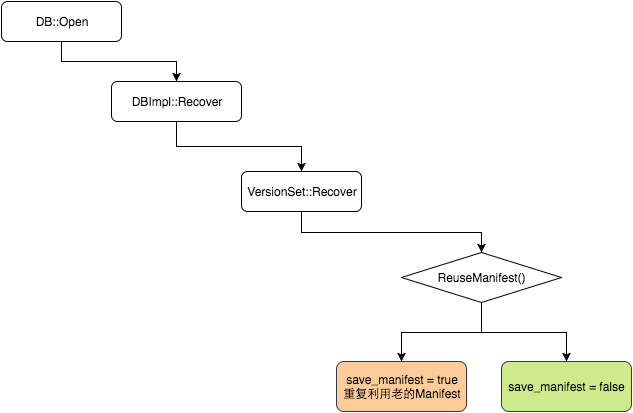
DB::Open
DBImpl 的构造函数只是一个初始化成员列表,并不包含其他逻辑了。
在得到 DBImpl 对象后,首先加锁,并且调用 Recover 方法。这个方法比较复杂,包括会调用更复杂的 VersionSet::Recover 方法,后面会专门介绍。但它的主要内容是加载 Manifest 文件,并恢复故障。
Recover 会设置两个参数:
edit
实际上是作为RecoverLogFile的参数。因为这个函数可能会产生新的 Level0 文件,所以需要修改 edit。save_manifest
这个参数,会被通过调用链传得很深,如果是 true,就需要调用LogAndApply创建一个新版本。主要是两个场景:- 在
RecoverLogFile中可能出现 Memtable 大小超过 write_buffer_size 从而被 dump 到 Level0。这样产生了一个新的文件,就需要创建新版本。 - 在
Version::Recover中,如果不能ReuseManifest
ReuseManifest这个函数的情况比较多。例如:options_->reuse_logs为 false 则直接不能复用- 旧的 Manifest 文件太大,也不能复用
- Append 打开文件错误,也不能复用
- 在
1 | Status DB::Open(const Options& options, const std::string& dbname, DB** dbptr) { |
创建一个新的 log 文件。如果没有 Memtable,需要创建一个。
1 | ... |
下面是两步:
- 如果需要 save_manifest,则调用
LogAndApply创建一个新版本 - 调用
RemoveObsoleteFiles并检查是否需要 Compaction
RemoveObsoleteFiles在前文已经提过,主要是清理掉 Memtable 对应的文件,例如 kLogFile 等。
1 | ... |
DBImpl::Recover
首先创建数据库目录,并且加文件锁,也就是目录下的 LOCK 文件,这个函数很有意思,后面专门来讲。
1 | Status DBImpl::Recover(VersionEdit* edit, bool* save_manifest) { |
下面检查 db 目录下有没有 CURRENT 文件。如果没有就认为数据库就不存在,如果此时设置了 options_.create_if_missing 就创建,否则返回错误。
1 | ... |
下面调用 VersionSet 里面的 Recover 函数。这个函数负责读取Manifest文件,恢复版本信息。
1 | ... |
下面,要分析Log文件,如果有Log文件大于Manifest中记录的值,就说明这些日志是上次关闭时丢失的数据,需要恢复这些日志。
注意PrevLogNumber不再使用了,但是出于兼容性,我们依旧关注这个字段。
1 | ... |
filenames 表示数据库目录下面的所有文件,我们依次遍历这些文件,并用ParseFileName解析出他们的number。这里的number就是诸如MANIFEST-000002里面的2,应该也是对应到FileMetaData里面的number字段。
1 | ... |
RecoverLogFile 的作用是回放日志。既然这样,就需要对日志进行排序。回放日志会修改 VersionEdit,并且可能会导致 Compaction。
1 | ... |
MarkFileNumberUsed 的作用就是设置 next_file_number_,确保 next_file_number_ 要严格大于传入的 logs[i]。即,如果小于等于传入的 logs[i],就将它设置为 logs[i]+1。
1 | ... |
VersionSet::Recover
1 | Status VersionSet::Recover(bool* save_manifest) { |
首先读取 CURRENT 文件内容,得到当前用的 Manifest 文件。注意,到这里为止,肯定是存在 CURRENT 文件的,如果不存在,DBImpl::Recover流程就已经会去创建了。
1 | ... |
如果没找到Manifest,就返回一个错误。对于这种情况,应该也是能处理的。
1 | std::string dscname = dbname_ + "/" + current; |
下面就是根据Manifest文件里面的内容,读取并设置VersionSet。
【Q】在哪里写入的呢?答案是在VersionEdit::EncodeTo和Writer::AddRecord里面,这个函数在LogAndApply的时候被调用。
1 | ... |
下面,我们用一个while循环,从reader中读取记录。ReadRecord这个函数,将下一个record读入*record中,如果读取成功,返回true;如果EOF了,就返回false。可能会使用*scratch作为临时存储。*record是有效的,直到下一个对reader的变化操作,或者对*scratch的变化操作。
1 | ... |
Manifest里面会记录当时的Comparator(用文本编辑框打开这个文件,能看到一个类名一样的东西),VersionEdit会比较这两个是否一致。
1 | ... |
【Q】在LogAndApply实现中,builder.Apply之后还会跟着builder.SaveTo,这里为啥不跟了?稍等,Apply是一条记录Apply一次,SaveTo是最后全搞好了,一次SaveTo。我们往后看,就能看到对SaveTo的调用了。
1 | ... |
到此为止,这个文件就读取完毕了,我们释放这个文件。
1 | ... |
下面就是SaveTo、Finalize、AppendVersion的流程,和LogAndApply是类似的
1 | ... |
检查是继续用现有的Manifest文件,还是重新建一个。这个可能修改descriptor_file_,从而影响到LogAndApply,但是这样的影响只会存在于Recover里面。
【Q】这么处理的目的是什么呢?
目的是为了解决Manifest文件过大的问题。
1 | ... |
DBImpl::RecoverLogFile
【在阅读这个函数前,需要先学习VersionSet::Recover】
RecoverLogFile用于读取Log,并且将应用尚未Apply到版本的Log。
1 | Status DBImpl::RecoverLogFile(uint64_t log_number, bool last_log, |
现在开始循环读取日志到record中。接着调用InsertInto方法将它写到Memtable中,这个方法原理在介绍DB::Write时讲解。
1 | ... |
接着更新last_seq。【Q】有点奇怪,这里为啥要加Count?参考写那一部分的分析。
1 | ... |
如果Memtable内存超限了,就开启Minor Compaction。当然,这里是一个局部的Compaction,因为不需要维护版本,所以没有LogAndApply调用。因为也不会产生多余的文件,所以也没有 RemoveObsoleteFiles 调用。回忆一下WriteLevel0Table的实现,我们实际要做的是:
- 生成SSTable
- 计算SSTable放到那哪一层
- 写VersionEdit
如果需要将Memtable落盘,那么就要设置save_manifest为true。这个值是从DBImpl::Open开始一层一层传下来的。
1 | ... |
到现在为止,上面的while循环就结束了,我们释放掉这个日志文件。但是这里同样要看一下是否可以重新利用log文件fname。
1 | ... |
如果重新利用Log,就不需要走到后面的WriteLevel0Table了。
1 | Log(options_.info_log, "Reusing old log %s \n", fname.c_str()); |
1 | if (mem != nullptr) { |
文件锁
PosixLockTable
PosixLockTable这个类用来管理所有通过LockFile锁住的文件。
需要注意的是fcntl(F_SETLK)也可以实现文件锁,但是它不能保证同一个进程中的并发访问,所以在此之外,还需要再包一层。
【Q】为什么进程中还会有并发访问?在下文中解释。
1 | class PosixLockTable { |
LockFile
为了加锁,我们首先得往自己进程中的PosixLockTable locks_中加入加锁记录。如果加锁失败,说明这个锁已经被我们进程持有了,就退出。
1 | Status LockFile(const std::string& filename, FileLock** lock) override { |
如果我们进程没有持有锁,再调用LockOrUnlock加文件锁。如果加锁失败,说明锁已经被其他进程占用了,这时候就要将它从locks_移除出去。
1 | if (LockOrUnlock(fd, true) == -1) { |
LockOrUnlock
LockOrUnlock根据传入的lock对文件进行F_SETLK操作。F_SETLK是非阻塞的,还有一个F_SETLKW函数是阻塞的。F_SETLK可以锁定文件的某些部分,在这里,设置l_start和l_len都为0,表示锁定整个文件。
1 | int LockOrUnlock(int fd, bool lock) { |
有关Linux进程和线程的补充说明
这里需要注意,Linux中pthread库创建出来的线程可能具有相同的PID,不同的TID,我们可以从下面的代码看到。
1 |
|
写
LevelDB可以通过WriteBatch支持批量更新的功能。当然了,作为对Write函数的一个简易化封装,Put只会更新一个字段。
1 | Status DB::Put(const WriteOptions& opt, const Slice& key, const Slice& value) { |
写数据库的流程:
- 写WAL
- 写MemTable
- 更新Sequence Number
如下所示,写是可以并发的,因此会有类似于 InnoDB 中的 Group Commit。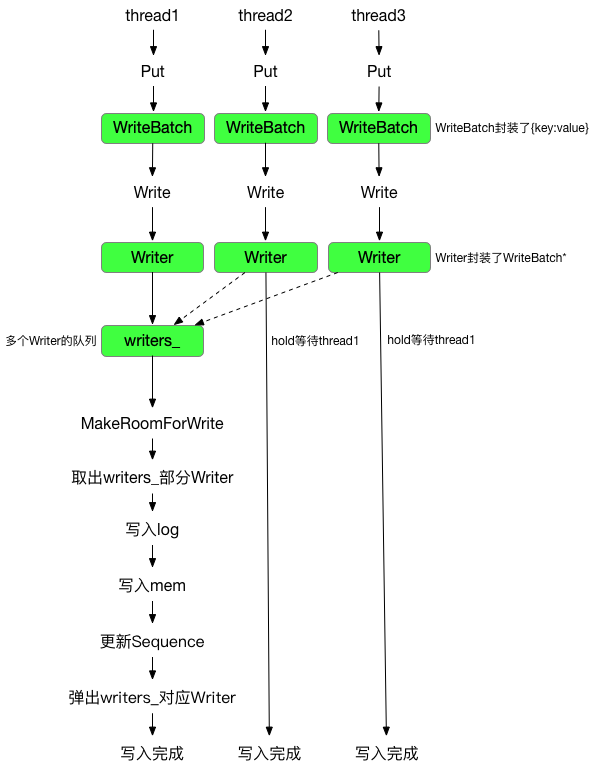
DBImpl::Write
首先,全局有个writers_队列,维护所有的写。
1 | class DBImpl : public DB { |
我们新创建一个DBImpl::Writer这个对象,这个对象中有一个关联到mutex_的条件变量w.cv。
接着将这个Writer对象放到writers_中,然后我们等待下面的条件:
w.done()
表示其他线程已经帮w写完了。w == writers_.front()
表示这个Writer位于队头,并且抢到了锁。1
2
3
4
5
6Status DBImpl::Write(const WriteOptions& options, WriteBatch* updates) {
Writer w(&mutex_);
w.batch = updates;
w.sync = options.sync;
w.done = false;
...
所以当一个写线程进入时,首先先要获得锁,这个锁可能会被其他的写入(的部分阶段)持有,或者被后台Compaction(的部分阶段)线程持有。获得锁之后,它能做的其实也就是把自己的Writer挂到writers_队列上,然后如果现在不是队头,就要去等待信号量。
1 | ... |
如果从条件变量上醒过来,还是要再检查一下有没有w.done(),因为可能是另一个条件醒过来的。
1 | ... |
下面调用MakeRoomForWrite,如果updates是nullptr的话,force就是1,强制MakeRoomForWrite进行Compaction。
【Q】什么时候updates是nullptr呢?DBImpl::TEST_CompactMemTable里面有个注释,说如果设置为nullptr,就是在催促。
1 | ... |
在MakeRoomForWrite之后,肯定是可以往数据库里面写东西的了。
我们需要得到一个Sequence Number才能写,所以首先取出上一次写的Sequence Number。
1 | ... |
下面是一个Group Commit的过程。BuildBatchGroup会合并队列里的多个写入到tmp_batch_里面。这个batch算作一次更新,具有全局唯一的一个Sequence Number,从之前递增而来。在合并的时候需要考虑:
- 总写入数据大小
- 如果有请求是
sync==false了,那么就不加入sync==true的
在合并结束后,BuildBatchGroup会更新last_writer,表示最后一个写入。
【Q】是不是可能在Memtable有两个record,他们的Sequence Number是相同的?现在看来是有可能的,这是因为批量写的话只会有一个Sequence Number。但是假如有Count个一次性写入,那么Sequence Number会在这个之后增加Count次。有点奇怪。
1 | ... |
下面是写日志的操作对应AddRecord。
【Q】根据注释,这个操作是不需要加锁的,为什么呢?文章说,这样可以先让其他请求进入队列中排队。
这样做是安全的,因为只有一个写,就是&w。
同时,可以看出这一步会给写入速度带来比较好的提升,因为只有拿到锁才能往writers_里面push。
1 | ... |
先写日志,写完才能写Memtable,对应InsertInto。
1 | ... |
逐个弹出writers_里的元素,并唤起等待write的线程,直到遇到last_writer。它表示本 write group 中的最后一个 writer。
1 | while (true) { |
处理完writers队列,应当Signal一下。
1 | // Notify new head of write queue |
DBImpl::BuildBatchGroup
1 | // REQUIRES: Writer list must be non-empty |
讨论第一个batch的大小来设置max_size:
- 如果比较小
就设置为size + (128 << 10) - 如果还可以
就设置为1 << 20
1 | size_t size = WriteBatchInternal::ByteSize(first->batch); |
first是writers_队头,下面,我们就遍历整个writers_队列,直到:
- 如果
first是non sync的话,那么我们会在遇到第一个要加入的sync请求的时候就break掉。反之,如果first是sync的话,那么可以兼容non sync的请求的。 - 大小超限
1 | ... |
我们把这些batch,全部加到result里面。如果涉及多个batch,result就指向tmp_batch_,否则就指向first->batch
1 | ... |
DBImpl::MakeRoomForWrite
MakeRoomForWrite 用来确保有空间写入,如果此时 Memtable 满了,就需要去 dump 成 Immutable Memtable。如果现在 Level0 负荷过重,那么就要延迟一下写入速度。
在研究这个函数时,要注意各个 if 条件的判断顺序,这体现了优先级。
1 | // REQUIRES: mutex_ is held |
一进来,首先一个 while 循环。唔,这个功能为啥要有 while?原因是因为里面要等待信号量的。还有一个原因是,当产生 Immutable Memtable 之后,需要等待它落盘。
1 | ... |
如果 force 为 false,也就是不强制执行 Compaction,就认为是允许延迟的。【Q】其实我没搞懂这个逻辑。
如果允许延迟,并且 Level0 的文件数达到至少8个,那么就开始慢速写。注意,Level0 层最大文件数不是4,这是个误区。当有4个文件的时候开始 Compaction,当有12个文件的时候,才停止写入。
慢速写的实现就是主线程睡1000ms,这个时候后台的 Compaction 线程是可以开始 Compact 的。在睡眠结束之后,要将 allow_delay设为 false,也就是说对于一次写,只慢速一次。
1 | ... |
下面,如果不强制Compaction,并且Memtable的大小没有超标,那么就啥都不要做,这个应该是最通常的情况。
1 | ... |
如果此时上一轮Immutable Memtable还没有Minor Compact完毕,那就在background_work_finished_signal_这个条件变量上面等待。
注意到在进入这个函数时是持有mutex_的,所以这个生产者消费者模式是安全的。
1 | ... |
同理,如果Level0满了,即达到12个文件了,那我们同样要在信号量上等待。
1 | ... |
对于剩余的情况,我们要将 Memtable 改成 Immutable Memtable。然后创建一个新的 Memtable,并为这个新 Memtable 使用新的 log。
要注意到这个分支并不会在最后 break 掉!这因为此时有了 Immutable Memtable 了,我们需要等它被刷成 SSTable 落盘,所以至少还需要一次while循环。
这个落盘过程等到什么时候呢?
- 对于
CompactMemTable来说,至少要执行完 LogAndApply 之后,才会将imm_设置为nullptr。 - 而这个条件变量,在
MaybeScheduleCompaction调用完之后会被 Signal。当然,需要注意,在 Major Compaction 过程中,如果有 Immutable Memtable 需要落盘,那么还是要先执行CompactMemTable的,在这个之后,也会触发一次 Signal。
注意,这一次刷盘还可能会导致 Level0 文件达到上限,那就要等更久了。
1 | ... |
读
【Q】思考
- 读要加锁么?
首先考虑分布式共识这一块,为了实现一致读写,Raft 即使是读请求,也需要走一遍 LogEntry 的。而 ZK 的话,可以选择直接读,所以未必是一致读。
当然,这个离题了。我觉得根据 LevelDB 的 MVCC 模式,其实至少有一部分是可以不加锁的。 - 在哪些地方可以非线性地查找?
在非0层找 SSTable 时,见 FindFile。
在 BlockReader 返回 Iterator 之后,可以通过 Seek 来二分。 - 在读取的时候会做缓存么?
LevelDB 在 Table 和 Block 两个层面进行缓存。
在 Table 层面通过 TableCache。
在 Block 层面通过 BlockReader 里面的table->rep_->options.block_cache分支。
迭代器
在前几篇文章中已经介绍了各种迭代器了,这里只是统一做一个分类。
- Iterator
这个是所有迭代器的基类。 - MemTableIterator
- Block::Iter
Block::NewIterator 返回类型,用来遍历一个 Block。 - TwoLevelIterator
Table::NewIterator 返回类型,用来遍历一个 SSTable。此时指定 block_function 为 BlockReader。 - DBIter
- MergingIterator
DBImpl::Get
1 | Status DBImpl::Get(const ReadOptions& options, const Slice& key, |
可以看到,在获取了当前版本current之后,就可以解锁了。
【Q】这里还取出了mem_和imm_,是不是在MVCC下面,可能同时存在多个mem_和imm_?我想从 Compaction 的逻辑来看,不会出现这种情况。这里取出来的目的一方面是增加引用计数,防止被 gc 掉。另一方面也是方便解锁后读。
下面就是经典的读取三部曲:
- 首先查 Memtable
MemTable::Get 的实现很简单,就是用专门的 Iterator 去读。 - 然后查 Immutable Memtable
- 然后就去 SSTable 里面找,具体是调用
current->Get
1 | ... |
读完之后,锁要重新加回来。
读操作也会触发 Compaction,毕竟有 seek compaction 的嘛。
1 | ... |
Version::Get
主体函数
主要就是构造一个 state,然后调用ForEachOverlapping。
1 | Status Version::Get(const ReadOptions& options, const LookupKey& k, |
ForEachOverlapping
ForEachOverlapping 根据 smallest 和 largest 找到对应的文件。
func的作用是在文件里面找 key。
实际上是State::Match这个函数。这个函数返回 true 说明需要继续搜索其它的文件,返回 false 则说明搜索结束。
进一步比较 State::Status 和 State::found 可以判断是否找到,以及是否发生了错误。arg实际上是 State 对象,但 ForEachOverlapping 并不关心其具体内容,而是作为参数传给 func
1 | void Version::ForEachOverlapping(Slice user_key, Slice internal_key, void* arg, |
从 Compaction 一文的介绍中了解到,files_ 里面存放了当前 Version 中所有 SSTable 的元信息。
首先遍历第0层的所有文件,放到 tmp 里面,按照 f->number 排序。排完序就借助于 func 查找。
1 | ... |
下面,就可以用之前介绍过的 FindFile 来二分查找剩余的层了。
1 | ... |
State类
State 类中主要定义了从 SSTable 中找对应 Key 的函数 Match。
Match 函数的过程如下:
- 设置 seek_file,其作用是判断何时调度 seek_compaction
- 尝试从刚才找到的文件 f 对应的 Table Cache 中获得对应的 internal key
1 | ... |
TableCache::Get
TableCache 这一块是一个缓存层,如果缓存中没有,才去读 SSTable,并把它加到缓存里面。
- 通过 TableCache::FindTable 找到对应的
TableAndFile对象 - Table::InternalGet
1 | Status TableCache::Get(const ReadOptions& options, uint64_t file_number, |
TableCache::FindTable
TableCache 实际上是用的一个通用的 Cache 的实现。这个函数通过参数返回一个 Cache::Handle 指针,实际上是 TableAndFile 就是打包 RandomAccessFile* 和 Table*。
首先在 cache_ 里面查文件的 file_number,如果没找到说明 Cache Miss,就得调用 Table::Open 去读文件了。
1 | Status TableCache::FindTable(uint64_t file_number, uint64_t file_size, |
最后调用 Cache::Insert 将这个文件加到 Cache 中。
1 | ... |
SSTable 格式的回顾
在介绍 Table::InternalGet 前,先来复习一下 SSTable的格式:
- data block
- meta block
- meta index block
- index block
记录每个 data block 的“largest”,满足两个性质。也就是大于等于当前 block 的 key,但是严格小鱼下一个 block 的 key。
注意,从之前介绍的 FindShortestSeparator 来看,这里的 largest 不是单纯的 largest,而要进行一些修正。它实际上是分隔两个 Data Block 的最短 Key。 - footer
记录 index block 和 meta index block 的位置
所以要先通过 index block 去定位 data block。
接着复习一下 block 的格式
- record
- restart
- 额外信息
num restarts
type
crc32
所以要用 LookupKey 先去找 restart,然后从 restart 开始找。同时注意由于 meta block 的存在,会有一些优化。
Table::InternalGet
首先,遍历 index block。
1 | Status Table::InternalGet(const ReadOptions& options, const Slice& k, void* arg, |
可以通过布隆过滤器判断这个 block 里面有没有。
1 | ... |
布隆过滤器可能假阳,所以后续还要再用 BlockReader 去 Seek 一下。先前介绍过 BlockReader,这个函数返回一个 Iterator,实际上是一个 Block::Iter 对象。
当时他被用在创建 TwoLevelIterator 里面,这个双层迭代器实际上指 index block 上的迭代器和 data block 上的迭代器。
1 | ... |
Table::Open
【这一部分可以先不读,因为是个非主要路径】Table::Open 负责读取 SSTable 到表对象 Table 中。
1 | Status Table::Open(const Options& options, RandomAccessFile* file, |
先读取 footer。
1 | ... |
再读取 block。
1 | ... |
Reference
- http://luodw.cc/2015/10/30/leveldb-14/
介绍WriteBatch - https://zhuanlan.zhihu.com/p/340804308
介绍Revocer逻辑 - https://blog.csdn.net/sparkliang/article/details/9311487
介绍RecoverLogFile - https://izualzhy.cn/leveldb-write-read
介绍了LevelDB读写流程,我使用了它的部分图片 - https://leeshine.github.io/2019/01/24/leveldb-put-get/
- https://sf-zhou.github.io/leveldb/leveldb_10_details.html
讲述多线程写的demo,很值得一看 - http://1feng.github.io/2016/08/24/mvcc-and-manifest/
介绍MVCC机制,很好 - https://www.cnblogs.com/cobbliu/p/6194072.html
介绍SSTable、Block的格式,一张大图,非常屌 - https://blog.csdn.net/weixin_42663840/article/details/82629473
我见过最屌有关读写的注释 - https://github.com/facebook/rocksdb/wiki/Write-Ahead-Log-File-Format
介绍WAL格式